
This is a Veteran Owned site
Shop Cart/Table Saw ExtensionText and Photos by Tom Hintz
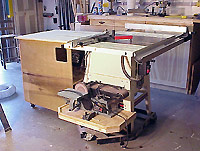
The table surface is 27-inches wide and 31 1/2-inches long. I built the top from a sheet of particleboard, covered with a high-pressure laminate, applied with contact cement. The cabinet itself is 24 1/2-inches wide and 30-inches long, built from 9/16-inch-thick plywood. Panels are joined with ¼-inch-deep dados, glue and screws. The locations of the horizontal and vertical panels were designed around the motor on my Jet contractor-style saw. I left one inch to
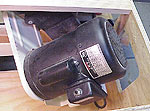
spare below and behind but you can alter that as you see fit. Clearance above the motor is determined by the height of the table saw surface. I discovered that with the saw tilted to 45-degrees, the motor touched the outside wall of the cabinet. That problem was solved when I cut large holes on either side of the motor compartment to insure unrestricted airflow. I seldom run my saw for long periods, but wanted to insure adequate airflow to minimize any chance of overheating. Another consideration is sawdust buildup in the air surrounding the motor. If the motor is enclosed, the amount of sawdust suspended in the air surrounding it increases. Though admittedly remote, there is the possibility of ignition if the dust-to-air ratio gets too high. Cutting the ventilation holes works to minimize both problems. To get the proper height of the side panels I installed the three ½-inch-tall casters on the floor panel (fixed casters on the saw end, locking swivel casters on the other) the temporarily assembled the floor and sides. I had cut the side panels approximately two-inches long purposely to allow matching them to the table saw surface. I put the cabinet top on the floor behind the saw, and then set the partially assembled cabinet in position. With the cabinet properly located against the saw, it's wheels resting on the top, placing a long
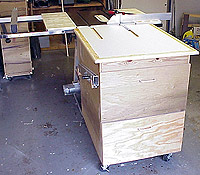
straight edge across the table saw surface, extending out against the cabinet sides let's you draw a perfect cut line at which to trim the side panels. When I made this cut I made sure to "take" the line so the cabinets surface wound up just slightly below that of the table saw. This may be the long way around to find this dimension, but it worked perfect. With the sides cut to size, the cabinet carcass was permanently assembled and a two-inch-wide, flush-mounted face frame was added inside the upper edges to both stabilize the cabinet sides and provide material through which to secure the top with screws. Two drawers, 20-inches-wide, 15-inches long and six ¾-inches deep were built. These drawers will carry considerable weight so I used ¾-inch-thick pine and cut through dovetails on my Leigh jig on the front corners. The rear of each drawer was finished with another ¾-inch-thick piece of pine secured in a dado. The drawer bottoms were made from ¼-inch-thick plywood, set into 3/8-inch-deep dados. Full extension, ball bearing slides were installed on both drawers and after checking fit and operation, 9/16-inch plywood drawer fronts were attached with brads and screws.
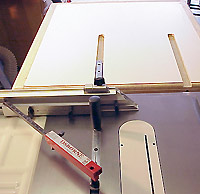
The drawers were the only source of "trouble" in this project. In the past either my cabinet carcasses or the drawers (or both) were sufficiently out-of-square to create enough drag to keep the drawers from moving in or out unexpectedly. They worked, but had a little resistance. This time my construction was better. Now when I reposition the cart, if the drawers are facing forward, they don't always stop when the cart does. Occasionally after the cart stops, the drawers continue on to full extension, something my shins discovered, twice so far. To finish the top I routed a bevel on all four side edges. Grooves were routed in the top to accept miter guide bars as they protrude through the rear of the saw table slots. In use, this cabinet/saw table extension works great. The size seems good for my shop and adds a substantial level of stability to large work pieces as they slide off the back of the saw table. Keep I mind that all but the overall height of this cabinet can be whatever you need to fit your shop and situation. Think about your needs, the layout of your shop and how this cabinet will affect your works pace. In my shop, this cabinet stays out of the way when not needed but always seems handy when I have work for it. |
||||||||
Do you have a comment about this page? - Email Me!
|
All written, photographic and drawn materials are property of and copyright by NewWoodworker.com LLC 2000-2019. Materials may not be used in any way without the written permission of the owner.