
This is a Veteran Owned site
Router-Cut Inlays
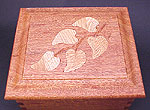
It's easier than you thinkText & photos by Tom Hintz The router is a wonderful machine with a range of capabilities many woodworkers fail to use fully. Most woodworkers buy a router to cut decorative profiles into the edges of wood. Some even use it to carve wood into shapes or for mortising. However, there is much more on the list of things a router can do. For decades, inlays were the exclusive domain of highly skilled artisans who were adept in the use of small tools and fragile pieces of wood. For modern woodworkers, the inlay learning curve has been all but eliminated with the introduction of inlay kits designed around the capabilities of the modern router. Install this kit in your router and the toughest part of making inlays is designing the pattern. How The Inlay Kit Works
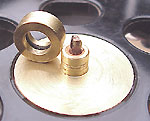
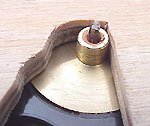
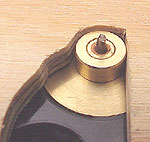
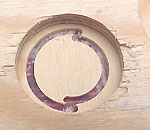
The design of an inlay kit is actually rather simple. A small diameter bit passes through a small collar, much like a normal guide bushing setup. The trick part is a removable bushing that fits on the collar. When installed, the bushing positions the bit to cut the recess for the inlay. Remove the bushing and the bit is now correctly located to cut the outline of the inlay, sized perfectly to fit the recess. It should be noted that the precise relationship between the bit, collar and bushing, more specifically, their physical sizes, means there are no alternatives. Using a substitute bit or other part will ruin the accuracy of this kit. To Plunge or NotAccording to their instructions, most inlay kits can be used with either fixed or plunge based routers. While I am certain this is true, I am equally certain using a plunge router is the smart thing to do. Routing the recess for the inlay with a fixed base is simple because all of the material within the template is removed. Cutting the inlay with a fixed base router is far more difficult.
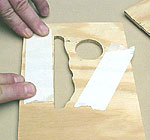
To cut the inlay, the bushing and bit must enter the work piece against the edge of the template. The precision of these kits means any deviation will ruin the inlay. With a plunge base, the router can be positioned correctly with the bushing against the edge of the template before the bit is plunged into the work. Being able to plunge the bit straight down with the router already positioned correctly greatly reduces the chance for error. Designing the TemplateThere are three concerns that must be addressed when designing the template for an inlay; material thickness, corner radius and overall size. The material used for the template has to be thick enough to prevent the bushing and collar from dragging on the workpiece. Most inlay kits require a minimum of ¼"-thick material, but check yours to be sure. Using material much thicker could present a problem because the bits are generally short. The corners of the inlay template opening must accommodate the outer diameter of the bushing. When routing the inlay outline, with the bushing removed, the collar will fit in a much smaller corner than will the bushing. If the bushing does not fit into a portion of the template, the recess will be smaller than the inlay in those areas.
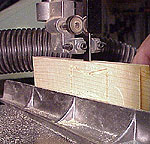
I find it easiest to keep the bushing handy when drawing out my templates. Simply sliding the bushing around the drawing, making sure it fits the corners is all that is usually needed. I also use the bushing to make a final check of the template as it is much easier to make adjustments then. The only problem with the overall size of the inlay is that as they get bigger, it becomes harder to seat them in the recess without breaking. Most inlays are relatively small and present no special problems. Keep in mind that long narrow inlays can also be difficult to seat in the recess. Making the InlayNote: I use my band saw to cut the inlay pieces from the donor stock. Some use a table saw for this cut, but I do not think that is the safest way to do it. The band saw, used with a fence and push sticks, is an effective and much safer choice for this task.
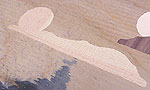
The "happy" thickness for inlays seems to be around 1/8". Inlays thinner than 1/8"-thick can be fragile and difficult to install without breaking. Cutting the inlay much thicker than 1/8" has no apparent significant benefit. It is very important that the bit depth be the same as the cut thickness on the machine being used to extract the inlay. When these dimensions are the same, a thin coat of glue in the recess will keep the inlay piece slightly proud of the surface so it can be sanded flush. To set bit depth, I first set up my band saw and make a test cut. Lay the template on a flat surface, set the router into the opening and lower the bit until it touches the surface below the template. Then I use the test cut piece as the gauge to set the adjustable stop on the plunge base. If the template and work piece are large enough, clamps can be used to secure them for routing. In many cases, double-sided tape is the best choice for securing the template to the work piece. Make sure both surfaces are clean and dust-free and that sufficient tape is used to hold the template firmly in place. The only downside to using double-sided tape is that it must be replaced whenever the template is moved. To me, the results more than justify the cost and time.
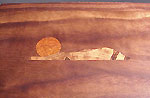
Grain direction in both the piece receiving the inlay and the inlay itself can be used to conceal or highlight the installation. Align the template accordingly and be sure it is secure before routing. If the template moves at all, the inlay is probably ruined. After routing the outline of the inlay piece and cutting it free, I have found it helpful to sand the rear edges slightly, just breaking the sharp corner, no more. This makes it much easier to get started in the recess, which should be exactly the same size. Remember that inlay templates can be used many times, and from either side, giving you mirror images of the pattern. Saving your patterns for use as is, or in combination with others will continually expand your inlay capabilities. Installing the InlayBecause the inlay piece fits the recess so precisely, you cannot test fit it. The only way to test your setup is to make an inlay and recess and put them together. I always cut and install the first inlay on a piece of scrap just to be sure. It takes only minutes, but could easily save an expensive piece of wood and hours of time. With the recess and inlay piece prepared, brush a thin coat of glue in the recess. I press the inlay piece into the recess by hand to get it started. Holding it perfectly level to the surface is necessary to get all edges engaged.
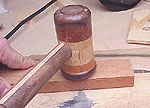
Then, place a flat piece of hardwood, larger than the inlay piece, on the inlay and whack it with a mallet. One or two moderate blows should seat the inlay completely. Remember that the glue will hold the inlay piece slightly proud of the surface and beating it further only serves to damage the surface. Let the glue set up and then sand the piece flush with the surrounding surface. Overlapping InlaysOverlapping contrasting inlay pieces can produce spectacular results. Once an inlay is set and sanded flush, the next template doesn't know it is there, so the process remains the same for each subsequent inlay piece being installed. By varying the species, color and grain direction of the inlay pieces, dramatic looks can be achieved with relative ease. Dutchman Repairs
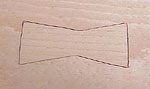
Another use for the inlay kit is making and installing surface repairs, often called a "Dutchman." A Dutchman is simply a piece of wood set into a recess that has been routed to conceal a surface imperfection. Though a bowtie shape is common for a Dutchman, feel free to create whatever looks good to you. The process of making the template, routing and installing are the same as with a decorative inlay. The only caution with using a Dutchman is if the damage is deep, the hole should be filled beneath the inlay to avoid creating a soft spot in the surface that could fail later. Warning: The inlay process is rather simple, but there is a very easy way to mess it up. Before turning the router on, always be sure the bushing is installed when cutting the recess and removed when cutting the inlay piece. Once the bit is touched to wood, there is no going back if you are wrong.
Using inlays to decorate your projects is a great way to create a distinctive look and an impressive finished product. Spend a little time making practice inlays in scrap material and before long, you can add another skill to your woodworking with confidence. Investing a little money and an afternoon learning to use the inlay kit can have a huge effect on many of the projects you build. Even a small inlay can give an object that custom touch that sets it apart from the rest.
|
||||||||||||||||||||||
Do you have a comment about this page? - Email Me! Back to the Tips & Tricks List
|


All written, photographic and drawn materials are property of and copyright by NewWoodworker.com LLC 2000-2019. Materials may not be used in any way without the written permission of the owner.