
This is a Veteran Owned site
 |
|||||||||||
Router Dado JigText & Photos By Tom Hintz The idea behind this jig has been around for ages. Though extremely simple, this jig can both increase the accuracy of your dados and reduce the amount of time required to make them. There are times when cutting dados with a router is easier even when a table saw and dado blade are available. This is especially true when working with long narrow pieces like the sides of shelf units or tall cabinets in a small shop. Clamping the work pieces to a bench and routing the dados can be easier, and sometimes safer, than trying to keep such a long piece straight while sliding it through a table saw. With quality flat-cutting router bits available that actually match real-world wood thickness (yes, even plywood) the router can be a very effective tool--if we can locate the dados exactly.
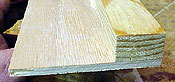
As with most woodworking operations, there are several schools of thought on how to layout and cut dados with a router. Probably the most common method is to lay out the dado, and then space another mark away from the dado on which to locate a guide for the router. That guide mark is offset from the dado location at a distance equal to the measurement from the outer edge of the cutter to the outer edge of the routers base. Establishing the offset dimension is one thing, repeating its placement accurately at each dado location is another matter. Remember, you not only have to repeat the offset measurement, whatever is being used to guide the router must be accurately aligned with this mark each time as well. This repetition increases the opportunity for error proportionately. A few minor errors in dado location can add up to serious problems in the finished project. This jig eliminates having to measure and lay out the offset between a temporary fence and the bit. Simply align the edge of the jig to the dado layout line, clamp it down and route the dado. The MaterialsTo build this router jig you need a length of plywood (I like ¼-inch-thick ply or hardboard) and a strip of (usually) solid wood. The plywood must be a bit wider than the combined measurement of the bit to the base edge, plus the width of the guide strip. The guide strip need only be wide and thick enough to guide the router base and provide a good clamping surface for securing the jig in place. I usually make guide strips from solid wood 1 1/2-inches wide and ¾-inch thick. The most important thing about the guide strip is one edge must be perfectly straight, and that edge positioned so the router base slides against it when in use. If a jointer is available, true one side of the guide strip and mark it to insure proper orientation during assembly.
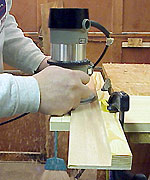
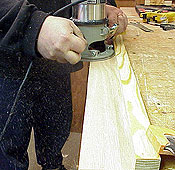
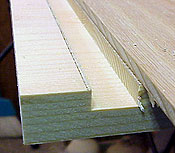
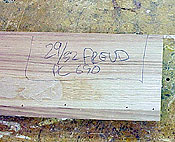
The length of the jig is totally up to you. Common lengths are in the range of 24, 36 and 48 inches, but feel free to indulge yourself, and your shop needs. It is important to remember that this jig works with one router and bit combination only. If you use more than one size bit for dados, you will need to make jigs for each of them. Be sure to mark each jig with the router and bit for which it is intended. Building The JigActual construction of this jig is simple. The crucial operation in the jigs construction is trimming its width properly. Ultimately, we want to use the router, equipped with the intended bit to make the final cut. However, it is safest to remove most of the excess material before making that final cut with the router. First, fasten the guide strip to one edge of the plywood with glue, screws or brads, making sure you have the straight side of the strip oriented correctly. Measure from the edge of the router bit to the outer edge of the base plate, add 1/8-inch or so just to be sure, then trim the exposed plywood to that dimension. I usually rip the plywood to rough size, approximately 1/8-inch more than needed, on the table saw. To make the final cut, clamp the jig securely to a bench or other stable surface, making sure the router bit path, above and below the jig, is clear. Set the router depth to a little below the plywood and run the router down the entire length of the guide strip. The jigs edge and guide strip are now perfectly aligned. That's it. All that remains is marking the jig with the router and bit it is to be used with. Make a test cut or two in scrap to familiarize yourself with using the jig.
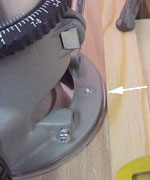
Using The JigI have found that some baseplates are slightly out-of-round and can affect the accuracy of the jig. Most of us grip the router the same way every time we use it, but it might be helpful to mark the baseplate itself (so it can be reinstalled to the router base in the proper orientation) and the router base where it contacts the jigs guide strip to insure accuracy every time you use it. When setting bit depth remember to take the thickness of the jig into account. I place the router on the jig and make depth adjustments that way to insure the final depth of the dado is correct. To use the router jig, lay out the dados normally, and then clamp the jig with the edge of the plywood on the line marking your dado. Remember that the bit cuts right at the edge of the jig. Aligning the edge of the jig with the dado lay out line will place the cut accurately. Normally the jig is clamped above or to the left of the dado so the bit rotation pulls the router against the guide strip, not away from it. I have made the mistake of trying to route dados with my guide on the wrong side with predictable results. In most cases, you can simply turn the workpiece end-for-end and have plenty of clamping room to route the dados. Of all the techniques for cutting dados with a router, I find this jig to be the easiest, fastest, most accurate and most repeatable. Once you build and use one of these simple jigs, get ready to clear a spot on the wall in which to hang several versions. Like me, you will probably build more than one. |
|||||||||||
Do you have a comment about this page? - Email Me! |

All written, photographic and drawn materials are property of and copyright by NewWoodworker.com LLC 2000-2019. Materials may not be used in any way without the written permission of the owner.