
This is a Veteran Owned site
Sacrificial Fence AttachmentText and photos by Tom Hintz
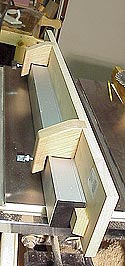
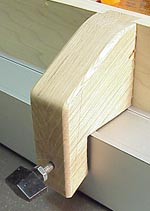
One of the accessories we all need for a table saw is a sacrificial fence to protect the primary fence, particularly while cutting rabbets with a stacked dado head. There probably are as many ways of making a sacrificial fence as there are woodworkers so I did not let convention stand in my way. The one thing I did not want to do was drill holes in the face of my new fence. Aside from defacing my shinny new fence, I was concerned about stock catching in the holes during normal use. I wanted the sacrificial fence tall enough to allow clamping feather boards to it. That also meant the sacrificial fence had to resist lifting during use. I cut a 1x6 piece of poplar two inches longer than my fence to allow attaching a locating block to the back. This block helps place the sacrificial fence quickly and correctly each time. To make blanks for the attaching blocks two 1x4 lengths of red oak were laminated for sufficient thickness. Both ends of the blocks were cut at a 30-degree angle. This would angle the mass of the blocks down behind the back side of the fence with the grain running diagonally. Cutting both ends also keeps them parallel. This would be important later to support the screws that would lock the sacrificial fence in place. Overall, the length of my blocks, dictated by fence width, is 3 7/8 inches but yours are likely to be different. The idea was to make them long enough to reach the opposite side of the table saw fence and provide for at least an inch of material through which the clamping bolts would pass.
With a quickly made jig, a pair of dovetailed slots were routed into the rear of the poplar, stopping just above the height of the regular fence. With the dovetail bit moved to the router table the angled ends of the oak blocks had dovetails cut in them to match the slots. I dry-fit one of the oak blocks into the poplar then held it against the end of the fence. Cut lines were traced around the fence leaving about 1/8-inch clearance. After cutting, the excess material out on the band saw both blocks ere installed and test fit over the fence before being glued and screwed in place permanently. I assembled plastic knobs (with jam nuts) onto studs with ¼-20 threads on one end and wood threads on the other. Holes were drilled in the tails of the oak pieces and the studs screwed in. After threading the handles into the oak the sacrificial fences was put into position and the clamp handles snugged down before removing it again. The ends of the screws left marks in the back side of the fence that identified where dimples were then made with a large drill bit. When the clamp handles are tightened, their ends press into these dimples allowing the fence to be very secure without excessive pressure being applied. Last, I installed the dado blade, raised it to one inch in height (the highest setting I could imagine ever needing) and traced its outline onto the poplar. I used a jig saw to cut that material away before sanding the edges of the cut smooth. For less than $15 I had a custom-built sacrificial fence that would work the way I wanted and I did not have to drill holes in my new Jet-Fence. |
||||
Do you have a comment about this page? - Email Me! Back to the Tips & Tricks List
|
All written, photographic and drawn materials are property of and copyright by NewWoodworker.com LLC 2000-2019. Materials may not be used in any way without the written permission of the owner.