
This is a Veteran Owned site
| |
|||||
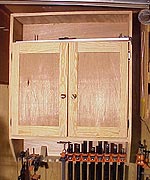
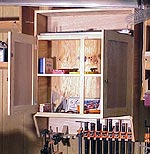
Shop CabinetIncludes pipe-clamp storageText & Photos by Tom HintzThis is fair warning to all of you. If you ever approach obtaining all the tools and equipment you think you need, you will not have enough places to put it all. Look in the background when watching The New Yankee Workshop. Despite its cavernous size, the walls of Norm Abram's shop are lined with cubbyholes, shelves, racks and cabinets. Like Norm, (not really, I just like drawing that parallel) I am always looking for better ways to store things. The previous owner of my house had installed a hopelessly small cabinet on the garage wall and I kept looking at the surrounding unused space. One day I decided I had enough scraps to build a more appropriately sized cabinet and toe the old one down. The overall dimensions of the cabinet are: 32-inches wide, 40-inches tall and 11-inches deep. The clamp opening at the bottom is 6 ¼-inches high and 5 ½-inches deep. Most of my shop cabinet is made from ¾-inch run-of-the-mill plywood. The face frame, door rails and stiles are southern yellow pine. The back panel of the cabinet is ½-inch plywood. The cabinet is hung using a French Cleat, a very strong but simple way to hang shop cabinets. (See my story on Building A French Cleat) The middle section of the cabinet is covered by a pair of flat panel doors, assembled with tongue and mortise joints. The rails are 2-inches wide and the stiles 2 ½-inches wide.
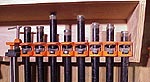
The bottom section of the cabinet is devoted to storing some of my Pony pipe clamps. It also is where the only major mistake was made. Admit it, you make mistakes also! I measured the heads of the Pony clamps and found that 7 inches between the top of the rack and the underside of the shelf above it would fit the clamps with ½-inch clearance. Unfortunately, I finished the cabinet the next day and cut the overall length to where the bottom shelves dado should have started. I did not discover the error until the cabinet was essentially finished and I tried hanging the clamps in a space that was now about ¼-inch short. They do fit nicely hanging upside down so now I tell people that is how I intended it in the first place.
Do you have a comment about this page? - Email Me! |
All written, photographic and drawn materials are property of and copyright by NewWoodworker.com LLC 2000-2019. Materials may not be used in any way without the written permission of the owner.