
This is a Veteran Owned site

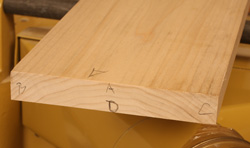 |
Using straight, square and consistent wood makes woodworking more fun. Making your wood straight, square and consistent can be fun also. Click image to enlarge |
Squaring Wood
Making your woodworking life easier
Text, photos and video by Tom Hintz
Revised - 2-23-2010
Taking the time to mill our lumber so that it is straight, square and consistent in thickness can have huge implications on how our projects turn out. If the wood is inconsistent there is no way for joinery to turn out perfect. Also, inconsistent or not-quite-square wood will give you fits trying to make a square project actually square.
This story assumes that you have a table saw, jointer and planer. I know some folks can do this using nothing but hand tools. There are also people who can hold their breath for four minutes or run a mile in that same amount of time. I am confident that my chances of actually squaring up lumber with hand tools even reasonably close to the results I get from my machines is about the same as me running that 4-minute mile while holding my breath the whole way. Judging by my email, many of you harbor similar concerns. If you are looking for instruction in the use of hand tools, you will have to look elsewhere - I suck with them and do not want to foster that deficiency on my viewers. If you want legitimate justification for adding a jointer, planer or table saw to your shop, this might be a small part of it.
Cash vs. Efficiency
Many woodworkers look at processing rough-cut wood for their projects as a cost-saving capability. Many (like me) use this cost-saving theory as justification to spend the money on a jointer and planer. While there actually is a cost savings in buying rough-cut as opposed to prepared (sanded 4-sides) wood, that overall savings is less than most expect. You probably could recover the expense of moderately priced jointers and planers if you do a BUNCH of woodworking but that is going to take years.
 |
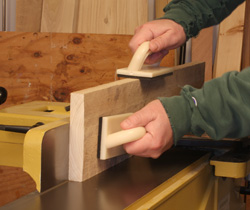 |
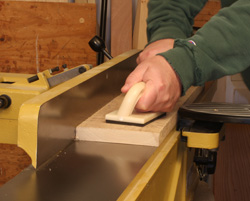
Step 1 (left) is to joint one wide face ("A") flat. We need this as a base for the remaining operations. Step 2 (right) is to put that freshly jointed face "A" against the fence and joint one edge true. that becomes "B". Click images to enlarge |
|
For most of us the real benefit of having these machines is the ability to process rough-cut wood as we need it. In many cases wood from a store has been sitting around for a while and may have distorted enough to need some truing up. Also, having our own machines allows us to produce custom sized wood that can set our projects apart even more.
The Sequence
There is an accepted sequence for processing wood to wind up with a straight, square and consistent piece of material. Many others and I have tried to take shortcuts in this process and all of us willing to admit our error go back and follow this sequence. When you look at each step, what comes before and after it, the sequence makes perfect sense. And, once you follow this sequence a time or two you will find that it goes quickly.
Jointer First
First we need to establish a flat, straight surface on which to base the remaining cuts. The only surface that makes sense is one of the wide faces of the board. Jointing one of the wide faces flat provides a stable, true surface to work with on the jointer, table saw and eventually the planer. After jointing a wide surface flat, mark it with the letter "A" so we can identify it in subsequent steps.
Now place side "A" against the jointer fence and make one edge flat and square to the wide face (A) jointed in the last step. When this edge is finished, mark it with the letter "B". Having jointed the wide face first and placing that against the fence we can get a perfect edge that requires no further machining.
 |
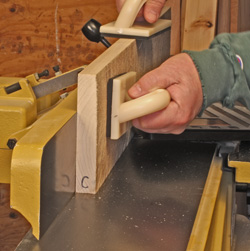 |
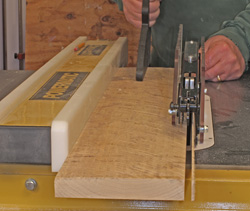
At the table saw (left) we put side "A" on the table and edge "B" against the fence so we can cut edge "C" parallel to edge "B". Then back at the jointer take one light cut from edge "C" just to clean it up. Click images to enlarge |
|
If you are working with raw edges that are far from straight, it might be wise to use a Table Saw Jointing Jig to establish one straight edge. Using this jig can sometimes allow you to align the grain more closely with the long axis of the board you are making. Click Here to see our Table Saw Jointing Jig plan page if you do not already have one.
After using the Table Saw Jointing Jig it is a good idea to go back to the jointer and make a pass or two to be sure that this freshly sawn edge is absolutely flat. One or two passes will also remove any marks left by the table saw blade.
Table Saw
Next we use the table saw to make the still uncut edge parallel to edge "B" that we previously trued on the jointer. Place the jointed side "A" on the table surface and the jointed edge "B" against the table saw fence. Then adjust the cut width to the size needed. This cut should be labeled "C".
You can use this step to simply trim the board to its maximum useable width. In this case just measure from the jointed side "B" across to the narrowest portion of the unjointed edge and set your fence-to-blade distance to 1/16" less. Then when you make the rip cut you will come away with a straight, parallel edge that is ready to be perfected with a pass on the jointer.
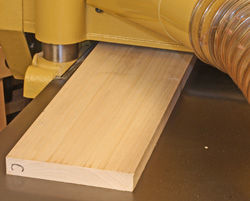 |
Then at the planer we put side "A" on the table so the planer can make the last face ("D") smooth, parallel to side "A" and consistent in thickness. Click image to enlarge |
You could also cut the board to the needed width right now. Just be sure to add 1/16" or 1/32" to the fence-to-blade width to allow for a cleanup cut on the jointer.
Back to the Jointer
After ripping the board to make the "C" edge parallel to edge "B" we go back to the jointer to take a very light cleanup cut on the newly cut edge "C". This cleanup cut is seldom over 1/16" deep and more often in the 1/32"-deep range. All we are doing is cleaning the edge up to get rid of saw marks and make certain that the edge remains straight. As long as we make just a single pass, the edge will remain effectively parallel.
Some feel this final cut on edge "C" is unnecessary. If your table saw produces a cut edge that is smooth enough for your application, feel free to skip this step. However for most of us the precaution of a final pass over the jointer is a good idea.
On to the Planer
Now with sides "A", "B" and "C" flat, true, square and parallel we can use the planer to make the remaining wide face "D" just as perfect. The planer depends on a straight surface to machine the opposing face straight so we put the jointed face "A" down on the planer table. Take a series of light cuts until side "D" is flat and true from end to end. You can also continue taking cuts until the board is reduced to the thickness needed for your project.
Video Tutor |
It might be tempting to try and process both wide faces of a board with the planer but without a flat, true surface on the bed, the planer will follow whatever defect the board has, particularly over its length. It will get thinner but the majority of the defect will remain. Stick with the procedure described here and save yourself a bunch of frustration - and wood.
Beware
I should add that if you keep your machines properly aligned, processing your project wood removes many of the excuses that could be used when joinery comes out badly or a box is not as square as it should be. Soon after I added a jointer and planer to my shop, my woodworking got better. Not having to fight crooked wood let me focus on other things like joinery. Even joinery got easier because my wood was straight and consistent in thickness.
Just buying a jointer and planer will not make anyone a master woodworker. However, using them correctly will let you be as good as you can be and allow you to learn without the built-in distractions of crooked wood. I also find that working with properly prepared wood makes woodworking more fun and that is worth the price of the machines on its own.
Related Material
Should I buy a Jointer or Planer First?
Preparing Wood for the Jointer
Have a comment on this article? - Email Me!
Back to the Tips & Tricks List
All written, photographic and drawn materials are property of and copyright by NewWoodworker.com LLC 2000-2019. Materials may not be used in any way without the written permission of the owner.