
This is a Veteran Owned site
| |
|||||||
Setting Table Saw Blade Height
Accuracy is simple if you use a simple toolText & photos by Tom Hintz Safety - All of the procedures described in this story must be done with the saw unplugged from the power source! Never work on or near a saw blade or any cutter while the machine is connected to the electrical power supply.
|
 |
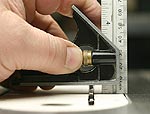 |
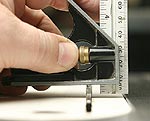
(Top) Move the square and blade back and forth to find the high spot, indicating Top Dead Center. (Bottom) Adjust the blade height until the end of the square's blade is flush with the table surface. Lock the table saw adjustment and recheck. That's it. Click images to enlarge |
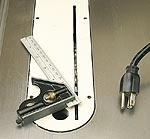
Adjust the combination square blade so that the desired depth extends beyond the 90-degree face and then lock it down. Hold the 90-degree face of the square lightly on the saw blade teeth and the end of the blade level with the saws surface.
Slowly move the square and the teeth it rests on forward and backward while watching the end of the blade. You can see it rise and fall as the square goes over TDC. With the end of the square's blade at its highest point, adjust the saw blade height until the end of the combination square blade just touches the table surface. Rock the square and blade back and forth slightly and watch for light beneath the edge of the combination square blade, indicating the height is still a bit too high.
Though you should keep your eyes near the level of the table surface, you can readily see light under the edge of the square's blade when it is off the surface.
Tip: If your shop lights do not illuminate the table surface enough, training a work light or similar light source from the rear onto the area surrounding the saw blade will make this procedure easier.
When adjusted correctly the end of the square's blade will stay on the table surface when you move the blade back and forth slightly but will lose contact with the teeth of the saw blade if moved farther.
Lock the saw's height adjustment and recheck with the square to be sure it has not moved.
Checking and Matching Depths
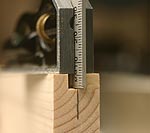 |
You can accurately match the depth of an existing cut with the combination square and then set the saw up. Click image to enlarge |
After setting the blade height, make a cut in scrap material and use the combination square, still set to the saw blade height, to check that the cut is at the correct depth.
The combination square is also useful when matching the depth of an existing cut. Loosen the blade lock on the combination square just enough to allow the blade to move with some resistance. Extend the blade a little more than needed and press the end of the blade into the cut or groove to be matched. Slide the body of the combination square down until its 90-degree face rests flat on the material surface. Lock the square's blade and recheck before moving to the table saw to set the saw blade to the same height using the procedure described above.
Combination squares are useful in the wood shop for many tasks. When it comes to setting blade height, a simple combination square makes this common job fast, accurate and easy.
Do you have a comment about this page? - Email Me!
All written, photographic and drawn materials are property of and copyright by NewWoodworker.com LLC 2000-2019. Materials may not be used in any way without the written permission of the owner.