
This is a Veteran Owned site
![]()
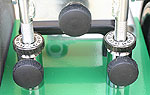
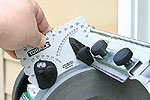
Tormek Planer/Jointer Blade Jig - SVH-320Fast, accurate blade sharpening and maintenanceText & Photos by Tom Hintz If you use a jointer or planer, the Tormek SVH-320 Jig represents an effective way to maintain and extend their performance. In addition, the SVH-320 can help save time and money, commodities that are important to all of us. The Kit The SVH-320 jig has a built-in adjustable support system that goes in the vertical mounting sleeves on the Tormek machine. The support is part of the pivoting, keyed platform on which the blade holder slides. The angle of the platform is adjusted with a single knob, which sets the angle of the blade to the stone.
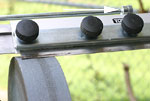
Along the top of the jig is a bar with two positionable collars (hex key included) used to limit left and right travel of the sliding tool holder.
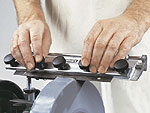
The tool holder has a cast-in shoulder against which the blade rests to insure it is aligned accurately in the jig. A clamp bar uses five finger knobs to secure the blade in the holder. The finger knobs appear to be spaced randomly but are really placed this way to allow grinding of other straight edge tools that are unsuitable for other SetupPreparing the SVH-320 jig for sharpening is slightly more involved than other Tormek jigs because the blade (and jig) are leveled to the stone in addition to setting the bevel angle and depth. This additional step actually adds very little time to the setup process but is essential.
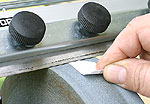
I clamped the blade in the holder, placed the holder on the support platform and turned the graduated thumbwheels to lower the blade edge close to the stone. A little adjusting of the thumbwheels aligned it to the stone's surface before locking it in place. Slipping a piece of paper between the blade and stone is suggested in the manual to confirm this alignment and works well. It is important to remember that the graduations on the thumbwheels need not be the same when the jig is properly adjusted.
Note: I noticed that the cutting edge on a used blade can be distorted somewhat. Use your best judgment when "reading" the scrape mark in the color on the edge.
It is essential that you continue grinding each blade until you reach the stop and you cannot grind anymore. For optimal sharpness you can adjust the stone for fine grinding and hone the blades manually on the leather wheel. In UseThe first time I used the SVH-320 jig, I spent a total of 2 hours sharpening the blades from my jointer and surface planer. That included reading the instructions, removing, sharpening, reinstalling and setting the blades up in both machines. A little experience with the jig reduces that time substantially. The next time I sharpened the jointer and planer blades I was able to perform all of the same steps in just over an hour. Sharpening my jointer and planer blades on the SVH-320 jig the first time showed just how out-of-whack they really were. Before sharpening, the machines were cutting OK, but I had
noticed more passes were necessary and the finish was not as smooth as it used to be. The transformation after sharpening with the SVH-320 jig on the Tormek was remarkable. Both machines cut effortlessly and the wood emerged with a satin-smooth finish that would require little sanding before finish could be applied. ConclusionThe Tormek SVH-320 Jig is a worthwhile investment if keeping your jointer and planer blades sharp is important. Being able to freshen the edge of my blades whenever necessary, without having to make a trip to a sharpening shop (during their business hours) makes the SVH-320 both a cost and time saver for me.
Since using the SVH-320 jig, my jointer and planer perform better than they ever have. Being able to maintain the sharpness of their cutting edges anytime I feel it is necessary means I do it more often. That allows my machines to work at their best all of the time. Update: (6-13-2006) The SVH-320 jig has proven to be more than worth its price. I have saved far more than that on sharpening bills and not having to buy replacement knives for my jointer and planers. Even the "throw-away" planer knives are usually able to be touched up once or twice per edge before having to be replaced. That alone has saved hundreds of dollars over the last couple of years! Do you have a comment about this page? - Email Me!
|


All written, photographic and drawn materials are property of and copyright by NewWoodworker.com LLC 2000-2019. Materials may not be used in any way without the written permission of the owner.