
This is a Veteran Owned site
| |
||||||||||||||
Table Saw Jointing Jig
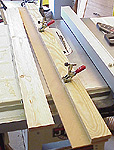
Help for the jointerlessText & Photos By Tom Hintz The table saw jointing jig is actually a sled with a straight face on one side that rides against the fence and a bed on the other side to which a crooked piece of wood can be secured. When the sled is pushed through a table saw the straight side of the jig follows the fence, moving the crooked edge through the blade in a perfectly straight line. The most popular length for this jig is 4-feet and accommodates the vast majority of pieces for our projects. Longer versions, up to 8-feet-long, are possible should your shop have those needs. This story is based on a 4'-long jig but the same construction techniques apply to longer versions with appropriate modifications to the length of the parts. Start Straight
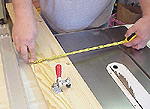
To build an accurate table saw jointing jig, start with a straight board for the main rail. If you have a friend with jointer, the main rail board can be made easily. For those lacking such access, spending a little time cruising the plywood rack at your favorite lumberyard can yield a reasonable facsimile. Nearly every supplier carries the 2 by 4'-long sheets of ¾"-thick plywood. These sheets are generally cut very straight and can make an acceptable main rail. Look over the sheets and find one with the straightest, least damaged edge. Standing the sheets on edge across the saw table is an easy way to find the straightest side. Place that edge against the table saw fence and carefully cut a 3"-wide strip. Turn that freshly cut edge against the fence and trim the piece down to 2 ½"-wide. Making the second cut should remove small imperfections in the edge. Building a Rigid Bed
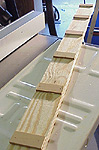
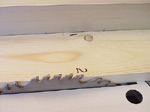
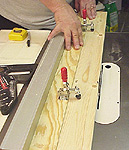
This jig is very stiff due to the way it is constructed. Using spacers between the main rail and the bed creates a type of beam that substantially increases the stiffness of the jig without adding excessive weight. Cut a piece of ¼"-thick plywood 4'-long and 5"-wide for the bed. Cut 9 pieces of ¼"-thick plywood 1"-wide and 2 ¼"-long for the spacers. Choose which face of the ¾"-thick ply will face downward and place the main fence on a flat bench with the bottom facing up. When installing the spacers, center them on the main rail so they do not over hang the edges. Glue and brad the spacers to the bottom of the main fence placing one at either end and one at the center. Install the remaining spacers 6" on center working out from the center spacer. Apply glue to the spacers and set the ¼"-thick bed onto them, making sure it does not overhang the main rail on the side that will ride against the table saw fence. With the assembly flat on the table, secure the bed to the spacers with two brads at each location. Let the assembly dry completely on the flat bench surface before continuing. ClampsI use a pair of lever clamps on this jig because they are adjustable to work with a wide range of stock thicknesses. Some use three clamps to allow working with a wider range of board lengths. I routed pockets about 3/8"-deep in the main rail in which to mount the clamps. Sinking them into the main rail insures material as thin as ¼"-thick to be clamped in the jig. FinishingI have never put a finish on this jig but it is important to sand the bottom and edges to remove any irregularities that could catch on the fence or table while cutting. Make sure all of the brads used to secure the bed are sunk below the surface so they do not scratch the saw table. Using the Table Saw Jointing JigNote: To facilitate securing the work piece in the jig the straightest edge is usually placed towards the jig.
Carefully adjust the work piece in the jig so that the widest portions (if there are more than one) are equal in distance from the fence side of the jig and secure it with the clamps. If the board is more tapered, adjust it as best you can so that the blade path cuts the most attractive edge considering the grain pattern. Take measurements along the piece to locate the narrowest spot, measured to the fence side of the jig, and note that dimension. Adjust the fence to blade distance to that dimension, minus 1/16" to 1/8" to insure a full cut on the work piece. To make the sequence of cuts easier to remember, and explain here, mark the cut side of the work piece #1 and the jig side #2. These numbers should remain facing up during all of the cuts.
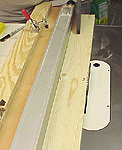
Cut 1 - With the fence and jig set up as described above, you are ready to make the first cut that straightens the #1 side of the work piece. Start the saw and keeping the jig against the fence, slide it through the saw. Cut 2 – Take several measurements along the width of the work piece to locate the narrowest spot (if there is one) and note that dimension. Set the fence to blade distance 1/8" under that figure. Remove the wood from the jig and turn it so that side #1 is against the saws fence. Start the saw and carefully move the wood through the saw. This cut makes the sides parallel. Cut 3 – This cut is necessary because the wood can sag slightly during cut #1, making that edge slightly out-of-square. Set the fence to blade distance to the final width desired. Turn the board so that the #2 side is against the fence, turn the saw on and carefully make the final cut. This cut brings the wood to its final dimension and insures both edges are square. If your saw is properly set up, the board should have parallel and square edges and be ready for trimming the ends to final length. Not Just For the Jointer-lessThis simple jig is handy even when a jointer is available. Rather than remove large amounts of wood on the jointer, the wood can be quickly straightened on the table saw before cleaning up the edges with a single pass on each edge on the jointer. The final step is to drill a hole in one end of the table saw jointing jig so it can be hung in a handy place. This is one jig that you will use often. Plans are available for this project! - Click Here!
|
||||||||||||||
Do you have a comment about this page? - Email Me! Back to the Tips & Tricks List
|

All written, photographic and drawn materials are property of and copyright by NewWoodworker.com LLC 2000-2019. Materials may not be used in any way without the written permission of the owner.