
This is a Veteran Owned site

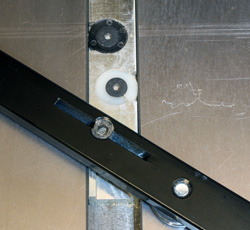 |
These nifty guide bar adjusters let us remove play from often-us4ed tools like miter gauges. The problem is that with the tiny tolerances we can now adjust to, small variances in miter slot width just became an issue. But, it's an easy issue to deal with! Click image to enlarge |
Tuning Miter Slots
Tuning out tiny deviations for accuracy and safety
Text, photos and video by Tom Hintz
Posted - 7-13-2010
The introduction of adjustable width miter bars made it possible to eliminate side-to-side play in tools like miter gauges and similar tools used on any machine with a miter slot. Reducing the side-to-side play so dramatically increased accuracy substantially but also bolsters safety buy reducing unexpected lurches when additional pressure is applied to overcome a tight spot within the miter slot.
The problem with the new guide bars comes when we discover that the new adjustability can reveal small variations in the width of our miter slots, frequently in more than one spot. If my email on this subject is any indication, the price of your machine has little to do with the probability of finding these small deviations in miter slot width. It appears that this little problem can be found on virtually any machine equipped with miter slots regardless of the brand name or price.
The good news is that these deviations in miter slot width are usually very small, in the range of a few thousandths of an inch in most cases. That means that the fix is both easy and relatively quick. All you need is a wooden block that is slightly thinner than the width of the miter slot, some fine emery paper, masking tape and a little time. And, once you complete this miter slot tune up, it lasts forever, or until you physically damage the miter slot. I have performed this tune up on all of my miter slot-equipped machines and in 30-some years of woodworking have never had to repeat it.
Adjust the Bar
 |
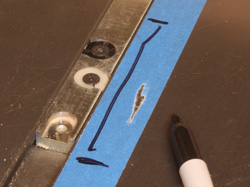 |
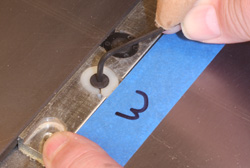
After adjusting the forward width mechanism to fit the widest portion of the slot (left) we use that adjuster to find the tight (narrow) spots along the miter slot and mark the beginning and end on the tape. (right) Click images to enlarge |
|
First put a strip of masking tape down one side of the miter slot. We will use this to mark where work must be done.
We want to get the bar set to the widest spot on the miter slot. We adjust only the first compensator on the bar to make it easier to define the spots along the miter slot that need attention. You are likely to discover that most of the miter slot is the same width but take the time to check. Using a digital caliper is an option if you have that instrument in the shop but using the miter bar itself is still the best to wind up with the best fit possible.
With your guide bar in the miter slot, adjust the first width compensator according to the manufacturers' instructions. As you adjust that compensator to fit the slot, move it from spot to spot along the length of the miter slot to find the widest areas. Most often the majority of the slot will be the "wide" spot with just a spot or two being narrower.
With the bar set to the widest spot move it all the way back to the operator's end of the miter slot. Adjust the last width compensator on the guide bar so that it is slightly loose at the wide spot in the miter slot. We want this compensator to move freely right now so we can more easily define the narrow areas within the miter slot.
If you are encountering tight spots along the miter slot we need to mark them. Put a strip of masking tape along the edge of the miter slot. Move the bar forward until it encounters the first tight spot and mark the beginning of the tight area. Move the guide bar forward until the adjuster begins to break free of the tight spot and mark that end of it on the masking tape. Repeat this process on any other tight spots along that miter slot. When the areas are marked, park the guide bar out of the way for the time being or remove it from the slot.
Tuning the Slot
 |
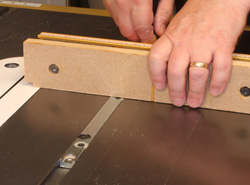 |
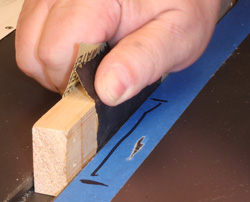
Wrap a piece of fine emery metal abrasive (200-grt seems to work fine) around a block of wood (left) that is slightly thinner than the miter slot is wide and sand each edge of the problem areas equally. When satisfied, fine tune all of the adjusters on the miter bar and slide it through the entire miter slot (right) to be sure it move smoothly from end to end. Click images to enlarge |
|
Wrap a piece of fine emery paper (200 grit or finer seems to work well) around a block of wood that is almost the same width as the miter slot. Ideally the block with emery paper wrapped around it slides easily in the slot so we can intentionally focus sanding pressure against one side of the slot at a time. I like to use a block of wood between 6 and 8 inches long because that length makes it easy to keep the block stable.
With the emery paper around the wood slide it back and forth in the slot scrubbing one edge of the miter slot between your marks on the masking tape at a time. Take several strokes of the block against that one side of the slot, and then take the same number of strokes while holding the block against the opposite edge. Wipe the slot clean and try the guide bar through that spot.
In most cases it only takes a little sanding to relieve a narrow spot within a miter slot. I found two minor "narrow" spots on my POWERMATIC PM2000 and it took less than 20 strokes with the block at each of them and just a few minutes to complete the operation.
Video Tutor |
Once you have the miter slots evened out, go back and adjust all of the width compensators on the guide bar per the manufacturers' instructions. Carefully move the guide bar back and forth through the full length of the miter slot and check for binds. Should you encounter tight spots, repeat the process to fix those and then check the full length once more.
If you use a guide bar in more than one slot on the machine or have a special runner for each of your slots, use them with this process to tune up the slots in which they run. The process requires just a little while and very little effort but can make working with the machine much easier and safer.
Having tools that work in the miter slots move smoothly through those slots without having to shove it through a tight spot lets you focus on making a clean cut exactly where you want it. Tuning up your miter slots can also increase safety because relieving tight areas that require extra force to overcome can result in jamming the wood into the blade or cutter as the miter bar slips free of the narrow area. That alone should be worth the time and effort of tuning up your miter slots.
Have a comment on this story? - Email Me!
Back to the Tips & Tricks List
All written, photographic and drawn materials are property of and copyright by NewWoodworker.com LLC 2000-2019. Materials may not be used in any way without the written permission of the owner.