
This is a Veteran Owned site
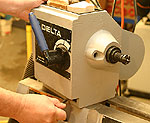 |
A pivoting headstock is a very handy feature on a lathe but the mechanics that make it possible may have a small liability built in. The good news is that the fix is nearly always very simple. Click image to enlarge |
Aligning Lathe Centers
Curing Mystery Vibrations
Text & Photos by Tom Hintz
While this alignment problem will undoubtedly seem like a no-brainer to veteran turners, the number of emails received at NewWoodworker.com on this subject indicates it is a common and frustrating problem for those with less experience. Fortunately, we can cure this problem easily in most cases and perhaps eliminate a common bump in the learning process at the same time.
The Liability of Convenience
Being able to swivel and reposition the headstock is a common and handy feature on many lathes. However, this capability includes a minor liability in the form a small but necessary amount of play in the locking mechanism that allows this movement of the headstock. That little bit of play, when extended out to the point on the drive spur can result in a small but important miss-alignment of the drive center points.
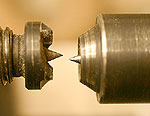 |
This alignment error is less than 1/8" at the points but can help cause vibrations that can make learning how to use turning tools more difficult than it need be. Click image to enlarge |
The result of this miss-alignment can be a small vibration that first shows itself at the cutting tool in the form of those annoying spiral ridges in the wood when rounding. The combination of uneven pressure on the wood and the spurs on the drive center engaging the wood at a slight angle all but guarantee some level of vibration.
Vibration induced spirals can also occur on a perfectly aligned lathe by pressing the cutting tool against the wood hard enough to cause a bow or whip. Dull tools and bad technique can also cause vibrations. However, the number of emails I receive on this point and the frequency with which correcting this alignment cures the problem clearly indicates it is a very common problem. For the novice turner who is unaware of this alignment issue, it can complicate their learning to use turning tools properly.
Matching Points
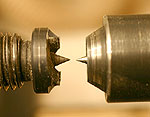 |
Simply tugging the headstock to the right side of the built-in play aligns my centers perfectly when the headstock is locked down. My old lathe needed the opposite correction but both corrections were well within the available play in the locking mechanism. Click image to enlarge |
Lock the headstock as you normally do and install the drive spur, making sure it is fully seated. Carefully slide the tailstock up so the point of the live center is about 1/8" from the point on the drive center. Look at the points from the side and top to see how closely they are aligned. Ideally, the points will be aimed directly at each other. However, finding a miss-alignment is rather common but in most cases, it can be fixed easily.
If the points were perfectly aligned, release the headstock and see if there is enough play towards or away from you to cause an alignment error when the headstock is locked. It your headstock can only lock down with the points perfectly aligned, you are done, and very lucky. If not, continue reading.
The Locking Procedure
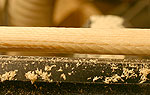 |
With the points misaligned, this spiral, caused by the vibrations that alignment condition helped create, were nearly impossible to control. Click image to enlarge |
Release the locking mechanism, gently turn the headstock so the drive points are perfectly aligned and then lock the headstock in place. In most cases, the headstock will stay aligned with the point in the tailstock and your troubles are over. So far, in every instance I have encountered, (on about 40 lathes to date) moving the headstock fully towards or away from the operator within that small range of play before locking resulted in aligned points.
The key to this fix is remembering which way the headstock must be "cheated" before locking it down. On my Delta, I return the headstock to the center detent and then give it a light tug towards me before locking. The Jet lathe I had earlier needed the headstock pushed away from me to the other side of the play range before locking. Both stayed in alignment after locking the headstock regardless of how much they were used. Also, despite using both lathes heavily and frequently turning the headstock to turn bowls, the correction needed when returning it to center for spindle type work never changed. The key is to get in the habit of nudging the headstock to whichever side corrects the alignment of the centers.
Bigger Problems
 |
This is the same piece of wood, same tool and lathe but the centers have been aligned. I was able to reduce the diameter even further with three additional cuts and get a very smooth surface. Click image to enlarge |
While I have yet to encounter a lathe that could not be properly aligned within the range of play available, there undoubtedly will be a few with errors too large for this correction. In those cases, the best alternative is checking the instruction manual to see if there is an adjustment available or barring that, contacting the manufacturer. Life would be nice if every tool was produced perfectly but that simply is not the case, with any brand or price point.
Whether you are experiencing vibration problems or not, take the time to check the alignment of your drive center points. It only takes a minute to do but could save lots of frustration and maybe a little wood.
Do you have a comment on this story? - Email Me!
All written, photographic and drawn materials are property of and copyright by NewWoodworker.com LLC 2000-2019. Materials may not be used in any way without the written permission of the owner.