
This is a Veteran Owned site

 |
When the wood dealers failed to appear at the show I went back to my scrap bin, all told a 148-mile trip! As long as I have wood and glue I will not be denied! Click image to enlarge |
Building a Chunk of Tree
Making a big hunk out of smaller hunks
Text, photos and video by Tom Hintz
Posted – 10-24-2011
OK. I may not be making a whole tree but I was forced to create a substitute for a sizeable chunk of one. I had just gotten my Carter Hollow Roller and needed fair sized piece of tree to evaluate it. It just so happened that a small annual woodworking show was running that weekend and while there was seldom anything new to see the show usually featured a couple of wood dealers. One of those dealers usually had several large chunks of wood that would feed my lathe and Carter Hollow Roller nicely. After driving the 74-miles to what I already knew would be a small show I found that it was smaller yet because neither of the aforementioned wood dealers showed up. Suffice it to say that I was neither happy nor anticipating repeating this 74 mile trek next year to see if this show got smaller yet. About an hour and half later I arrived back at my shop – and my scrap bin. I wasn’t taking this laying down.
Cutting and Gluing This to That
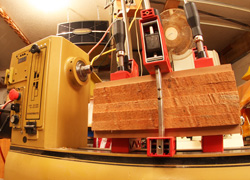
I had a 60-inch long piece of ambrosia maple that was roughly 5-3/4”-wide and about ¾”-thick. I say roughly because one edge was very rough and the other edge sorta rough. No problem, my roughing gouges and 3HP Powermatic 3520B laugh at irregular surfaces. I also had a couple small lengths of red oak. After some measuring and minor mathematics (this is me remember) I arrived at a length of 13-inches as the magic number. I cut the maple board into five 13-inch-long pieces and trimmed the two red oak scraps to 13-inches as well. Because all of these pieces were around ¾”-thick, milled for various long-past jobs, the glued up stack approximated the approximate 5-3/4” width of the maple boards. Close is all I needed in this case.
 |
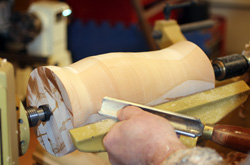 |
I had a couple narrower oak boards (left) so they went on the ends where rounding would cure that. After rounding I cut in a basic shape (right) that I could use with the Carter Hollow Roller. Click images to enlarge |
|
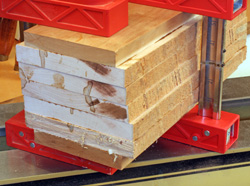
I applied glue to the faces of the maple boards and glued them into a stack. I also applied glue to one face of each red oak piece and added them to the stack, one centered on the top and the other on the bottom of the stack. The red oak boards were a bit narrower than the maple pieces but being on the outside of the stack meant that the rounding procedure would fix that automatically. If not I could always make the overall diameter a bit smaller until they did fit. I am king of my lathe, most of the time.
After gluing and stacking the pieces I applied three of my parallel jaw clamps and dialed in enough pressure to keep them in place. Then I set this assembly aside and worked on other material for a couple days. I have learned that with this much stuff glued up and the 5-3/4”-or so width, allowing an extra 24 hours gives the glue along the centerline of the stack time to actually dry. I am going to be sticking a large cutting tool down the middle of this glue up and don’t want to be dodging chunks of it when I find no-so-dry glue.
Going Between Centers
After the blank had cured I found the center of mass at each end and punched that with an awl. Then I mounted the blank in my lathe between a drive spur and tailstock live center. Since this blank is going to be used to try out a hollowing system I wanted to get the outside shaped and rough sanded before beginning that evaluation.
Video Tutor |
When the rounding was done and I had turned a basic shape into the piece I sanded it down to 220-grit. Finally I cut a tenon on the headstock end sized to fit my Oneway Stronghold chuck. I took the blank off of the lathe and removed the drive spur. Then I put the tenon in the jaws of the chuck loosely and brought the live center in the tailstock up and its point put back in the center hole. With a light pressure applied with the tailstock I could tighten the jaws around the tenon and keep the blank on the centerline.
My final act to prepare the blank for the hollowing tool was to bore a large hole down the centerline of the blank. I used a drill chuck in the tailstock to hold a 1-5/8”-diameter Forstner bit to drill the first few inches of the hole before switching to my 1”-diameter brad point bit to go another 7 inches. The rest will be left up to the hollowing tool.
In the end I had produced a blank of sufficient size to test the hollowing tool. It isn’t as pretty as a burl but it was cheap, I used up some scrap in my shop and I wasn’t waiting on a brown truck to arrive. Once I get used to using the hollowing system I can send for more expensive cuts of wood but for now, building my own piece of a tree saved the day, the budget and my not-so-patient patients.
Have a comment on this story? –Email Me
All written, photographic and drawn materials are property of and copyright by NewWoodworker.com LLC 2000-2019. Materials may not be used in any way without the written permission of the owner.