
This is a Veteran Owned site
 |
Not being one to turn down free wood, I gladly accepted these walnut logs. Click image to enlarge |
Logs to Blanks
A small shop conversion process
Text & Photos by Tom Hintz
When a friend was forced to harvest a seriously distressed walnut tree, I was presented with several logs to feed my turning habit. With bark-on diameters in the 8" to 10" range, the yield was not going to be large, but considering the price, I gladly accepted.
Rather than just cut the logs into relatively straight turning lengths, I decided to go a step further and reduce them on the bandsaw to eliminate as much of the waste as possible and hopefully speed the drying process somewhat. The high contrast between the familiar dark walnut core against the outer white wood made slicing the chunks into squares without loss much easier than with many species.
As always, before the first cut, the logs were inspected closely for any sign of metal. Finding none, I moved on to the initial cuts.
Chain Saw
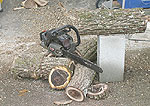 |
In about 10 minutes, the chainsaw had the raw logs broken down into rough lengths. Click image to enlarge |
The second step was breaking the logs down into straight sections that would allow mounting the pieces in the lathe, centered on the dark wood core. Since trees refuse to grow with eventually being turned in mind, these cuts are often judgment calls. It would be nice to cut nothing but long, straight blanks from logs but that is seldom possible, especially when the focus is retaining the center wood.
While cutting the logs into segments, I try to square the ends within reason. Pronounced turns or bends often mean two cuts will be necessary to avoid ending up with a steep angle on one of the pieces. Usually, these cuts can be made very close together, minimizing the wood lost.
While the chainsaw is out and warmed up, I trim away branch stubs and other protrusions that could make cutting at the bandsaw more difficult.
Bandsaw
 |
 |
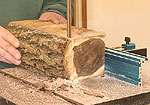
(Left) A good blade and some patience soon had the log chunks reduced to turnable rectangles. (Right) Removing much of the waste shortens drying time and how long it takes to sweep up when it comes time to round the pieces after drying. Click images to enlarge |
|
A ¾"-wide, 3-tooth-per-inch Timber Wolf blade was installed on the bandsaw for squaring up the log pieces. Surface quality of the cuts is of little concern and this blade handles cutting thick material easily.
I have a sled that can be used to help make the initial cuts in oddly shaped pieces but did not need it with this batch. After cutting, the sections had at least one relatively straight edge that could be placed against the fence for the first cut that begins the squaring process.
With one cut made, that flattened side was turned to the bottom and the fence adjusted to slice away as much of the white wood as possible without removing the target wood at the center. Irregularities in how a tree grows mean there will be dips and protrusions of the dark core wood but overall, I was able to reduce the amount of white wood considerably. This should speed drying time somewhat and will definitely reduce the waste generated during the rounding stage later when the blanks are turned.
With the pieces reduced to squares, a miter guide can be used to true up the ends if they need it. These cuts could be made just before turning but I do not see the point of drying wood that will have to be cut away before the piece can be installed on the lathe.
Coating
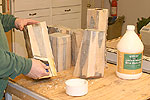 |
Brushing on the wax emulsion is by no means an artistic endeavor. Slop it on and get a continuous coat. Click image to enlarge |
As soon as the blanks are squared up, they have to be coated to slow moisture loss or they will begin cracking, often within hours. While woodturners mix up all sorts of concoctions to coat turning blanks, I stick with the commercially made green wood sealers (wax/water emulsions) that go on easily and work very well. A gallon costs around $20 but coats out LOTS of wood so this is not a big expense.
A foam brush seems to work best for applying the sealer to rough-cut wood. It is also nice to just throw it away rather than trying to wash a wax emulsion from a bristle brush.
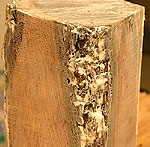 |
Slicing away all of the bark is not easy or necessary. I brush the emulsion over that area also but do not spend time trying to get it in all the crevices. Bark itself slows drying if it is attached firmly. Click image to enlarge |
There are no style points awarded for your technique when coating turning blanks. The primary goal is a continuous coat on all of the cut surfaces and applying lots of sealer makes attaining this all-important goal easier.
Some of the blanks have bark along the corners and while I did try to get sealer in those crevices, the bark itself retards drying so I did not spend a lot of time on those spots. So far, I have not had any trouble with cracks or splits starting around tight bark.
This wood was very wet which slowed the drying of the coating. In the past, I have dried wood with only one coat of sealer but decided this much free walnut was worth the effort of a second coat. The first application was allowed to dry overnight and then the second coat was applied.
Drying
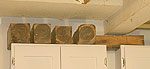 |
The last thing is to put the blanks up out of the way and wait, probably several months. We will check these blanks occasionally to see how the moisture content is dropping. Click image to enlarge. |
When the coating had dried, the pieces were set aside in any free spot in the shop to dry. Because these blanks are relatively small, I was able to scatter them across the tops of shop cabinets, shelves and the tool shelf on the lathe.
Anticipating at least several months of drying before use, some of these blanks may have to be moved occasionally, which can be a good thing. Turning a blank during the drying process occasionally helps equalize drying. If a blank is left lying on one side or end, that face can dry more slowly and could induce cracking or a warp.
Stay Tuned

Over the coming months this article will be updated with progress reports on drying and any problems found in that time. Eventually, all of this wood will be turned into household objects that will be given back to the friend that supplied the logs in the first place.
Have a comment on this story? – Email Me!
All written, photographic and drawn materials are property of and copyright by NewWoodworker.com LLC 2000-2019. Materials may not be used in any way without the written permission of the owner.