Ferrule Mandrel
Make your own; it's easy and cheap
Text and photos by Tom Hintz
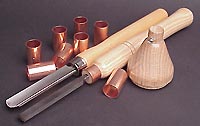 |
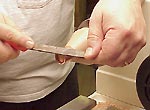
The mandrel described here makes producing your own handles, and ferrules (the chisel in front has my handle/ferrule) an easy, cost effective job.
Click image to enlarge |
When I decided to turn new handles for the chisel set that came with my Jet (JWL-1236) lathe, the first obstacle was finding a suitable material from which to make the ferrules. Ferrules are available commercially, but they are relatively pricey and I wanted a way to make them in my shop whenever needed; and save some money in the process.
I tried reshaping a brass plumbing compression nut but by the time it was round, its wall thickness was questionable and the process was quite time consuming. In addition, the finish left by even a fine file was ugly.
I briefly considered using the ferrules from the factory chisel handles but they are very thin stamped tin and I thought I could do better.
A trip to my local home improvement store turned up a bag of copper tubing sections, meant for splicing ¾-inch copper pipe. The pieces have an inside diameter of 7/8-inch (to allow room for solder), and at 1 9/16-inches were long enough to yield two ferrules roughly ¾-inch-long. This tubing is seamless, and has a wall thickness of 0.042-inches which represents a substantial increase in strength over the tin ferrules supplied from the factory. Best of all, a bag of ten costs $2.30 meaning a few mistakes during the development process would not break the bank.
Mandrel Design
My idea was to turn an oak mandrel that could be mounted in my SuperNova chuck for making the ferrules.
The first mandrel design was based on a 4 ½-inch-long section of oak, that when turned to a cylinder was 1 3/8-inch in diameter. One end was trued to fit into the center of the SuperNova jaws, the other had a ¾-inch-long tenon turned down to just under 7/8-inch in diameter to which the copper union would be secured.
This design was an immediate failure. The small-diameter base on the chuck end was totally inadequate for supporting the mandrel, which was easily knocked off center.
Here endeth design one.
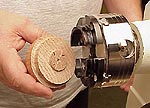 |
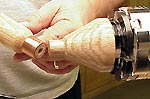
The key to this mandrel is the wide base and shoulder that locate it firmly to the SuperNova chuck. There is no wobble.
Click image to enlarge |
Design two had far more potential. Applying my best seat-of-the-pants engineering, this version sported a wide a base at the chuck to resist the forces applied at the tenon end. This change proved to be the key and produced a useable mandrel.
I began with a piece of red oak 3 ¾-inches long that when turned to a cylinder had an outside diameter of 2 ¾-inches.
The rear (chuck end) was turned flat, and then a 2 3/8-inch diameter spigot about 5/16-inch wide was cut. The spigot fits into the SuperNova jaws near their widest limit. The shoulder at the right end of the spigot was also turned flat and butts against the jaw faces without the spigot bottoming out. This adds considerable stability and repeatability to the mandrel.
This design appears to be working just fine. Though it has been used many times to date, I have had no trouble with the mandrel going out of line. Installing the mandrel in the same position each time is simple; align pencil marks on the body (explained later) to the number one jaw and slider and the mandrel runs true every time.
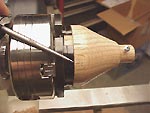
The nose of the mandrel is a simple straight tenon, turned to snugly fit the 7/8-inch inside diameter of the tubing. When turning the tenon I changed from the scraper to sandpaper while still oversize so I could sneak up on the correct diameter to fit the copper tubing as snugly as possible.
The body of the mandrel, between the rear face and the tenon, was tapered, back to front. The taper actually begins about 3/8-inch from the rear face to allow sufficient mass there to prevent distortion or splitting. The forward end of the taper is just large
 |
These alignment marks make installing the mandrel in the right position fast and easy.
Click image to enlarge |
enough to create a small shoulder at the rear of the tenon to act as a stop when mounting the tubing. This shoulder also helps keep the tubing running true to the rest of the mandrel.
After sanding, marks were made on the mandrel at the rear flange that align with the center of the number one jaw slider and both ends of the number one jaw. Using these indicators, the mandrel can be re-installed accurately, and quickly.
Finally, three coats of water-based polyurethane were applied to preserve the oak and help control responses to humidity changes.
Making Ferrules
 |
 |
(Top) A standard tubing cutter, used with the lathe OFF, removes excess tubing safely.
(Bottom) Turn the lathe on slow speed and lightly file the raw edge round and smooth.
Click image to enlarge |
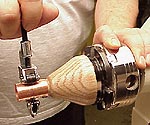
A small screw near the rear of the mandrel's tenon secures the tubing, keeping it aligned and preventing it from spinning. The friction fit is close, but with use will release, so I went with the screw from the start. A hole is drilled in the tubing, large enough for the screw to pass through without threading, about 1/8-inch from the end. Then, the tubing is placed on the mandrel's tenon and the screw installed.
Note: The tubing is cut with the lathe OFF!
After marking the length wanted, I use a hand-operated (sorry) tubing cutter to trim the tubing to length. This cut takes literally seconds to do by hand and is not worth risking the cutter hanging up and spinning if the lathe is running. I like cutting the ferrules this way so I can custom fit them to the handle in the event I made a small length error when turning the tenon.
With the tubing cut to length, I turn the lathe on at its lowest speed (550 rpm on my Jet) and use a fine metal file to smooth and round what will be the forward edge of the ferrule. The back, or butt end of the tubing, is left untouched.
When satisfied with the edge the ferrule is ready to be removed from the mandrel and installed on the chisel handle.
Installing the Ferrule
Most of my ferrules fit the chisel handles snug enough to require a few taps with a mallet to seat them fully. Then, when the chisel's tang is driven into the hole in the handle, the wood expands slightly, further tightening the grip on the ferrule.
 |
Making ferrules for your custom handles is easy, fast and cheap.
Click image to enlarge |
When a little "professional over-sanding" results in a slightly under-sized tenon, a thin coat of 15-minute epoxy on the handle's tenon fills the void and when dry, secures the ferrule more than adequately.
Don't ask how I know this.
The ferrule mandrel is a simple, but useful tool if making your own chisel handles is on your project list. There is little cost for the wood or tubing, making the production of custom ferrules for your custom chisel handles a cost-effective procedure.
Now, whenever I want to turn out another handle or two, making ferrules for them is a fast and simple part of the job. |
