nwwlogo

- FlyingRC.net
NewMetalworker.com  -  NWW on YouTube  - Donate


This is a Veteran Owned site

 
If you have ever felt the urge to take a hammer to your chuck to get it free, you were about to do some serious damage.
In this story we show you how to remove a chuck without killing anything!
Click image to enlarge
Installing and Removing a Lathe Chuck
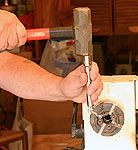
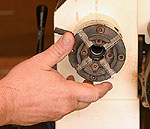
Hammers not allowed - or needed
Text & Photos by Tom Hintz

   If you turn wood, you own, or will own, a chuck. Modern lathe chucks, like the Oneway Talon 4-jaw scroll chuck in the accompanying photos, are well made and easy to use. However, there is one problem nearly everyone encounters sooner or later with a chuck regardless of brand – getting it off the lathe.
   Even when installed correctly, the forces of turning wood tend to tighten the chuck. When the time comes to remove it, breaking it's grip on the spindle threads can be difficult. Done incorrectly, the chuck, lathe or both can be damaged.

No Hammers!

   I have heard from too many new (and veteran) turners who have damaged their chuck or lathe by using a hammer to break the chuck free. Aside from marring or distorting the chuck, the impacts of hammer blows can chip or even break the bearings supporting the spindle.
   The trick is to apply enough pressure to break the chuck free without delivering sharp impacts like those generated by a hammer.

Get a Strap Wrench

   There is a ready-made tool for this task called a strap wrench. A heavy fabric-reinforced rubber belt is secured to a handle on one end. The remainder of the belt wraps around the chuck before threading back into the handle. When pressure is applied, the belt is locked in place and handles length provides a substantial amount of leverage that multiplies the force being applied.
   Strap wrenches are available in a number of lengths but the one I use most has an 8"-long handle. Using the procedures described in this story, I have been able to free my lathe chucks without problem.

Grip, Pull and Maybe Thump

   To free a stubborn chuck, lock the spindle according to the lathe manufacturers instructions. Wrap the strap wrench around the body of the chuck and snug up the strap.

(Top) The strap wrench alone is usually enough to break a stubborn chuck free.
(Bottom) When things get tough, clamp a piece of board in the jaws, pull on the strap wrench and give the board a thump with your fist. If that doesn't do it, you need to talk to the manufacturer for more aggressive, but safe suggestions.
Click images to enlarge

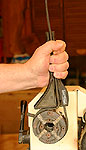
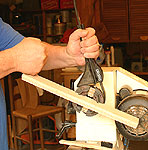
   Remember that strap wrenches are directional so it has to be wrapped around the chuck in the correct direction. It is also good to know that when the chuck breaks free, it does so all at once. Depending on where the hand pulling on the wrench is aimed, you can deliver an embarrassing blow to your own nose, as did a NewWoodworker.com viewer, nearly knocking himself out. Install the strap wrench so when locked on the belt the handle is at the 10 o'clock position. That way the pulling pressure is downward, not at your face.
   Place one hand on the lathe to steady it and pull lightly on the strap wrench to be sure the spindle is firmly against the lock. Give the wrench a good pull and hopefully the chuck will come free. If not, repeat the procedure a few times. Make sure to have the spindle against the lock before each pull to avoid over-stressing that mechanism. If the wrench alone does not break the chuck free after a few pulls, try the next step.
   Clamp a piece of hardwood ¾"-thick by at least 2"-wide and about 18"-long between the jaws, its flat sides facing up and down. The board has to extend across the entire face of the chuck with most of its length to your side. The actual length I use is determined by what I have laying around but so far, more than 18" of length outside the jaws has not be necessary.
   Orient the wood so it is in the 9 o'clock position and then snug the strap wrench in the 10o'clock position. Hold pressure on the wrench and then give the board a thump near the end with your fist. If the chuck does not break free the first time, repeat the procedure a few more times, perhaps with a little more force behind your fist.
   In all but the most severe cases, the chuck will break free. If not, it's time to contact the chuck and or lathe manufacturer for specific suggestions on more aggressive techniques that will not damage the lathe or chuck. It may be tempting but bringing out a hammer is just too risky.

Installing the Chuck

(Top) Clean the threads on the spindle and inside the chuck thoroughly before installing the chuck.
(Bottom) screw the chuck onto the spindle until it touches the shoulder, back it off 1/2 to 3/4-turn and then give it a spin and let it bump against the shoulder. That should be all it needs to lock in place.
Click images to enlarge
   Most screw-on chucks are installed the same way but read the instructions that came with your equipment and follow them if they differ from the procedure described here!
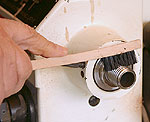
   First, clean the threads on the spindle and inside the chuck thoroughly. Debris trapped in either place can act like thread-locking compound and make the chuck difficult to seat or remove later.
   Turn the chuck onto the spindle being careful not to cross thread it. The chuck should thread onto the spindle easily without a lot of play or tightness. Turn the chuck by hand until it contacts the shoulder on the spindle (or bottoms out) and then back it off ½ to ¾ of a turn. Using just your hand and a snap of the wrist, spin the chuck clockwise and let it "bump" into the shoulder.
   This should be all that is needed to lock the chuck onto the spindle. Everything you do when using the chuck tends to tighten it more.

   Woodturning lathes and chucks are expensive making it well worth your time to treat them right. Installing and removing the lathe chuck need not be a damaging experience, or a frustrating one. Take your time, follow the procedure described here and your chuck, and you, will remain undamaged.

Do you have a comment about this page? - Email Me!

Back to the Turning Directory


All written, photographic and drawn materials are property of and copyright by NewWoodworker.com LLC 2000-2019. Materials may not be used in any way without the written permission of the owner.
Privacy Statement