
This is a Veteran Owned site
![]()
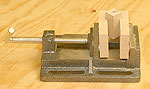 |
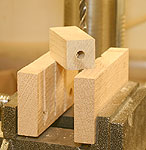
Starting with a simple drill press vise, these shop-made jaws make drilling pen blanks with precision easy, and cheap. Click image to enlarge |
Making A Pen Blank Drilling Vise
Cheap but functional
Text & Photos by Tom Hintz
When I started turning pens, buying the equipment needed was for the most part an understandable expense. When I looked at pen blank drilling vises and noticed the ones that looked good had price tags between $30 and $50, my understanding mood faded. When I looked at how these vises were made and the task they did, a thought came to mind.
On the way home from the woodworking store, I stopped at the local big box and picked up a $15, 4"-wide drill press vise I had seen. I remembered it had removable jaw inserts (important) and thought I could use that feature to my advantage.
Making the Jaws
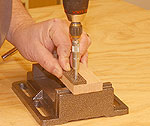 |
Using a Vix-style centering bit to drill pilot holes through the original jaws assures holes that align with the vise body. Click image to enlarge |
Two pieces of oak, 4"-long by 2"-tall and ¾"-thick were cut to replace the metal jaw inserts. The metal inserts were removed and used as drilling patterns for placing the mounting holes in the wooden jaws. A Vix bit was used to drill a shallow marker hole to accurately align the screw holes through the metal jaw inserts.
First, a 3/8"-diameter drill was used to bore the countersinks deep enough to accommodate the screws I found and keep the head below the surface of the jaws. You will have to measure this as some jaws, as mine do, have blind holes in which the jaw screws go. I bottomed one of the screws in the hole, measured the protruding part and added an 1/8" to determine the counter bore depth.
Next, a drill sized to match the diameter of the screws is used to finish drilling the hole through the jaws.
 |
If a dedicated mortising machine is available, setting the 1/4" chisel 45-degrees from normal makes a nice v-cut in each jaw . Click image to enlarge |
After drilling, a sanding block was used to remove any chips and splinters from around the screw holes that could hold the jaws out of line with the vise. The wooden jaws were installed, closed on each other and the top surface sanded (or use a rasp) to be sure the jaw tops are flush to each other.
Centering Grooves
There are two favored ways of cutting the grooves in the wooden jaws that hold the pen blanks straight. One is with a dedicated mortiser and the other a simple drill press. For the set of jaws made in this story, I did it both ways and found either groove works perfectly.
With either machine, make sure the depth is set so the bit stops slightly above the slides of the vise or the bit is certain to die an ugly death. We need not set the pen blank fully in the jaws anyway. Drilling the grooves 1 ¾"-deep is more than enough to hold any pen blank I have used straight and secure.
 |
 |
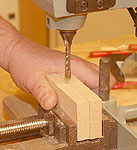
(Left) A 1/8" wood bit can be used in the drill press but make sure the table is 90-degrees to the bit. (Right) Whichever machine is used, the result is grooves that hold the blanks square to the bit. Click images to enlarge |
|
With the dedicated mortiser equipped with a 1/4" bit/chisel, using a small square to draw lines across the tops of the jaws where the grooves are to be cut makes setting the chisel up easier. Jaws in the common 4"-width can easily have two pen blanks clamped in them at the same time if their size is consistent.
Adjust the mortiser fence so the bit lines up with the groove location. Loosen the chisel and turn it so that two of the corners align with the layout lines drawn earlier. Lock the chisel in place and you are ready to drill the grooves.
Hold or clamp the drill vise securely and drill/chisel the grooves, stopping about ¼" above the vise slides. If the alignments were correct, there will be two equally sized v-grooves directly across from each other.
When using a drill press, first be sure the table is exactly 90-degrees to the bit. You should be checking this occasionally anyway but when drilling through the center of a pen blank, it is especially important. Install a 1/8"-diameter drill and adjust the depth stop so the bit stops about ¼" above the vise slides.
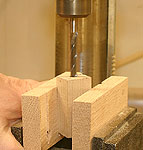 |
 |
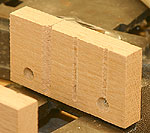
(Left) Clamp the blank with the corners in the grooves and drill through the center. (Right) If you made the jaws correctly, the exit hole in the bottom of the blank will also be centered. Click images to enlarge |
|
Clamp or hold the vise securely so the point of the bit is exactly on the seam between the two jaws and then drill the hole. If more than one blank location is being drilled, move to that spot and make that hole.
After drilling, open the jaws and sand the jaw faces to remove any chipping or splintering along the edges of the grooves. In most cases, there will be very little but it is worth the effort to clean them up.
Your new pen-drilling vise is now ready for use. Clamp the pen blank between the jaws, putting the corners in the grooves and if you made the jaws right, the blank will be square to the drill bit in the drill press.
Have a comment on this story? - Email Me!
All written, photographic and drawn materials are property of and copyright by NewWoodworker.com LLC 2000-2019. Materials may not be used in any way without the written permission of the owner.