
This is a Veteran Owned site

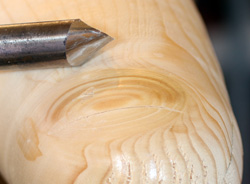 |
Riding the bevel on some turning tools gives you lots of control along with leaving a much smoother surface. Click image to enlarge |
Riding the Bevel
Fulcrum, lever and control
Text, photos and video by Tom Hintz
Posted – 2-11-2011
From the day that I posted my story on Using Pine for learning to turn I have been getting email asking for more on what “riding the bevel” actually means. Point taken. Hindsight suggests that this story should have come before the Using Pine one but it didn’t so here it is now.
Riding the bevel can be considered both a safety and performance technique. Riding the bevel does give you more control and that makes you safer. Riding the bevel also lets many of our turning chisels cut cleaner and that translates into less sanding. While the principals involved in riding the bevel are reasonably simple do not underestimate the benefit lots of practice can have on learning this skill. Like anything in turning it takes some time at the lathe to get comfortable doing it.
Think of the bevel as a fulcrum. With the bevel in contact with the wood the rest of the tool becomes a lever that gives you a big advantage with which to control how the tool engages the wood. We always stay on the tool rest as well but the bevel is a big controlling factor that lets you take very light cuts that produce remarkably smooth surfaces.
Riding Which Bevels
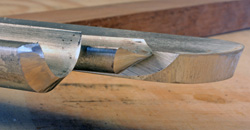 |
All of these tools have bevels but only the front two are meant to be sued with the bevel rubbing. Click image to enlarge |
While many turning tools have bevels not all of them are meant to be ridden. For instance, all of my scrapers have a distinct bevel below the cutting edge but if I tried to ride that bevel bad things are going to happen when I try to engage the cutting edge. Similar appearing bevels on roughing and spindle gouges are meant to be ridden and give you the control needed when engaging the cutting edge to control the depth of cut and avoid catches. Skew chisels surprise some in that they also are designed to be used with the bevel rubbing when making shaving-type cuts. In general the bevels on tools meant to slice get ridden. Everything else, probably not. When in doubt read the instructions or literature that came with your turning chisels or ask the manufacturer.
Sharpness Matters
Even with the increased control you get when riding the bevel a clean, sharp cutting edge remains important. A dull edge will force you to tip the cutting edge farther into the wood to initiate cutting. That and the increased pressure needed by a dull edge can lead to catches or the tool diving deeper into the wood than you wanted. Neither is a good thing.
With a clean, sharp edge you can gently engage the cutting edge to take very light, slicing cuts that leave a very appealing surface. Lighter, controlled cuts do less damage to the fibers of the wood which translates into much less sanding. When you slowly bring a sharp cutting edge to the wood with the bevel rubbing you can feel it begin to cut and that gives you far more control.
Ride the Tool Rest First
 |
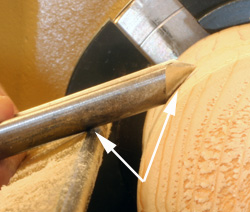 |
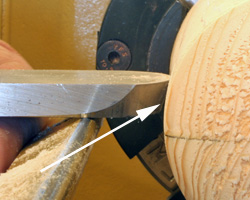
The scraper (left) has a bit of a bevel but this tool is designed to work off of the edge, with the tool rest below the centerline of the wood. The spindle gouge (right) does ride the bevel. Note that it is always in contact with the tool rest and the bevel on the wood. Never one or the other. Learning to lift the handle to let the edge come down to the wood takes a little practice. Just go slow and remember to maintain both contact points! Click images to enlarge |
|
Before you can ride a bevel the tool rest must be set to the right height. For scrapers and similar tools that cut off the edge without riding the bevel we want the tool rest a little below the centerline of the wood. For slicing tools that ride the bevel we want the tool rest a little above the centerline of the wood so we can lay the bevel on the wood to establish contact and then slowly engage the cutting edge.
Lifting the tool off of the tool rest while turning can be disastrous and I can promise from experience that you will only do that once. Lifting the tool almost guarantees a catch and if your fingers are between the tool and the rest you are likely to undergo a pain threshold test. Trust me when I say that you don’t want to do that and taking the time to focus on keeping the tool in full contact with the tool rest and the wood is well worth the effort.
Learning to Ride
Learning to ride the bevel really is rather simple but does require practice in how you present the tool to the wood. As with any kind of turning the tool is always placed on the tool rest first and then rocked forward to place the bevel onto the wood. It is important to get the feel of setting the bevel and not the cutting edge on the wood. Then with the bevel rubbing on the wood we slowly raise the handle to pivot the cutting edge down to the wood. The tool is always in contact with the tool rest so to bring the cutting edge down to the wood the tool is slid back towards you just a bit so that the bevel and cutting edge moves downward to engage the wood. This is very hard to explain in words so make sure that you watch the Video Tutor that is also on this page.
Video Tutor |
While with tools like roughing and spindle gouges bring the cutting edge down to the wood by lifting the handle, some other tools like bowl gouges, including fingernail type bowl gouges are rolled into the wood. The bevel is placed on the wood first, the tool always remains on the tool rest but instead of lifting the handle we roll this type of gouge to bring the cutting edge to the wood.
I am far from a champion turner but with most of my tools with bevels I don’t have to think much about bringing the bevel to the wood first anymore. It has become a habit with that type of tool. But that comfort level came after lots of practice and getting the feel of bringing those tools onto the wood. Going slow, paying attention and practice is the only to learn how to put the bevel on the wood. When I start with a new chisel I will lay it on the tool rest and then onto the wood a few times before turning the lathe on, just to get the feel of laying the bevel on the wood.
We always have to be careful around a lathe but with some practice riding the bevel becomes a valuable skill. Once you learn to ride the bevel consistently you will find that your projects need much less sanding and that translates to an improved final product. And that means that you just became a better turner!
Have a comment on this story? –Email Me!
All written, photographic and drawn materials are property of and copyright by NewWoodworker.com LLC 2000-2019. Materials may not be used in any way without the written permission of the owner.