
This is a Veteran Owned site
![]()
 |
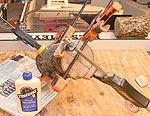
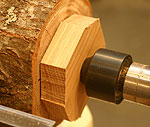
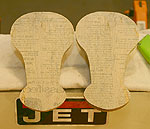
It used to be that making split turnings was hardest after the halves were separated. This procedure insures they are identical thickness when they come apart, not after an afternoon of sanding and carving! Click image to enlarge |
Making Split Turnings
Turning identical halves is not twice the work!
Text & photos by Tom Hintz
Posted – 9-22-2006
One of the more intriguing capabilities of the lathe is making half or “split” turnings that are most often used as decorative features on other projects. Split turnings can be stand-alone projects such as wall sconces, brackets o whatever you can imagine. Though seemingly a simple idea, the problem is ending up with identical pieces, specifically in depth. Though many have tried using jigs and techniques of all descriptions, successfully creating identical thickness pieces has been as much luck as skill. Usually after slicing a turning into two pieces, lots of work remains to be done to the cut edge to make them even reasonably identical.
The split turning in this story was turned entirely on my Jet Mini Lathe but virtually any lathe will work. In many cases, split turnings are small and I find the overall size of the Jet Mini Lathe to be more comfortable for the job.
There is a better way and it involves your morning newspaper.
Making the Blank
 |
 |
Starting with one piece and cutting it in half (top) is my favorite when that option is available. If the pieces are large enough, a light pass or two over the jointer (bottom) insures a flat glue surface. Click image to enlarge |
If we want to end up with two pieces, it makes sense to start with two pieces. The trick is gluing them together in a way that allows turning them safely and still be able to separate them later – and get two identical pieces.
To make the blank we need either one solid piece that is a little larger than needed or two (or more) pieces that can be glued up to produce the size needed. The idea is to end up with two laves that are reasonably close to equal in thickness. As you will see later in this story, matching the thickness at this point is less important than having a flat glue surface.
First, we need two halves of the blank that are roughly the same thickness, each with a truly flat surface that can be used for joining them. Remember that the combined dimensions of the halves after rounding have to yield a blank of sufficient size for the project in mind. When in doubt, make the blank a little bigger just to be sure.
When beginning with multiple pieces, start by gluing up halves and allowing the glue to set up. If an odd number of pieces is closest to the diameter needed, I add another layer to get two equal thickness halves and then turn the blank down to size when rounding. Another option (my favorite when possible) is to start with a single piece that is a bit larger than needed and saw it in half as close to center as possible.
Next, flatten the glue surfaces. If the pieces are large enough, a jointer is the best tool but sanding or hand planning them flat may be the only option. Take your time and get the surface flat so they match each other well. Taking the time to make truly flat surfaces now not only insures a good glue bond but also provides nearly perfect rear surface when split apart that makes preparation for mounting far less labor intensive.
The Newspaper
 |
 |
Putting a single layer of common newspaper between the glue-coated halves (top) is the key to getting them apart later without damage. Clamping can be a little difficult. (bottom) Adding a clamp at each end across the glue line helps keep everything aligned until he glue sets up. Click images to enlarge |
Cut a single layer of common newspaper that is the slightly larger than the gluing surface of the blanks. Apply an even coat of plain yellow glue (Titebond for instance) to both of the gluing surfaces but not the newspaper. Lay the newspaper in the glue on one of the pieces and align it. Carefully add the second half of the blank over the newspaper and clamp.
I have found that adding the newspaper makes the pieces especially prone to slipping while the glue sets up. Adding a clamp on the ends at the glue line helps keep the pieces aligned while the glue sets up.
As with any glue up, use only enough pressure to close the joint. Too much pressure can squeeze enough of the glue out of the joint to weaken the bond. When satisfied with the clamping, set the assembly aside to dry thoroughly. Rushing this step could result in turning into the middle of the glue up where the glue has not yet fully dried. That could result in the halves flying apart on the lathe. Take your time and be safe!
When the blank has dried, trim the ends square and flat if necessary.
The Center Point
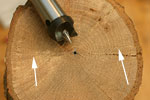 |
Make the centerpunch at the middle of the glue line. We don't care about the width now as that will be automatically corrected when the piece is rounded. Click image to enlarge |
To end up with identically sized half turnings, measure across the glue line and mark the center. We disregard the thickness when punching the center point because during rounding, the halves will automatically become equal if the center point is on the glue line. Using an awl, make a small punch mark at the center point of the glue line. Repeat the process on the other end and use these holes for locating the drive spur and live center when mounting on the lathe.
Capture Plate
Note: I use my (Oneway Talon) chuck to secure one end of split turnings and recommend you do so as well. The clamping force generated by the jaws provides a large safety margin, insuring that the glued up blank stays together during turning. If you do not have a chuck and do not take this opportunity to “need” one, making a second “capture” plate, like the one described below for the tailstock end can be used for the drive center end as well. Adding a piece of double-sided tape to the interior of the capture plate recess will help prevent the blank from spinning independently during turning. While less effective than a chuck, the capture plate it is better than using the drive center alone.
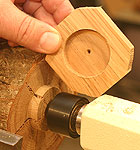 |
Making the capture plate is easy. Just be sure to size the tenon correctly to fit it! Click image to enlarge |
To secure the tailstock end of the glued up blank, a simple “capture” plate is made that effectively traps a tenon turned on the blank. The capture plate also allows turning the piece close to the tailstock end to maximize the size of the project that can be obtained from that blank.
Ideally, the tenon on the tailstock end will be between 1 ½” and 2”-diameter, based on what size Forstner bits you have. That provides sufficient “meat” at the ends of the blank halves to secure them during turning while maximizing access to that end of the blank.
Cut a square of hardwood at least ¾”-thick and 2” larger than the tenon size determined earlier. Find the center of the plate and drill a 1/16” or 1/8”-diameter pilot hole completely through it. Change to the Forstner bit that matches the tenon and with the point of that drill in the pilot hole, drill a recess ¼” to 3/8”-deep. Trimming the corners of the capture plates a little will make them easier to turn later.
Turning the Tenons
 |
 |
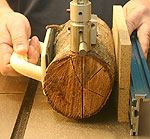
(Top) Before turning the tenons, put two full wraps of good duct tape around the center to restrain the halves during that operation. (Bottom) With the capture plate pressed into place by the tailstock, there is little chance of the halves coming apart while turning. Click image to enlarge |
Note: If capture plates are used on both ends of the blank, make the capture plates and tenons the same size.
Mount the blank between centers, applying just enough pressure to secure it. Put two or three complete, tight wraps of duct tape around the center of the blank to restrain it while cutting the tenons. It is not likely that the blank will split apart but it is way easier to be safe now.
Carefully turn a tenon on the drive center end, sized to fit your chuck jaws. Set a caliper to the outer diameter of the Forstner bit used to drill the Capture plate recess and use that to size the tenon on the live center end of the blank. The length of the tenon should be slightly longer than the depth of the recess in the capture plate. A good fit (diameter) is important so check your progress frequently.
Remove the blank from the lathe and check the fit of the Capture plate. When satisfied, remove the tape from the blank.
Rounding & Turning
Mount the blank in the chuck and lightly close the jaws on the tenon. Place the Capture Plate recess over the tenon on the tailstock end, insert the point of the live center into the pilot hole on its back side and snug the live center against the capture plate. Give the assembly a couple turns by hand to be sure it is seated before tightening the jaws on the chuck.
 |
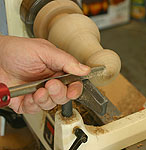 |
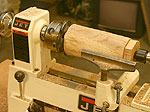
(top) With the blank mounted in the lathe, capture plate in place, you are ready for rounding and turning the piece. (bottom) When using a chuck, we can part off the tailstock end and finish turning that part without support. Light cuts and a steady hand are important. Click images to enlarge |
As part of the initial rounding process, I also turn the corners off of the Capture plate if it is as large or larger than the blank. This is largely a safety issue as removing the corners both gives you better access and prevents banging the knuckles. Be careful not to remove more material than is necessary to round the Capture plate. Leaving the outer walls as thick as possible insures its strength.
Check to be sure the tailstock is still pressing firmly against the Capture plate before rounding the rest of the blank. You can now turn the shape into the blank. The only caution is to leave enough material at either end to prevent compromising the grip of the chuck or Capture Plate. Finish reducing the ends of the turning after the major shaping and sanding has been completed. I try to do as much turning and sanding as possible and still leave a 1”-diameter section at either end of the piece. When possible, I also complete as much finishing as possible before turning the ends down and parting the piece off. That leaves a small area on either end that needs sanding and finishing to complete it.
When using a good chuck, if the turning is short enough to remain stable, I part off the tailstock end and carefully finish turning that end. I can also sand and finish that end in many cases.
The last step is to part the headstock end off on the lathe or saw it off. Sand that end of the blank before continuing.
Separating the Halves
 |
 |
 |
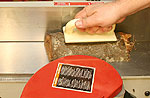
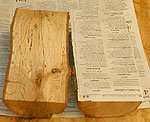
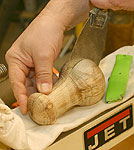
(top) Take your time working a utility knife, then a putty knife into the glue line to separate the halves. (middle) The newspaper has torn apart evenly, leaving very little work to prepare the halves. (bottom) Usually, a little sanding on a flat surface is all that is required and the pieces are ready for installation. Click images to enlarge |
The most important thing when separating the halves is to go slow when starting the split and then working your way around the piece. I start with a utility knife to begin working the seam at the newspaper. The main thing we are trying to avoid is denting or cracking the edge of the turning by simply driving a chisel into the seam. After the utility knife I can usually slip a spackling knife or thin chisel into the gap and work the halves apart. The paper generally separates right down the middle producing two flat surfaces.
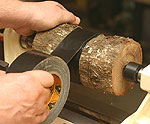
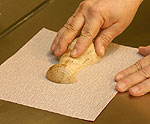
Once the halves are separated all that remains is cleaning up the newspaper-covered surfaces. This can be done easily by “scrubbing” it on a piece of sandpaper laid on a flat surface. If the halves are large enough to control safely, a light pass or two across the jointer makes short work of this process.
Just how particular you are with removing the newspaper and glue is up to you and how the piece is to be mounted. In most cases, this surface is hidden and presents no finishing problems.
With the halves separated and the back sides flat, you can sand any remaining areas and finish as desired and your split turnings are ready to be installed.
Be safe and have fun!
Have a comment on this story? - Email Me!
Back to the Woodturning Directory
All written, photographic and drawn materials are property of and copyright by NewWoodworker.com LLC 2000-2019. Materials may not be used in any way without the written permission of the owner.