
This is a Veteran Owned site
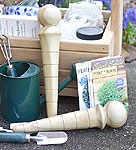
Turning a DibbleA fun, simple project for the gardener in your lifeText & Photos by Tom Hintz A Dibble (also called a Dibbler) is a simple tool used by gardeners to create holes in soil for planting seeds and small plants. The base design includes a ball-shaped handle, a flare and a taper with a series of 6 markings at 1" intervals that serve as a depth gauge. Modifying the Dibble with your own ideas or to fit your favorite gardeners needs is simple. MaterialVirtually any type of wood can be used to make a Dibble. Most gardeners keep their Dibble in a tool kit that is stored out of the elements when not in use. Because the Dibble is quick and easy to turn, making several to keep a gardener supplied for years to come can be done in a single afternoon.
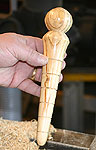
The finished Dibble is about 9"-long with a maximum diameter of 2". Using a blank 2 ¼" to 2 ½"-square and 12"-long leaves more than enough scrap at either end to make turning this project between centers safe. Rounding and Sizing
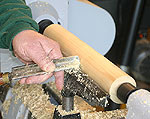
Begin by turning the blank to a 2 1/8"-diameter cylinder. I like to turn Dibbles with the small end at the tailstock because forming the taper feels more natural to me in that direction. The layout as described in this story refers to that orientation. Shaping
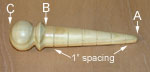
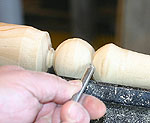
Rough in the taper between the A & B marks, leaving it slightly oversize for now. As material is removed, especially at the B mark, the handle and flare area gets in the way. It is easiest to use a spindle gouge to begin roughing in the ball handle and the flare below it at this time also. Turning a rough cove in the left-side waste creates room for turning the top of the ball. Depth Indicator LinesWith the lathe off, lay out lines 1" apart, starting at the point of the taper. If the handle features were located properly, there should be room for 6 markings below the handle flare. Turn the lathe on and cut V-
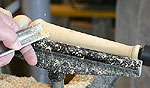
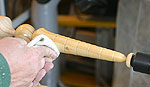
grooves about 1/16"-deep and 1 1/16"-wide at the layout lines. Complete Turning Finish sand all of the surfaces down to at least 220-grit, being careful around the depth lines. Sand any frayed grain around the lines but do not round their edges over. Applying a Finish
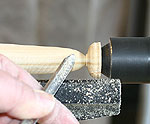
Though Dibbles need not be finished, I like applying a simple "burned-in" wax finish (Hut stick) to improve the appearance and give it a little protection. Part the Dibble Off Carefully part the Dibble from the waste. Use a sharp utility knife or chisel to trim any remaining waste before hand sanding the ends smooth. Be sure to round the end of the taper rather than forming a point that will just break off in use.
Options This is an easy project to turn and equally simple to modify to fit your gardeners wants or needs. The key is to have fun, practice the turning skills used and be creative.
|
|||||||||||||||
Do you have a comment about this page? - Email Me! |
All written, photographic and drawn materials are property of and copyright by NewWoodworker.com LLC 2000-2019. Materials may not be used in any way without the written permission of the owner.