
This is a Veteran Owned site
![]()
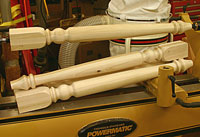 |
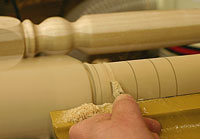
Turning any visually identical pieces, such as table legs, is easier than you think. And, you don't need an expensive duplicating attachment! Click image to enlarge |
Turning “Identical” Legs
When individuality is a bad thing
Text, photos and video by Tom Hintz
Projects such as table legs or balusters require turning multiple pieces so that they appear identical to each other. This task can be sufficiently frustrating to inspire some turners to invest considerable sums of money in a lathe duplicator. However, with a common sense approach and a little practice, you can turn out visually identical pieces on your lathe, with your tools and without the extra machinery.
Prep the Stock
As with most woodworking projects, quality results begin with precise stock preparation. When making a set of legs or other repetitive spindle-based projects, beginning with pieces that are dimensionally identical is crucial. While identical length is important for a table, perfectly square pieces, all the same size, makes turning a number of identical looking pieces much easier. Whenever possible, I run all of the pieces through my thickness planer on two adjacent sides to insure they are identical in thickness as well as square. Insuring that the pieces are perfectly square makes it easier to find the center and end up with nearly identical rounded diameters.
Joinery must also be considered before turning. The legs in the photos are to be assembled to the aprons with mortise and tenons. Before turning I lay out and cut the mortises while the piece will lie flat on its side for that operation without shimming.
Make a Story Stick
 |
A story stick is nothing more than a piece of wood or cardboard with the important transition points marked on it. I like to draw a rough representation of the shapes associated with those marks to help prevent mistakes on the first piece. After that, mounting the first turning behind those that follow let me match the marks up with the shape they interact with. Click image to enlarge |
A story stick is nothing more than a strip of wood or other stiff material cut to the same length as the blank with the major transitions (high and low spots) marked on it. Many, myself included, draw a loose representation of the corresponding shapes above the marks on the story sticks. Some take the time to make an accurate scale drawing of the profile. This drawn shape helps when turning the first piece but its value is limited on the remaining copies. As described later in this article, we use the first completed turning as a visual sample for those that follow.
Using the story stick, you can accurately (and quickly) apply marks to all of the blanks so that major points of reference are cut in exactly the same positions on each piece. This alone helps a great deal in turning identical looking pieces. If you might be making more than one set of legs, the story stick is even more valuable.
Square to Round
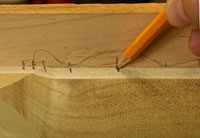
The first transition is an important one. Many table legs have a square section at the top though some have another square section near the bottom as well, particularly when stretchers between the legs are used. The transition from square to round requires rounding the corners that lead to the rounded sections. The easiest way to accomplish this without chipping is to mark this transition on all four corners and use a small hand saw (a dovetail saw works well) to make preliminary cuts. The maximum depth of these cuts depends on the diameter of the round portion where it ends. However, I have found little benefit of making these cuts deeper than 3/8” to ½”.
 |
 |
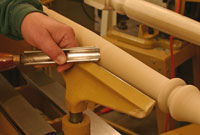
(left) Using a small back saw to cut notches at the round-to-square points lets you round that corner with less chance of developing splits.
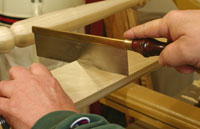
(right) I like to use a large skew chisel to do the initial rounding of this point. Later, a spindle gouge is used to clean this curve up before finalizing it with sandpaper to blend the edges. Click images to enlarge |
|
To begin rounding these corners I normally use a wide skew chisel. Using a series of light cuts, round the corners, turning the skew in towards the bottom of the saw cuts to make a relatively short radius. I have found that limiting this rounding cut to the depth of the preliminary saw cuts is sufficient – and often safest. Later, after the rest of the blank is rounded, there is room to refine the square to round transition with a medium to large spindle gouge.
I stop short of completing the rounded corners with turning tools and finish it with sandpaper later. This produces a very smooth rounded shape and blends it into the square corners above it evenly for the best visual appeal.
Round the Rest
Unless you have one or more square sections elsewhere on the leg, you can round the remainder of the blank. Regardless of the tool used (I like a sharp, 1” roughing gouge) it will be very difficult to round the blank fully at the square to round transition point. After rounding the rest of the blank I come back and clean up this area. It is much easier to make a final cut or two with the chisel facing back at the square to round transition to complete that area. There is little material that has to be removed but take your time. With a little caution this task can be completed without damaging the rounded corners of the square portion adjacent to it.
Landmarks
 |
 |
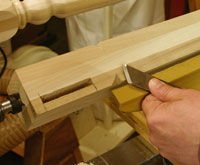
(left) After rounding and marking the transition, I use a parting tool to cut the low points. The other lines show the center of the high or rounded sections. (right) Leaving a small flat at the top of rounded shapes allows you to finish shaping them with sandpaper very quickly and helps prevent making points rather than rounded shapes. Click images to enlarge |
|
Note: Not all turners begin with a finalized design. I often have a basic idea of the shape but develop it fully while turning the first piece. Then, a story stick is made from the completed first piece for use when laying out the remaining copies.
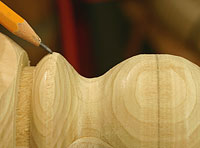
Using the story stick lay out the transition points on the blank. Because of the square portion it is safest to make dash marks at the transition points with the lathe shut off and then remove the story stick to run them around the piece with the lathe set at a slow speed.
Some turners prefer to mark only the low points of the design while others, myself included, also mark the center (high point) of rounded features. Marking the high points can make the initial turning a bit more confusing and forces you to pay attention when cutting the low points. This gets easier once the first piece is completed and mounted behind the piece being turned so you can actually see the shapes and more clearly identify where the cuts are placed. As with many things in woodworking, a little experience makes this much easier.
 |
Tapering is most easily done by starting at what will be the narrow end, taking a light, short cut and then backing up a little and taking several more light cuts, extending each new one further towards the largest point of the taper. Click image to enlarge |
I start each new piece by carefully turn the low points down to slightly over their final dimension. Leaving 1/16” to 1/8” of extra diameter helps prevent accidentally cutting or sanding the low spots smaller than desired in the final piece. After the first piece is completed, using a caliper to size these cuts off that helps consistency.
The ¼”-wide parting tool is probably the most used for cutting the low point markers. The ¼”-wide groove provides sufficient access for rounding adjacent shapes with a small spindle gouge and makes a good base for flowing one shape into another.
While it is not possible to anticipate here the range of turning tools that can be used, it is important to take your time with them. The goal in turning is to produce a smooth, nearly sand-free finish right off of the tool but many lack that much experience. The best plan is to carefully turn the shapes but leave them slightly oversize. Then they can be fine-tuned with sandpaper. This can be especially useful where one shape flows into another. Turning these transitions using only turning chisels is very difficult and a good way to accidentally reduce the diameter far below what is wanted. Leaving the shapes a bit oversize and then sanding them to the final shape is safer and allows even novices to produce very attractive shapes and transitions. As your turning tool skills grow, the need for sanding is reduced and you will know when that level of confidence is attained.
Visual Samples
An exceptionally helpful technique for producing visually identical pieces is placing the first turning, or an existing sample being copied, directly behind the lathe. With the sample out of the way but within reach, duplicating shapes and contours on the new piece is much easier. It is also very handy to be able to measure various points of a feature to be sure it is sized accurately on the new piece.
Video Tutor |
My Powermatic 3520B Lathe has a standard feature called The Comparator that uses adjustable dead centers to mount the sample a safe distance behind the piece being turned. The sample is aligned with the work piece to make comparing your progress with the desired shaped very easy. Lacking this feature, turners may tape the sample to a work support or other stand placed behind the lathe. While more clumsy, it can be done and serve essentially the same purpose.
However you do it, having that sample makes creating accurate duplicates much easier. It also helps identify which layout marks are to be low spots and which are high points. This visual identification alone can prevent serious errors that can scrap out an expensive piece of wood.
Using these common sense techniques and taking your time allows even novice turners to produce attractive and visually identical sets of legs or other multiple-piece sets of turnings.
The “visually identical” term used throughout this article is important. Turning absolutely identical features on multiple pieces without expensive machinery is virtually impossible. However, using a story stick and a visual sample along with careful turning can easily result in a set of legs that appear identical when installed. If a guest or self-appointed critic gets under the table with a caliper to check your work, their opinion matters little. Certainly less than their jealousy of your project that is likely to be driving their need to find invisible differences.
Do you have a comment on this Story? –Email Me
All written, photographic and drawn materials are property of and copyright by NewWoodworker.com LLC 2000-2019. Materials may not be used in any way without the written permission of the owner.