
This is a Veteran Owned site
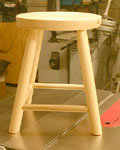 |
Turning a stool is easy and cheap, but good practice that results in a useful piece of shop furniture. Click image to enlarge |
Turning a Stool
Making a handy shop seat
Text & Photos by Tom Hintz
Materials List
1 - 12 ½"-diameter by 1 ½"-thick, Seat
4 – 1 ½"-square by 15"-long blanks, Legs
4 – 7/8"-diameter dowels – approx. 9"-long, Rungs (actual measurement taken during dry fit assembly)
Note: Because this stool is not tall or designed to be stood on, I used common pine for the one in the accompanying photos, mainly because there was enough in my scrap box. Hardwood will work as well of better and increase the strength considerably. Regardless of the material, stools are not for standing on.
Step 1
 |
 |
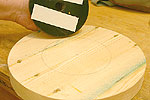
I attached the faceplate with tape only as this surface will become the top of the seat. The outer edge is turned to be basically round but will be refined later. Click images to enlarge |
|
After gluing up the seat blank and rough-cutting the circle to 12 ½" in diameter, I used a compass to draw a 6"-diameter circle at the center of the best looking side. The faceplate was attached to this side first, using double-sided tape only because this would become the top of the seat. The faceplate was then spun onto the spindle, the tailstock brought up and the live center tightened against the center of the blank as further security.
 |
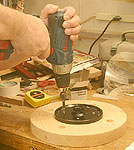
The leg holes are drilled at 15-degrees, angled towards the outside of the seat. Here, I use the Oneway DrillWizard that makes this precise and easy. Click image to enlarge |
Turn the outside edge just enough to true it up for now. Flatten the face until smooth and then temporarily retract the live center. Using a compass anchored in the point hole from the live center, draw a 8"-diameter circle on the face that will be used to locate the leg holes. Using the lathes index stops, mark the locations of the four leg holes, 90-degrees apart. If your lathe does not have the indexing feature, carefully lay out these holes by drawing on line across the center of the face and then use a square to add the second line 90-degrees to that.
Drill 7/8"-diameter holes, angled 15-degrees towards the outside of the seat. The holes should be approximately 5/8"-deep. I used a Oneway DrillWizard but a wedge cut to 15-degrees or a simple angle-finder could also be used to guide the drill by eye. However you drill them, be as consistent as possible.
Finish smoothing the face where the live center was and sand the face before removing the blank from the lathe.
Step 2
 |
 |
I used tape and screws (left) to install the faceplate on the underside of the seat. The seat area is dished out approximately 1/4" (right) to make it more comfortable. Click images to enlarge |
|
Remove the face plate and re-install it on the face with the leg holes using two-sided tape and 1"-long screws. I drew another 6"-diameter circle to help locate the faceplate precisely.
Mount the blank on the lathe and true the outside edge a final time. To make the outside edge look better, I tapered the outside edge, top to bottom, approximately 3/8". The bottom edge was rounded slightly while the top edge would eventually get more generous (what looks right) rounding to make using the stool more comfortable.
Flatten the face enough to smooth it. Starting about 1 ½" in from the outer edge, dish the seat to a depth of ¼" at the center. This dish makes the seat look right plus increases comfort. Some think the dish shape also helps keep your posterior centered on the stool. Round the top, outer edge before sanding the seat to at least a 220-grit finish.
Step 3
 |
 |
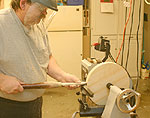
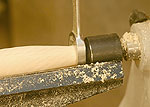
After sizing the tenon and tapering that end of the legs (left), a pair of holes, 90-degrees part is drilled for the rungs. (right) Click images to enlarge |
|
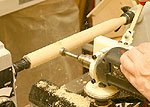
Carefully locate the center on each of the leg blank ends and punch a pilot hole. Mount a leg blank between centers and round it. I was able to round all four legs and maintain a 1 3/8"-diameter.
Measure the depth of the leg holes in the seat before turning a 7/8"-diameter, 5/8"-long tenon on the tailstock end of the blank. Taper the last two inches of the leg to flow into the tenon diameter. Repeat the process on the remaining three legs.
Step 4
Drill two 7/8"-diameter holes, 90-degrees apart, 4" from the bottom of the leg for the Rungs. These holes have to be angled 15-degrees towards the top (tenon end) of the leg. I put each leg back between centers to use the Oneway DrillWizard and the lathes indexing system. A wedge or angle-finder could also be used – carefully.
While each leg is back in the lathe, finish sanding them after drilling the rung holes.
Step 5
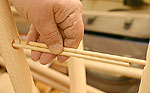 |
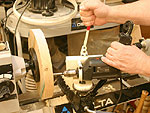
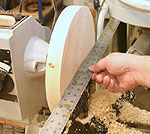
I used a pair of small dowels to find the average rung length. This is an easy, accurate method. Click image to enlarge |
Temporarily install the legs in the seat holes, the Rung holes aimed at each other. Using two 7" pieces of small-diameter dowel, measure the distance between each pair of legs. Hold the dowels together, slide them out until each touches the bottom of the rung holes and draw a line across them somewhere in the middle. Keeping the dowels in this position, check the distance between each pair of legs and average the distances found. Remove the dowels from the holes, hold them together with the line matching and measure the overall length to determine the final rung length. On the prototype, the distances varied a little under 1/8" so I cut the rungs 9 1/6"-long.
Cut the 7/8"-diameter Rung stock to length and test fit everything together. When satisfied with the fit, disassemble, apply glue to the tenons and the ends of the rungs before final assembly. Use clamps or large rubber bands to maintain tension on the legs against the rungs. Once the rungs are installed, use a dead blow mallet to make sure the legs are fully in the seat holes. Check to be sure that the legs are not canted out-of-square before allowing the assembly to dry.
Step 6
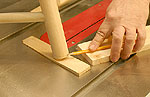 |
After shimming the stool level, trace the cutlines on the legs as described in the text. This is the easiest way I have found to level a stool. Click image to enlarge |
Unless you are either extraordinarily talented, or equally lucky, the stool will rock when set on a flat surface. The easiest way to cure this that I have found is to cut the angle at the bottom of the legs after the stool is assembled, using the method described below.
Stand the stool on a known flat surface, (I use my table saw) place a level on the seat and use shims to stabilize and level the stool. Usually one shim under the short leg and another under one other leg will level the stool and stop the rocking.
Find a scrap of wood that will space the point of a pencil just above the widest gap (from the table, not the shim) and use that combination to draw cut lines around all four legs while the stool is still shimmed level.
Use a hand saw to trim the legs and then return it to the flat surface. If the cuts were made accurately, any remaining rocking can be cured by a little work with a rasp or sanding block.
Once the stool rest solidly, sand a small bevel around the sharp bottom edge of the legs. This will help prevent chipping as the stool is slid on the floor.
The stool in the photos was finished two ways. The seat was given the three-step Beall Wood Buff treatment (I'm addicted to this system, sorry.) while the legs and rungs were wiped down with boiled linseed oil.
Do you have a comment about this story? Email Me!
All written, photographic and drawn materials are property of and copyright by NewWoodworker.com LLC 2000-2019. Materials may not be used in any way without the written permission of the owner.