
This is a Veteran Owned site
 |
||||||||||||||||
Using Gauge BlocksSafety and repeatable accuracyText, photos and video by Tom Hintz Posted/Updated - 9-10-2011 Often it is the simplest of things that can have the biggest effect. In the case of the Gauge Block, a simple piece of scrap wood can prevent dangerous kickbacks while making it possible to cut multiple pieces of the exact same length. Even better is that all woodworkers already have the materials needed to make a Gauge Block lying around in their shop right now. All you need to do is stop making excuses for not being as safe and accurate as possible. A Gauge Block also describes a work stop as used on a SCMS (sliding compound miter saw) or on a router table fence. The primary use on the table saw and router table is to prevent the wood from being in contact with the miter gauge, rip fence and blade at the same time. The drag on the end of the wood caused by the fence tries to rock the wood back using the miter gauge as a pivot. If this were to happen while in contact with the blade (or router bit) as major kickback is often the next thing you experience. Unfortunately, to many new table saw users having the wood on the miter gauge, fence and blade does not always set off their inner alarm because they have no experience with that situation. Once a new table saw or router table user either experiences a kickback or reads something like this story, it all makes sense. Let's hope that we can educate some folks before they have to learn the hard way by accident - as did so many of us from the pre-Internet era. The number of emails I continue to receive on this one issue suggests this story should be required reading for anyone considering pushing the ON switch of their table saw for the first time. Use It For Safety
Simply put, a Gauge Block is a spacer that prevents the workpiece from being in contact with the miter gauge and rip fence simultaneously. Without the Gauge Block, wood naturally wants to pivot back which will force it into the sides of the blade and that almost certainly begins a violent kickback. The other problem is that even if the kickback doesn't happen right then, without the gap created by the Gauge Block the cutoff piece of wood is trapped between the blade and rip fence. If you are exceedingly lucky, the cut off piece will lay harmlessly next to the blade until you can shut the saw off and the blade stops moving. Not likely. It is much more likely that the wood will jiggle around a bit (as it always does) and the spinning blade will grab it and shoot it out of the saw in your general direction. Keep in mind that predicting the actual speed (it will be substantial) or the precise direction of the short flight to your body is impossible. Predicting that the kickback will actually happen in this situation is way easier. Zero-Clearance InsertThere is a perception that installing a zero-clearance insert somehow prevents this kind of kickback. In fact, zero-clearance inserts do nothing to prevent this kind of kickback. The forces present during a kickback can easily distort the blade to the side, forcing it into contact with the insert. When that happens, the blade will often gouge into the insert and more often than not add your zero clearance insert to the flying objects, also coming your way. Using a wider opening in the insert is not the answer as too many have discovered. The real answer and the easiest/cheapest is the Gauge Block. Extending the Miter GuideA recent email from a NewWoodworker.com viewer described an idea he had that turned out badly. He attached a length of wood to his miter gauge that extended to the right beyond the blade and to the rip fence. He expected that the outboard fence would continue to support the cut off piece and push it beyond the blade as he made the cut.
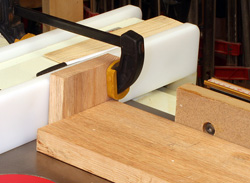
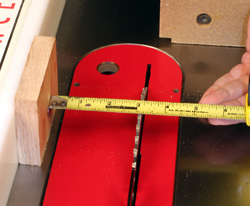
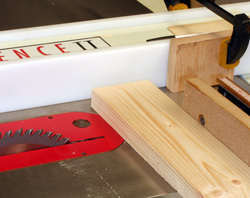
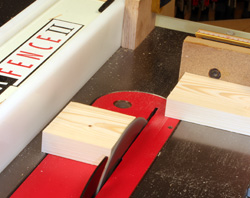
While this actually worked (he lucked out in a major way) a few times reality soon took over. The cutoff piece cocked between the fence and the blade and was kicked back hard enough to break off several inches of the auxiliary wooden fence he had attached to the miter gauge. His luck did hold out enough to limit his injuries to nothing more than a bruise and a couple of sore fingers. Setting Up the Gauge BlockThe most common Gauge Block is nothing more than a piece of ¾"-thick stock, clamped to the fence. Some use thicker material for Gauge Blocks because of the extra space it creates and that's fine. The main point to remember when setting up a Gauge Block is to place it far enough from the blade so that the workpiece can not contact the Gauge Block and blade simultaneously. To set the cut width, temporarily move the Gauge Block so it is directly in line with the blade and resting firmly against the fence. Measure the cut width from the surface of the Gauge Block to the edge of the blade. Remember to use the side of the blade that you need for that cut! If cutting a piece off you would most often measure to the side of the blade closest to the Gauge Block. However, for cutting grooves or dados you might have to measure to the opposite side of the blade from the Gauge Block.
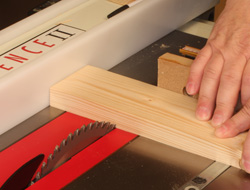
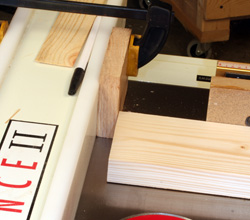
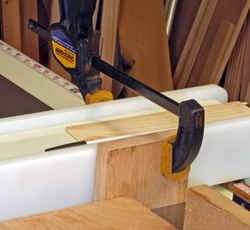
When satisfied with the fence setting bring the Gauge Block back towards the operator and clamp it to the fence as far back as is possible with the wood being cut. With the Gauge Block positioned correctly, the workpiece can contact it without touching the blade. Then, when the work piece is pushed forward it leaves the Gauge Block before encountering the blade. This is easy to achieve with most common sized lumber widths but when the workpiece is too wide to clear the Gauge Block before contacting the blade, you should consider using a cutoff sled, panel-cutting jig or similar device that eliminates the rip fence. Having the wood in contact with the Gauge Block, blade and miter gauge is no better than if it is contacting the fence itself, the blade and the miter gauge. Don't Be A HeroWhen each cut is completed, shut the saw off before trying to remove the cut off piece. The space created by the Gauge Block reduces the chances of kickback, but does nothing to protect your hands from the blade. Also, the cut off piece will be very close to the blade and any movement could initiate a kickback you might not have otherwise experienced. Repetitive Cuts
A secondary benefit of using a Gauge Block is being able to precisely cut many pieces to identical length. This is particularly useful when you nave to cut several pieces from one or a few boards. Set the Gauge Block and fence to the proper distance and you can cut your pieces with confidence they will all be the same size. Partial Depth CutsSome woodworkers feel it is OK to make partial depth cuts, such as cutting tenon shoulders with the work piece in contact with the rip fence and miter guide simultaneously. Of course, this is both wrong and dangerous for all of the same reasons laid out above. Since setting up the Gauge Block is so simple and just as accurate as any type of stop block or fixture, not using the Gauge Block is just dumb. Even with a partial depth cut, it is possible for the workpiece to cock during the cut and produce a kickback. Taking the few seconds required to set up a Gauge Block is a very small price for the safety it provides. Using a Gauge Block is a fast, simple (and usually free) way to make operating your table saw safer without compromising accuracy. this concept can also be applied to router tables. As is so often the case, learning to use even the simplest devices and techniques can substantially increase safety in our shops. Nothing is more important. See our story on building a clamp-free Gauge Block - GO! Do you have a comment about this page? - Email Me! |
||||||||||||||||
All written, photographic and drawn materials are property of and copyright by NewWoodworker.com LLC 2000-2019. Materials may not be used in any way without the written permission of the owner.