
This is a Veteran Owned site
 |
|||||||||||
The Art of Using Wood Glues
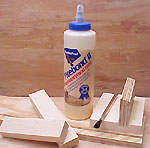
Sticky situations should be intentionalText and photos by Tom Hintz Next to cutting wood, gluing it together is one of the most common of woodworking procedures. New woodworkers usually have a far better understanding of how to cut wood apart than how to glue the pieces back together, evidenced by the large number of glue-related questions received at NewWoodworker.com. This story was built around the most common of those questions. It is tempting to explore the complex world of adhesive chemistry and engineering behind modern wood glues, but those types of articles tend to educate the author and bore the reader. How the products of those manufacturing efforts are applied in real-world situations is far more useful to new (and many veteran) woodworkers. A topic that may be surprising by its absence here is the discussion of what glue to use for specific tasks. While there are many good quality glues available, the vast majority of woodworking projects are assembled with yellow glues, most notably Titebond (Franklin Adhesives), or Titebond II, their weatherproof version. Multi-part epoxies remain useful, primarily for adhering non-wood materials to wood. Polyurethane glues are increasingly popular for outdoor and some high-stress applications. Even CA-(cyanoacrylate) glues are finding their way into woodworking, but for the vast majority of our projects, the basic yellow glues serve our needs. How Wood Glue WorksThe fact that wood is essentially a mass of fibers running in a generalized direction can be used to our advantage when gluing pieces together. When the fibers within two pieces of wood being joined are positioned correctly, modern adhesives can create a bond that is often stronger than the wood itself. The fibrous consistency allows the adhesive to form this bond IN not just ON the surface of the wood being joined. This is an important point to remember as it influences decisions on how bonding techniques are applied during the process of building virtually any project. The penetration of glue into the wood can be influenced by the speed at which it sets up. Generally speaking, the longer glue remains in a liquid state, the deeper it can soak into the wood fibers. Of course, the degree of penetration is directly related to the type and hardness of the wood. Softer wood is far more porous, usually allowing glue to penetrate far deeper than a harder wood. The porosity of even very hard woods still allows sufficient penetration for modern glues to form a very strong bond. Not long ago you could rate the strength of a glue joint by how long it took to dry. Longer dry times equaled deeper penetration, which generally translated to stronger joints. Longer dry times also result from different ingredients and formulas that create a stronger bonding material. That relationship between dry time and joint strength is less of a consideration today, but should not be completely disregarded. Grain Orientation
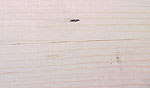
Reading the grain in the wood being glued is important. The alignment of the grain structure within two pieces of wood greatly affects the strength that can be expected in a glue joint. First, understand the terminology. When the grain along the joint line runs parallel to each other we call that a "long grain to long grain" situation. If the ends of the grain in one or both pieces at the glue line, that is said to be "short grain" joint. Long grain to long grain produces the strongest joint because the glue can "grip" the fibers along their length. Conversely, when one or more short grain sections are involved, the joint will be substantially weaker because the glue has only the ends of the grain to grip. Hold a common pencil by the point (short grain situation) and then tug on the eraser end with your other hand. You can easily pull it from between your fingers because there is little surface to grip. Hold that same pencil around the middle, simulating a long grain situation, and have someone tug on the ends. The pencil is likely to break before those same fingers lose their grip. Being able to get your fingers around the pencil, as the glue gets around the wood fibers, greatly increases the holding power. Those same principles apply when gluing pieces of wood together. Mechanical AssistanceHaving one or more short grain glue surfaces in a joint is sometimes inescapable. In these situations, adding some form of mechanical fastener to increase the joint strength is necessary. Screws and nails are often the first mechanical fasteners that come to mind, and they do have their applications, but other techniques like biscuits, dowels and splines can add at least as much strength to a joint with little or no visual impact on the project.
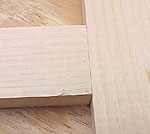
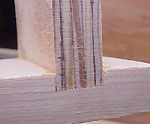
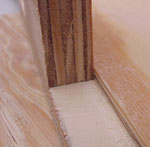
Probably the most common long grain to short grain joint occurs when making box-based projects, particularly when installing shelves or other dividers within them. Letting the short grain ends of crosspieces into dados cut in the long grain boards is the most common solution. The dado provides substantial strength by removing nearly all of the shear forces from the end grain and reducing the job of the adhesive to retaining the crosspiece within the dado. Biscuits and other mechanical enhancements when used without the dado also add mechanical strength to these types of joints, but at a lesser level. When the size of the piece being supported is small or will see limited weight in use, biscuits or dowels might be a good choice. In most cases, to be safe, dados remain the best choice. PlywoodJust when you start to understand how grain structure interacts with adhesives, along comes plywood to confuse the issue. The alternating grain directions within plywood is what gives it strength, but it also means gluing along any of its edges is not going to produce a strong joint. I treat all plywood as short grain and take appropriate precautions according to the situation. Glue CoverageAnother problem that can negatively affect joint strength is inconsistent glue coverage. While this would seem like an easy task to master, remember that different wood species absorb glue at different rates. Differences in the consistency within each piece of wood also create varying absorption rates. The amount of glue necessary to bond two pieces of oak together might be nearly completely absorbed by softer woods such as pine, resulting in a glue-starved joint in the pine that will almost certainly fail.
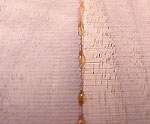
I spread what I think is enough glue and then go back over the surfaces looking for spots that have absorbed more glue than others. Adding a bit more glue to these "dry" areas is good insurance. When I do edge joining, small beads of glue appearing consistently along the joint line when clamping pressure is applied tells me the glue coverage is probably good and the joint will be consistent and strong. The small beads also mean scraping away excess glue is going to be easy when the joint dries. As important as using the right amount of glue is spreading it evenly across the joint. If one portion of a joint has considerably more glue than the rest, the pieces being joined can be miss-aligned, and can slide out-of-line as clamping pressure squeezes excess glue out of the joint. As the glue escapes, clamping pressure is reduced, making it easier for parts to slip out of position. Using equipment like glue brushes or roller-tipped glue bottles not only makes applying the adhesive faster, they help apply it evenly. A Word About Polyurethane GluesPolyurethane glues expand in a foaming process as they cure. Learning to use the right amount of glue can be a little tricky, and best learned through experience. The good news is that excess foam that emits from the joint can be scraped or cut away. Some depend on this foaming action to fill the joint and only apply a line of poly glue along the joint. I like to spread it out, just as with other glues but in a slightly thinner film. Again, practice is the best teacher here. Removing Excess Glue
Dealing with glue squeezed from joint lines is a fact of life. How and when to remove that excess has been the subject of occasionally heated conversations for decades. Some wipe excess glue away with a damp sponge, rag or paper towel before it sets up. Others leave the glue untouched until dry and then scrape the beads away. In both cases, sanding will be required; the core of the debate is over how much. I tend to let the glue dry and then scrape away the dried beads. Wiping wet glue has given me trouble when some of the excess glue would be rubbed into the pores of the wood. This small amount of glue can be all but impossible to see until the application of finish defines the portion of the wood sealed by that thin film of glue. At that point, the only remedy is to sand the piece again, removing enough material to eliminate the rubbed in glue. I have had much better success with letting the glue dry and scraping the excess away. However, many are successful in wiping up the still-wet glue. The choice is yours. The EnvironmentAdhesive performance can be affected by temperature, moisture, surface finish and surface contamination. Modern wood adhesives are exceptionally strong, but can still be compromised by the same old problems that have weakened glue joints since glue was first applied to wood. Temperature - Most wood glues are designed to function in temperature ranges beginning in the low to mid 50's. For most woodworkers this is not a problem as shop temperatures are generally above that. In the rare instances when I think my shop temperatures are nearing the lower end of the adhesive operating range I train a pair of halogen work lights on the joint, positioned just close enough to gently warm the area. Warning: Halogen lights (and other types) produce a considerable amount of heat that can represent a fire danger if used inappropriately. Be careful how close lights or any other heat source is placed to any combustible material. We only need to warm the parts slightly. Excessive heat does nothing good for joint strength but can easily represent a fire hazard.Moisture - The amount of moisture within the wood being joined can be tough to determine without the use of a good moisture meter. Some lumber suppliers store materials outdoors, subjecting them to vast humidity changes, if not rain directly. While the surface of the wood can feel dry, excessive moisture content within it can weaken a glue joint. Short of building your own kiln, paying attention to the feel of the wood when you buy it and letting it acclimate to the shop environment adequately are your only viable options. Adding a moisture meter to the shop may be the only way to accurately deal with this situation, particularly if wet wood is a common problem in your area. The exception to the moisture problem is polyurethane glue that actually needs moisture to cure. Even these glues can suffer if too much moisture is present however. Joint Fit - Modern adhesives are extremely strong, but so are the forces within a piece of wood. Squeezing an ill-fitting joint together is a good way to insure a failure in the not-so-distant future. Taking the time to make a tight fitting joint line is the only way to make full use of the strength modern adhesives offer. Contamination - While substances like oil and wax are no-brainer contaminants, simple saw dust can also compromise the strength of a glue joint. Saw dust is essentially short grain material and does nothing to enhance joint strength. In surprisingly small quantities, saw dust can wedge the pieces out of line or create gaps in the glue joint. Removing dust, chips or splinters from a joint requires little effort or time but can save hours of repair time. It's your choice. Information Makes Strong JointsTaking a little time to learn about the adhesives you are using is important, and can eliminate many of the common problems new woodworkers encounter. Beside the information packaged with adhesives, manufacturers often have tech lines and web sites which offer answers to many of your questions. Reading up on the capabilities and requirements of your adhesives will greatly enhance your chances of producing long-lasting glue joints.
|
|||||||||||
Do you have a comment about this page? - Email Me!
|
All written, photographic and drawn materials are property of and copyright by NewWoodworker.com LLC 2000-2019. Materials may not be used in any way without the written permission of the owner.