
This is a Veteran Owned site

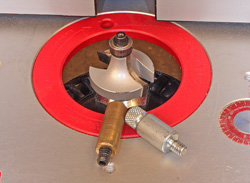 |
I get way too many emails from folks wanting to know what these "things" are for that came with their router plate or lift. they are Starter Pins and you need to know how and when to use them! Click image to enlarge |
Using Router Plate Starter Pins
Simple safety hardware and technique
Text, photos and video by Tom Hintz
Updated - 11-22-2011 (In Progress)
Bearing tipped router bits extend the versatility of a router table by making it possible to get ultra-consistent cuts in straight or curved stock that would be impossible to duplicate using a fence. The problem with many of these freehand operations is starting the cut safely. As the size of the wood being worked with gets smaller the danger gets a bunch larger but starting any cut controlled by the hand alone is dangerous.
It is important to realize that using a starting pin does not reduce the need for common sense hand protection. I like to use a push handle or my favorite, the rubber-soled push block whenever possible. No matter what we are doing on a router table it is important to consider where your hands will go if the wood kicks out. Large work pieces are less susceptible to being kicked out but it remains possible - and dangerous. The deceptively low-tech starter pin does wonders for controlling the start of these cuts where things can so easily go very wrong.
What It Is
A starter pin really is in many cases a sort of pin. Some are machined pieces of steel or brass while others are more like bolts equipped with a free-spinning plastic barrel. Most are 3/8" to ½"-diameter and screw into tapped holes to either side of the router bit. Better router plates or lifts will have a starting pin threaded hole on four sides of the bit to give you the most options.
 |
 |
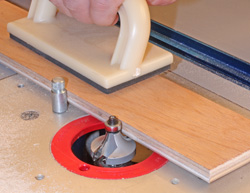
Sometimes it is best to use the starter pin close to the bit (left) especially when you have a long edge to work on. The ends of narrower stock might need the starter pin (right) farther away from the bit so that you can get the wood started safely. You might have to change the starter pin position one or more times during a single job to stay as safe as possible. Click images to enlarge |
|
When installing the starting pin we need to think about the job for which it is being used. Holding the wood near the bit and thinking the cut through before turning the router on can give you a better idea on which hole in the plate will be easiest and safest to use. I have started out using one starting pin location but found that another might be better or safer later in the operation. Don’t be afraid to try more than one location.
Using a Starter Pin
It is important to remember that a starter pin does not change feed direction. The stock must be fed against, not with the rotation of the bit. In most configurations, the wood is cut on the front side of the bit in relation to the operator because that gives you the best control as well as easy access to a starting pin.
To start the cut, the wood is held against the starter pin and then rotated into the bit. When the wood contacts the bearing, begin the right to left movement, sliding the wood against the starter pin and bearing. When working on a narrow end you may never take the wood away from the starting pin. With larger pieces you may use the string pin just to get started. Then after routing a few inches on the stock it might be safe to leave the starting pin to complete the cut.
Video Tutor |
Starting pins are almost always used with a bearing-tipped router bit. You can’t use a starting pin to control the depth of a cut, that is the bearing’s job. We also do not have to increase the pressure against the bearing when using a starting pin. The wood should be held against the bearing firmly enough to maintain contact but pressing harder just risks breaking the bit or making a long dent in softer woods where the bearing has been pressed into it.
Using a starter pin is a simple skill but one that should become a habit. It takes only seconds to install a starting pin but it can afford you a bunch of protection from dangerous kickouts or surprisingly powerful lurches of the wood, either of which can cause serious injury. There is a reason router plate manufacturers include starting pins with their products!
Have a comment on this story? - Email Me!
Back to the Tips & Tricks List
All written, photographic and drawn materials are property of and copyright by NewWoodworker.com LLC 2000-2019. Materials may not be used in any way without the written permission of the owner.