
This is a Veteran Owned site

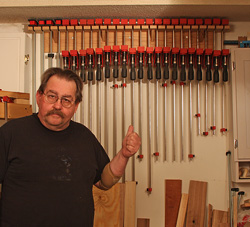 |
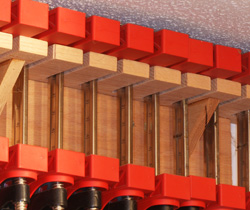
Despite posting thousands of photos and hundreds of videos with cool tools and stuff in them, a bunch of you are focused on the clamp rack in the background. I give up! the info is in this story! Click image to enlarge |
Parallel Jaw Wall Clamp Rack
In response to a sudden flood of emails – and a secret petition?
Text, photos and video by Tom Hintz
Posted – 11-14-2011
Somebody spotted the official NewWoodworker.com Wall-Hung Clamp Rack in the background of photos and video on my site and apparently has organized a grass roots group urging me to tell more about it. The NewWoodworker.com Wall-Hung Clamp Rack is nice and works great but the sudden demand for info on it caught me by surprise. Even more surprising is what appears to be a clandestine petition from 70-some members of a forum that supposedly doesn’t like my site – or me…. But, being the nice guy that I am - and being a little concerned about what lurks behind that petition…here is the info!
The Basics
I used ¾”-thick red oak lumber for the rack because I thought it was tough enough and I had enough of it in the shop. The upper slotted piece is 55”-long and 5”-deep. The wall piece is 48”-long and 6-1/4”-tall. The slotted piece is simply glued on top of it and that joint re-enforced with screws. The wall piece is centered under the slotted piece. I cut four triangle-shaped gussets and glued and screwed them (from the back and top) to add strength to this butt joint even though it is long grain to long grain. Note that the triangular gussets are located between slots. The slots themselves are 3/8”-wide, 3-1/2”-deep and positioned 2-1/4” (on center) apart to give the clamp heads a little room between them.
The length of the NewWoodworker.com Wall-Hung Clamp Rack was computed by measuring how much space I had on the wall between my photo equipment cabinet and the first storage cabinet on that wall. Not very scientific and not much ciphering but it fit. The other critical dimension was how far down from the ceiling to place the upper surface of the NewWoodworker.com Wall-Hung Clamp Rack. Here again science was replaced with lots of practicality. I just measured the thickness of the fixed jaw of the parallel clamps that would go in the rack and added ¾” or so to make putting the clamps in the NewWoodworker.com Wall-Hung Clamp Rack easy. In my case that put the top surface of the rack 2-1/4” down from the ceiling.
Cutting the Slots
 |
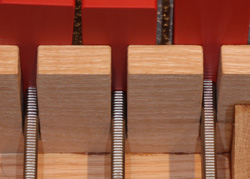 |
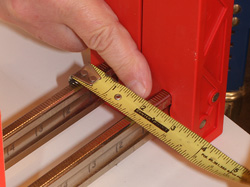
There is nothing spooky about how I arrived at the slot separation. I put two clamps together (left) and measured across the bars and added 3/8" or so. That separation in the finished rack (right) does keep the heads apart. Score one for me! Click images to enlarge |
|
I arrived at the 2-1/4” spacing between clamp positions by laying two clamps on the bench with their heads touching. Then I measured across the bars and added 3/8” to keep them separated in the NewWoodworker.com Wall-Hung Clamp Rack. When laying out the top piece for the slots I started at the center and worked my way out until I ran out of wood. That ended up giving the NewWoodworker.com Wall-Hung Clamp Rack a 24-clamp capacity in the space I had available.
To cut the slots I first made a layout line about 3-1/8” back from the front edge. This is the place that I wanted to drill 3/8”-diameter holes on the center marks of the slots. I chose 3/8” because that would allow a bit of space on either side of the clamp bars yet should keep the heads separated.
After drilling the holes I used a combination square to draw lines from the sides of each hole to the front edge of the top rack piece. Then I used a jigsaw to cut on the layout lines from the front edge back to the sides of the holes to form the slots. I tried using a square to guide the jigsaw to make nice straight edges but getting the cut started at the correct spot was harder that way so I just took my time and cut them by hand. Sorry, nothing high-tech here either. Just a guy at peace with his jig saw.
Assembly
I glued the top piece to the wall piece with Titebond Ultimate wood glue. I chose that glue because it was at the front of the cabinet. I am confident any of the Titebond glues would work but the Ultimate bottle was right there…..
 |
 |
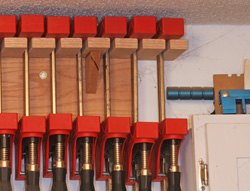
The overall width of the rack (left) was limited by the space between cabinets on my wall. During assembly I added four gussets (right) to add some strength to the rack. Click images to enlarge |
|
I added screws along the edge where the top piece and back piece met. I drilled and countersunk holes before installing 2”-long deck screws. (Yes, I use deck screws a lot in my woodworking! No petitions please) I further re-enforced that joint with 4 triangular gussets spaced sort of evenly under the top piece (where else would gussets go?) and making sure that they were between slots so I wouldn’t look stupid later when trying to put clamps into slots partially blocked by the gussets.
I considered applying some sort of finish to the NewWoodworker.com Wall-Hung Clamp Rack but that would have meant sanding and stuff so I skipped that step and went right to installation. If you enjoy or at least don’t hate sanding go ahead and finish the rack as you like. I won’t be coming over to yell at you about it.
Installation
I have never had anything fall off of the wall after I hung it there so I decided that 5/16”-diameter by 4-1/2”-long lag screws would keep that record going when hanging the NewWoodworker.com Wall-Hung Clamp Rack. Remember that the fasteners have to go through the ¾”-thick wall piece, the 5/8” (or so) wallboard and then into the studs. A little extra length here is just good sense.
I made a level line on the wall where the bottom of the NewWoodworker.com Wall-Hung Clamp Rack would be and then used my electronic stud finder to locate the studs and marked those positions on the level line made earlier. That gave me three studs so I transferred those locations to the wall piece and drilled 5/16”-diameter holes about 2”-down from the slotted piece.
After locating the position of the center lag I pre-drilled that hole for the lag and used that to get the NewWoodworker.com Wall-Hung Clamp Rack on the wall. I snugged down the first lag and then leveled the rack and drilled the remaining two starter holes right through the rack and installed those lags as well. I snugged all of the lags down and began putting clamps in the NewWoodworker.com Wall-Hung Clamp Rack. Note that I put steel washers roughly 1”- in diameter under the heads of the lags just to spread the force out over more wood. It’s a cheap but effective way to increase the holding power of the lags.
Video Tutor |
Conclusions
I am very happy with how the NewWoodworker.com Wall-Hung Clamp Rack came out. It has been up there for about five years and has been fully loaded virtually the whole time and has not fallen down. That is a victory. None of the clamps have fallen out either so that is another victory. Finally, the NewWoodworker.com Wall-Hung Clamp Rack still does not have a finish on it so that is the final victory for me!
I do not have a plan for this rack because A: It’s way too easy and B: you have to make it fit your space and clamps so a drawn plan would be pretty useless. If you just wanted to give me some money, use the “Donate” button under the header of this (and every) page. $10 should do it.
Have a comment on this story? –Email Me!
All written, photographic and drawn materials are property of and copyright by NewWoodworker.com LLC 2000-2019. Materials may not be used in any way without the written permission of the owner.