
This is a Veteran Owned site
Aligning Contractor-Style Blades
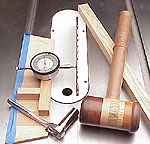
Tweaking your trunnionsText & Photos by Tom Hintz SAFETY: Throughout this procedure you will be working at or near the blade and the internal workings of your table saw. The saw should always be unplugged from the power source and the drive belt removed from the motor when performing the tasks described in this story.
|
 |
 |
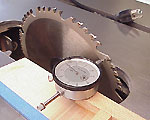
Using one tooth to measure at the front and back eliminates most problems with the blade from the equation. Take both readings from as far to the front and to the rear as possible, with the blade raised to full height. Click images to enlarge |
The procedure described below does eliminate a bent blade or arbor from the equation but it is best to repair that kind of damage before continuing. Aligning the blade with the miter slot will not compensate for a damaged blade or arbor. Problems will remain with safety and the quality of cut.
Step 2 - Measure the Alignment
Make sure the blade is installed properly and that it is clean. Pitch or other contaminants on the side of the blade can be several thousandths thick, rendering these measurements taken in that area useless.
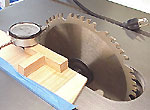
Raise the blade to its full height and make a dot with a felt tip pen at the base of one tooth, slightly lower that the gullets. Move the marked tooth as far forward as possible and place the dial indicator probe at the center of the dot. Zero the dial indicator, lift its probe from the dot, and rotate the marked tooth to the rear and carefully set the dial indicator on the dot. Note the difference between the readings taken at the front and rear to determine the amount your blade is out of line with the miter slot. I normally repeat this measurement three times to be sure I get the same reading each time.
Record the amount the blade is out of alignment and whether the rear of the blade is too close or too far from the miter slot.
 |
 |
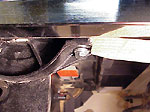 |
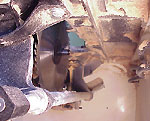
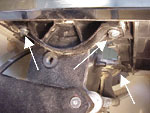
(Top) You may be surprised at the amount of debris under the table of your saw. Clean it out. (Center) these are the three easier trunnion bolts to get at. There is another to the left of the front trunnion that can not be seen here, or ever is some cases. (Bottom) Use a piece of wood on the trunnion and tap that with a mallet. Cast iron could break if hit with a hammer. Click images to enlarge |
Step 3 - Adjust the Trunnions
Tip: Now would be a good time to clean out the undercarriage of your saw. You know, the task you never quite get around to until the height or tilt mechanism starts binding up? An old paint brush with stiff bristles is great for getting sawdust out of crevices. Compressed air works also but remember that you are blowing the dust around inside a box so completely enclosed eye protection is needed. Once the dust is loose, vacuum all the debris out that you can.
Most contractor-style saws have front and rear trunnions, the front being the one closest to the operator side of the machine. Each trunnion is secured to the underside of the cast iron table, usually with two bolts. Normally each bolt has a lock washer and a flat washer between it and the trunnion to help resist loosening during use. It is not necessary to remove the bolts or washers unless they are obviously cracked or broken, both rare occurrences.
Loosen the rear trunnion bolts just enough that the trunnion can be moved with some effort. We do not want the bolts so loose that the trunnion moves freely or hangs away from its mounting pads.
Loosen the right side mounting bolt at the front trunnion and then loosen the left side mounting bolt of the front trunnion slightly. Leaving some tension on the left front trunnion bolt allows the assembly to be moved in small predictable increments for adjustment.
Some people do not loosen the left bolt on the front trunnion at all but this can be a dangerous practice, as trying to make the adjustment could put enough strain on the trunnion to snap the casting. I've heard from more than one woodworker who had done just that.
Using a piece of hardwood as a drift, gently tap the rear trunnion to move it as needed to bring the blade into alignment and then snug down both rear and the right front trunnion bolts.
Never use a hammer directly on a casting. Castings are relatively brittle and can chip, crack or break when struck with the hard face of a hammer. Using a piece of wood will deliver all the force necessary to nudge the trunnion into adjustment.
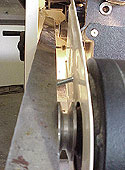 |
While you are at the back of the saw, check the alignment of the pulleys and motor, plus the condition of the drive belt. Click image to enlarge |
Step 4 - Check Your Progress
Because the blade is between the trunnions, adjusting one changes the measurements at BOTH ends of the blade. Measure the blade alignment exactly as you did in Step 2 and record the results to check your progress. Repeat steps 2 and 3 until the measured distances at the front and rear of the blade are equal or the variance is a maximum of 0.010" or under. With a little work, you should be able to get the blade within 0.003" of perfect, or less.
The trunnions may move slightly when the bolts are tightened, throwing the blade alignment out a bit. Fortunately, they usually move the same direction and amount each time. If you notice this movement, note the dimension before and after tightening. This will allow you to over-compensate the adjustment by that much so they pull to zero when the bolts are tightened.
Step 5 - Tighten and Final Check
Carefully tighten all four trunnion bolts. Though we want these bolts good and tight, care must be taken to not get carried away and break or strip them out. If the manufacturer provides a torque setting, borrow or rent an appropriate torque wrench and set them accordingly. With all four trunnion bolts tight, go through Step 2 once again to make certain the blade remains in alignment. If everything stayed put, you are almost done.
If the alignment changed in final tightening you have no option other than going back to Step 2 and re-setting the alignment.
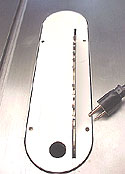 |
Carefully check the clearance between the blade and your throat insert. You may have to re-cut zero clearance inserts after adjustment to prevent the blade from throwing it out. Click image to enlarge |
Step 6 - Check Rotation and Insert Clearance
Before re-installing the drive belt, slowly turn the blade with a piece of wood to be sure no part of the rotating assembly makes contact with anything within the saw. Repeat this check with the blade fully elevated, and again with the blade at its full tilt.
Return the blade to zero tilt and install the throat insert. Check for adequate clearance between the blade and the sides of the insert opening.
If you use a zero clearance insert, remember that the alignment process moved the blade, altering its position within the insert. The insert should be re-cut for safety. Taking the time to clamp a board over the insert and raising the blade through it like when the insert was new could prevent injury to you and damage to the saw!
Adjusting blade parallelism on a contractor-style saw can be a challenging task, but one that gets a little easier as you become familiar with it and the tools needed.
Blade parallelism should be checked occasionally, with the frequency of the checks based on how much you use your saw. Checking blade alignment monthly is a good base line for preventing problems.
See these related stories on NewWoodworker.com!
Do you have a comment about this page? - Email Me!
All written, photographic and drawn materials are property of and copyright by NewWoodworker.com LLC 2000-2019. Materials may not be used in any way without the written permission of the owner.