
This is a Veteran Owned site
![]()
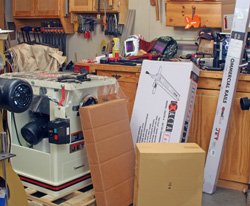 |
Getting a new table saw is a good thing, unless you try to rush assembling it. this article looks at how I set up my new JET Deluxe Exacta Saw. I also include my longest video to date at the end of this story to provide more detail. Click image to enlarge |
Assembling a New Table Saw
Or preventing future headaches with logic now
Text, photos and video by Tom Hintz
Posted – 6-14-2011
An early rite of passage into the world of woodworking is assembling a new table saw. Most saws are fairly easy to put together but that process can be peppered with ways to make it operate below its potential or even make it more dangerous than necessary.
This story was inspired by things I have learned over the years along with common problems that NewWoodworker.com viewers have encountered. It is important that you read the instruction manuals that came with your table saw and follow the procedures and specifications that they contain.
You must also remember that many of the components that make up a table saw are somewhere between “sorta” and really heavy. I have built many table saws by myself but the ones that I had help with went together easier and way safer. I still have all of my digits but am not totally sure why. Take your time, use the right equipment and/or help and be as precise with your adjustments as you can. Nothing works better (or safer) than a properly set up table saw which is something new woodworkers need more than any other group of woodworkers.
Save the Trash
I have learned the hard way that important pieces, including some surprisingly large ones can hide themselves in packing that comes with a new tool. If you throw trash out as you go you could be setting yourself up for a very frustrating surprise later on.
 |
 |
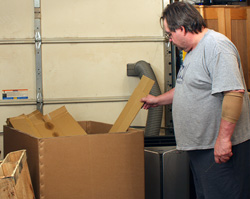
I save every bit of trash (left) generated by putting a saw together. You would be surprised at the size of pieces that can hide in packing materials until they are hauled away and THEN you realize something is missing.
There is nothing to be gained by building a saw and then trying to get in in a mobile base. (right) I put the saw in the base as soon as possible because I have tried it the other way, once. Click images to enlarge |
|
When I begin unpacking a machine and checking everything for damage etc. I save one good-sized box or even a big garbage bag and put all of the machine-related trash in that container. That container and its contents remain in my shop until the machine is fully assembled, adjusted and working correctly. Some like to check off the parts they use on the list that comes in some instruction manuals and that is a good plan but save the trash anyway! Once the machine is up, running and all is well the trash can be disposed of safely.
Mobilize Early
Note: If you are building a contractor style or other type of saw where the blade trunnion is attached to the underside of the saw top aligning the blade to the mire slot now can be much easier. In many cases this adjustment is easier with the saw turned on its side or fully upside down. If this is how your trunnion is mounted align the blade and miter slot and then put it in the mobile base.
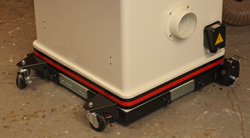
If your new saw is going to live in a mobile base put it in that base as early in the assembly process as is possible. The saw is only going to get heavier and harder to handle as the assembly proceeds so make your life easier and put it in the base right away.
Cabinet saws are a no-brainer and should go in the mobile base almost immediately. For saws on open leg sets I assemble the legs with the fasteners just snugged up. I put the leg set in the mobile base and then attach the saw to the leg set. That lets me level the table saw (already on its legs) and then tighten up the legs to lock it in that position. That cancels out any small leveling errors in the mobile base. Getting the saw as level as possible makes it easier to set up and use outboard work supports.
Blade & Miter Slot
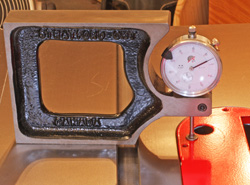
 |
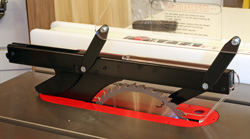
This is a great time to get the miter slot perfectly parallel to the blade, or as close as possible. I was able to get this saw parallel down to whatever about 1/3rd of the width of a dial indicator line represents. that's close enough to perfect for me. Click image to enlarge |
Before adding things like extension wings and fence rails it is a good idea to make sure that the blade is actually parallel to the miter slot. This is a “core” alignment that can make a table saw perform better as well as dramatically reduce the tendency to instigate a kickback. On most cabinet saws as well as some hybrids the top surface is joined to the cabinet with four bolts, one in each corner. That makes this a great time to do this alignment.
Take your time and get this alignment as good as you can get it. I realize some think that they can get this close enough with a simple stick and screw arrangement but I am a firm believer in seeing exactly how my adjustments are working out. For that reason I use a Woodpeckers Saw Gauge dial indicator. With this system I can literally see changes under 0.001” which allows getting this critical alignment virtually perfect. Actually with this JET Deluxe Exacta™ Saw I found that the table was 0.003” or so out of parallel to the miter slot. After a few minutes I was able to reduce that to whatever about whatever one third of the width of a single line on the dial indicators face works out to.
If you are working with a contractor or similar saw with a trunnion that bolts directly to the table surface from underneath you may have to settle for 0.003” or so. Take your time regardless of what type of saw you have and get this as close to perfect as your nerves allow.
Blade Guard System
This is also a good time to install the blade guard system and check all of its alignments. The mount for the splitter plate and/or riving knife must hold them directly behind and centered on the blade. I have seen people try to cheat the splitter or riving knife to one side or the other for various reasons and all they get for the effort is stock catching on the splitter or riving knife. Take your time, follow the manufacturer’s instructions to get the splitter and/or riving knife right. Also check the remaining components such as anti-kickback pawls and the blade guard itself to be sure they are aligned properly and work freely.
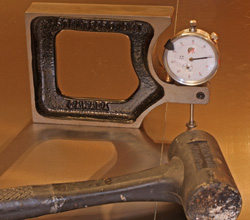
 |
 |
I also took this opportunity to check the blade guard system (left) and its alignments. while there I also adjusted the throat insert (right) so that it was about 0.001" below the table surface just to be sure that the wood does not catch on the inserts edge during a cut. Click images to enlarge |
|
We also need to get the throat insert flush with the table surrounding it. That is a bit easier now without the table extensions and fence system to get in the way. I again use my Multi-Gauge from Oneway to get the insert about 0.001” below the table surface just to be sure the wood won’t catch on it during a cut.
Table Wings
My JET Deluxe Exacta™ Saw has cast iron extension wings which everyone wants but few want to install, especially alone. Putting these wings on really should be a two-person job but that would mean waiting until who-knows-when for extra help to arrive so I did it myself. Remember that this does not mean going it alone was smart, just that it worked.
I have found that standing the cast iron wing on end makes it easier to control while getting the first (end) bolt started. It is important to have the bolt running all the way through the web that it screws into on the table saw top. Then I can then pivot the wing down and get the bolt at the other end started with its threads going all the way through the web again. I can GENTLY lay the wing on the bolts while I get the wrench and tighten both just enough to bring the flanges on the wing and the table saw together. I want to leave the wing just loose enough that I can rap it with a dead blow, plastic-covered mallet to persuade it in the final position. With the front edge of the wing flush with the front edge of the saws table and the top surfaces more or less aligned I can install the center bolt and turn it down so that there is just a little drag on it.
 |
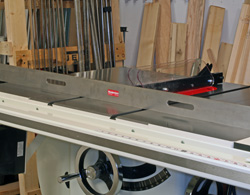 |
I used my Multi-Gauge dial indicator to get the extension wings (left) perfectly flush with the main table surface. My long Woodpeckers Straight Edge (right) shows me that the table and extensions are all flat. Click images to enlarge |
|
To get the wing extensions absolutely flush with the table surface I use my Multi-Gauge. I set it on the table saw surface and zero out the dial indicator. Then I can slide position it so that only the plunger is on the extension wing at one end. I rap the extension with the dead blow mallet until the dial indicator almost goes to zero. I stop there and tighten the bolt at the end just a little more. Then go to the other end and repeat then process, again stopping with the needle just before it zero’s out. I stop there because as you adjust one end, the other end of the wing changes a bit as well. Once the ends are close to flush that change is dramatically reduced and I rap on the table to zero out the Multi-Gauge at both ends.
When both ends are flush and tightened down I go to the middle bolt, first making sure that there is some tension on the bolt. Sometimes you need to rap on the center of the wing just a little to get it perfectly flush with the saws table. With that extension wing flush to the saw table all the way across I can move on to installing the other wing.
After both wings are installed and flush with the main table I get out my long Woodpeckers steel straightedge and make sure that the main table and both extension wings are flat across their full length. Though it is rare with better machines you might find a wing that is drooping downward or swept upwards just a little. To fix that you can insert pieces of common writing paper, 3/8” to ½” wide between the mating surfaces between the saw table and that wing, along the bottom of the mating surface to relieve a droop or along the top edge if the wing is swept upwards. This process is pure trial and error so take your time. The good news is that this kind of “repair” is not needed very often.
Fence Rails
The next challenge is getting the front fence rail installed as per the instructions. The distance from a specified surface on the front rail to the table surface is critical and is where many get tripped up. This dimension is what locates the rip fence so that it is level with the table saw surface. The instructions call for the top of the front rail on my JET Deluxe Exacta™ Saw to be 9/16” below the table surface. Believe it or not, that is a surprisingly simple dimension. Some fence systems require hard to measure dimensions like 64ths of an inch for the fence to perform well. Whatever the dimension is on your saw, you have to get this right.
 |
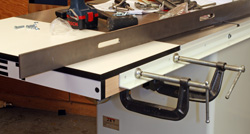 |
The front fence rail (left) must be at a specific distance below the table surface for the fence to work right. This dimension is in your instruction manual and you should take pains to get it right! The rear rail (right) usually has no specification so I just make sure that it is level with the table surface. Installing the extension table (right) can be frustrating but must be right so settle down and take your time. I like to use C-clamps because they can be easily adjusted to let me rap the table up and down with my dead blow mallet. Click images to enlarge |
|
I install the front rail with the screws, washers and nuts and snug them up so that they hold the fence rail in position. As with the table extension tables I want to be able to use my dead blow mallet to “rap” the front rail up or down to get it where needed. I set my 6” combination square to 9/16” and used that to check my progress. It really didn’t take very long for me to get this rail right. I tightened all of the bolts and checked it once more, end to end to be sure that it hadn’t moved and it had not. While the rear rail seldom has a spec, I adjust it level in relation to the table surface. You will see a bit later that this rail is part of the mounting system for the wooden table that fills the space between the fence rails.
Extension Table
Before bolting on the main fence tube we have to install the table extension because its mounting screws run through the front and rear rails. Getting this table flush and flat to the cast iron saw table would seem to be easy but sometimes it isn’t.
To hold the table in place initially I used four C-clamps. They allow me to reduce the clamping pressure enough so that I can rap (yes, the dead blow mallet again) the table to make needed adjustments. A good straightedge, the longer the better helps get this right. Resign yourself to this taking some time and be patient.
Once the table is aligned with the iron saw top drill the holes in the table as per the instruction manual and install the fasteners. Check once more to be sure that the table has not moved before moving on.
Final Fence Assembly
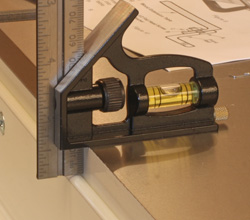
 |
 |
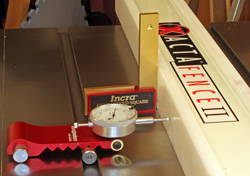
Adjusting the rip fence (left) so that it tails away from the blade slightly 0 0.001" to 0.003" - is crucial. These adjusting screws (right) on the T-square mount handle the corrections, usually in very small steps so go slow! Click images to enlarge |
|
Now we can install the main fence tube onto the front rail. There usually is no spec on setting this tube other than it should be flat on the front rail. After installing the bolts loosely I cheat the whole tube away from the rail upright as far as it will go in the screw holes. On an early table saw I installed the tube more or less centered in the mounting holes in the front rail and the fence mechanism rubbed on the rail. I pulled the tube away from the rail, to the front of the bolt holes and that fixed the problem.
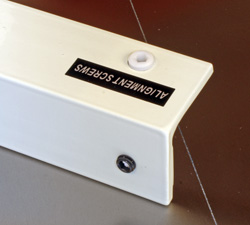
Now you can install the fence arm over the tube. The first thing we need to check is that the faces of the fence are square to the table surface. If adjustments are needed there should be a hex screw at either end of the T-square mount that can be turned to correct the face alignments.
Next we want to get the face of the fence parallel to the miter slots. Actually, most set the rip fence so that it tails away from the blade at the far end by just a couple thousandths of an inch. That is to be sure that the wood is not being pushed into the blade as the cut is made, a prime way for kickbacks to start.
There are screws on the front of the T-square for this adjustment. It is important to make equal but opposite turns to both screws – up on one, down on the other. If you try to crank all of the adjustment into one side you can run out of travel or make moving the fence along the tube harder than it needs to be. The adjustments needed here are usually very small so take your time and double-check your settings.
Bevel Stops
The instruction manual should guide you through checking and adjusting the stops that limit the bevel range between 0 (90-degrees to the table) and 45-degrees. I refuse to trust these adjustments so purposely set both ends beyond the normal range. That lets me use my INCRA Guaranteed Squares to set 0 and 45-degrees. I (and many others) check these settings with a good square anyway so I forgo the built-in stops. It is your saw, set them as you want.
Video Tour |
And that does it. The only thing that came with the JET Deluxe Exacta™ Saw that hasn’t been tuned up or checked is the factory miter gauge. While JET provides some of the better factory miter gauges packed with table saws, I still have my INCRA 1000SE and after fine-tuning that to the JET Deluxe Exacta™ Saws miter slot, it will once again be my primary miter gauge. The factory miter gauge will be tucked away to be used later for something like making a finger/box joint jig or something.
Overall I put about 8 hours into building and setting up my new JET Deluxe Exacta™ Saw. That may seem a little long but I have learned from past experiences that rushing the assembly or setup often turns into more work later trying to fix things that would have been much easier to do during assembly.
Whether you are building a brand new saw or giving your old machine a complete tune up, taking your time and being precise with the adjustments will give you a better performing and safer table saw.
Have a comment on this story? –Email Me!
All written, photographic and drawn materials are property of and copyright by NewWoodworker.com LLC 2000-2019. Materials may not be used in any way without the written permission of the owner.