
This is a Veteran Owned site
![]()
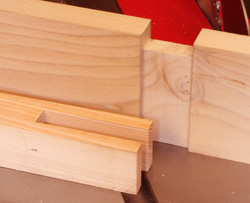 |
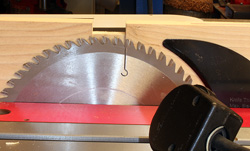
I know many of you fear the Bridle Joint but it really is not bad to make if you have the right equipment, primarily a table saw and a cast iron tenoning jig. Click image to enlarge |
Making Bridle Joints
It’s easier to be stylish than you think
Text, photos and video by Tom Hintz
Posted – 9-8-2011
Lots of woodworkers shy away from Bridle Joints because they think that making them is complicated. While they are easier joints to make Bridle Joints are not that bad especially if you have the right equipment. I know that some will differ with me on this point but I would not even try making Bridle Joints without a good, cast iron tenon jig. We need to make what amounts to a very deep dado in the end of a piece of wood which makes a good tenoning jig mandatory in my world.
What It Is
The Bridle Joints is sort of a reversed mortise and tenon joint. Rather than sinking a tenon down into a mortise cut into piece of wood we form double tongues that fit into dados on both outside faces. A major plus for Bridle Joints is the eye-catching appeal they can give a project. With the grain running 90-degrees to the grain in the wood it fits into you get a nice visual contrast. Make the Bridle Joints in wood that is thicker than the piece they fit over and you can create additional shadow lines. Use a different colored wood and you can set the Bridle Joints off even more. There are lots of options once you learn the basic Bridle Joint.
Down Side
For most woodworkers the length of Bridle Joint legs is limited by the maximum safe blade height that their table saw can handle. For most of us with 10” table saws that is around 3” to 3-1/2” or so. Very often when making a Bridle Joints woodworkers include a notch at the top of the dados that when filled by the bridle piece can add some structural strength to the joint. That notch effectively increases the width of the wood for which we can make a Bridle Joints. On the sample joint made for these photos I added a ½”-deep notch that combined with the 3”-long legs made the Bridle Joint fit perfectly in a board 3-1/2” wide.
 |
 |
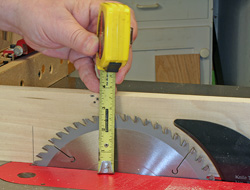
Knowing the maximum blade height (left) that is safe on your table saw is important and gives you the limit for the Bridle Joint legs. I use my stacked dado set and a gauge block (right) to be as accurate as possible for a clean, good fitting joint. Click images to enlarge |
|
The other factor that we must consider is that Bridle Joints are not as strong as a mortise and tenon. Because we cut Bridle Joints into the end grain twisting or other forces that apply pressure to the side of Bridle Joints can cause the wood to split along the grain. For this reason I never use Bridle Joints for stressed structural components. I have used Bridle Joints in situation that experienced moderate compressive loading but with other forces I am likely to go with a mortise and tenon.
Opposing Dados
When cutting the dados that will accept the legs of the Bridle Joint it is important to be sure that we leave sufficient wood at the center to avoid weakening the piece excessively. If you choose the materials correctly the visual effect of the Bridle Joints remains essentially the same. We just need to keep strength in mind when designing the Bridle Joints. This is another reason that I like to use thicker wood for the part of the Bridle Joints that fit over the mating piece. The extra thickness lets me leave more material between the dados to maximize strength without diminishing the visual appeal of the finished joint.
I use my stacked dado set to make the dados because these cuts are shallow and the dado set leaves very clean edges in addition to flat surfaces. I also use a gauge block on my rip fence and a miter gauge to make the dado cuts so that I can maintain perfect alignment of these cuts even though they are on opposite sides of the board. This is an important point so be sure to watch the video below if this isn’t making much sense. Once you make a few Bridle Joints the benefits of the gauge block becomes very clear.
 |
 |
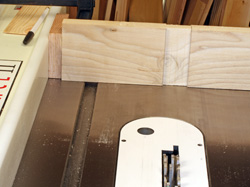
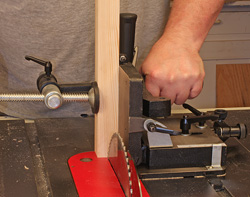
If I did not have a good, cast iron tenoning jig (let) I would not make a Bridle Joint. This kind of stand up cut at full depth is just too dangerous any other way. the notch in the receiving board (right) lets you use a Bridle Joint in wider boards. It also adds structural strength to the Bridle Joint. Click images to enlarge |
|
I can start at one edge of the dados, cut both sides and then move the rip fence slightly to sneak up on the width needed. I also make these cuts at the full depth required because with very few exceptions these dados are rather shallow. When trying to be very accurate to get a good fit on the bridle piece we want to avoid having to go back over those cuts with progressively deeper cuts.
I do go back and cut the notch after both sides because it is usually deeper. If you don’t move the rip fence and the gauge block you can use that setting to make the first notch cut. Then I move across the width of the notch using the sides of the dados as a sight to align the cut that defines the other side of the notch. When making the notch in the photos I had to clean up about 1/64” of wood on one side of the notch to get the bridle piece to fit at the full depth.
I keep a sample of the bridle wood close by so I can check the dados to make better adjustments of the rip fence and to confirm that the dado has reached the full width. I look for a dado and notch width that allows the bridle piece to be tapped into place with very light raps from my dead blow mallet. Recognizing this “almost slip fit” is another of the skills that woodworkers develop with experience so go slow and check your progress frequently!
Cut the Bridle Legs
I use a 10”, full kerf (1/8”-wide) table saw blade for cutting the legs because of the depth needed. I normally use a relatively high tooth count blade in the 50-tooth range. These blades tend to give a cleaner cut but require a slightly slower feed rate which we should be using anyway with such a deep cut.
 |
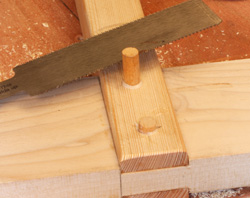 |
I like using thicker wood (left) for the Bridle part of the joint. That extra shadow line gives the project a whole new look. Adding a couple dowels to the Bridle Joint makes it look even better! Click images to enlarge |
|
Set the blade height needed to cut the legs of the Bridle Joint and check for interference under the throat plate. If you have large diameter blade washers or blade stiffeners there could contact the underside of the throat plate. Even though I use my JET Tenoning Jig I install my zero clearance plate as an extra safety factor and to assist the dust collection. Remember though that with so much of the blade above the table there will be dust flying around regardless of the dust collector used.
Put the wood in the JET Tenoning Jig and then adjust it to locate the blade at the center of the woods thickness. Make one cut, reverse the wood in the JET Tenoning Jig and make a second cut. This process insures that the cut is perfectly centered on the stock. If you remember to reverse the wood after each cut the opening will remain centered perfectly.
After each pair of cuts adjust the JET Tenoning Jig in towards the blade slightly, take another cut and repeat the process. Check your progress against the dados as soon as the opening begins to approximate the needed size to prevent removing too much material. The fine-threaded adjuster on most tenoning jigs makes it easy to sneak up on the perfect cut depth if you take your time.
Ideally the legs will slip into the dados and over the center of the receiving piece without little force being applied. The fit should be a bit snug but not tight because normal swelling and shrinking cycles of the wood could crack the bridle side of the joint.
Assembly
Video Tutor |
I use good quality wood glue to secure the Bridle Joints. Take care to not brush on too much glue to limit squeeze out. Applying a clamp along the length of the piece with the legs cut into it may be necessary if the fit between the parts are a little loose. Just make sure that the bottom of the bridle legs are not contacting the clamp before the wood they fit around does. After gluing be sure to check the assembly for alignment, to be sure it is fully seated and then leave it alone until the glue dries.
In addition to the contrast in the grains and woods used I often add a dowel or two to “pin” the joint. With the holding power of modern glues the additional strength added by dowels is probably not required but the visual appeal they bring adds a nice touch that shows off your craftsmanship.
Making Bridle Joints is not very tough but I would suggest making a few in scrap to get the feel of making the necessary cuts accurately. Like most things in woodworking it is worth burning up a little cheap wood before trying to apply a new skill to the big-buck project wood!
Have a comment on this story? –Email Me!
All written, photographic and drawn materials are property of and copyright by NewWoodworker.com LLC 2000-2019. Materials may not be used in any way without the written permission of the owner.