
This is a Veteran Owned site

 |
Learning to build a square, flat box is an essential skill you will use over and over again. Click image to enlarge |
Box Building Basics
An extremely important core skill
Text, photos & video by Tom Hintz
Posted – 1-4-2007
Woodworking is based on a small number of core skills that when combined in various groupings make it possible for us to build a huge range of projects. Unfortunately, too many new woodworkers do not take the time to learn the core skills, opting to jump ahead of themselves to projects that seem more appealing at the moment. Very often, acquired bad habits and frustration are just around the corner.
The Basic Building Block
The box shape is at the heart of most woodworking projects. Look at all of the objects around you right now and with the exception of turned items, you are likely to see at least one box shape within all of them. Also, notice how that box shape is the foundation on which the rest of the project is built.
Because so many projects are built around the box shape, the accuracy with which it is built influences how difficult the project is from start to end. Get the box shape perfectly square and fitting remaining parts is much easier. Build an even slightly crooked box and everything after that becomes a frustrating custom fit marathon.
Preparing the Wood and Machines
 |
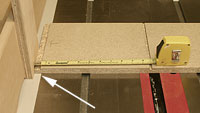
Setting the fence to cut precise-fitting rabbets is easy and an important skill for many project types. Click image to enlarge |
The best case scenario is using project wood that is straight and consistent in thickness. If the edges are curved or warped, holding the wood flat against a fence to make a square cut is nearly impossible. Also, if the thickness of the wood varies at all, the outside dimensions cannot be identical throughout a box.
Ideally, we’d all have a jointer and thickness planer with which to perfect the dimensions of the wood. In the real world, new woodworkers are least likely to have this machinery. This is one of woodworking’s dirty tricks because perfectly dimensioned wood also makes the learning process easier. See “Jointing With a Router” in the Resources section at the end of this story for an alternative method for straightening edges.
Equally as important as precisely dimensioned wood is being sure that your tools are set up to produce perfectly square cuts. If the ends of the project pieces are slightly out of square, there is no way to build a flat box. It is also unlikely that all of the joints, no matter how well they are formed, can be closed fully.
While most machines hold their alignments well, learn to check them before starting a project. It takes just a few minutes but can save lots of time and money if you catch a problem early.
Repetitive Precision
 |
 |
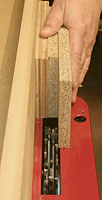
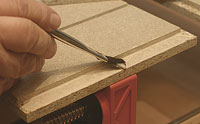
Using a gauge block, (top) allows cutting smaller parts safely. (bottom) Used correctly, the gauge block produces identical parts. There are four pieces in this photo. Click images to enlarge |
In every box type project, there are at least two sets of opposing sides that must have identical length parts to create a truly square project. Actually, the same applies for multi-sided projects that require equal length pieces to produce the desired shape.
The easiest way to make precise repetitive cuts is to use a gauge block (see Resources) or an adjustable work stop on the miter gauge. Using some form of mechanical stop against which the wood can be indexed while making the final sizing cuts is vastly more accurate and consistent than trying to cut on a layout line.
I use the work stop on my INCRA 1000SE miter gauge whenever possible because it both positions the wood exactly and makes holding it stable during the cut very easy. However, when the pieces needed are shorter than 10 or 12 inches, using a gauge block on the fence and cutting the parts from a longer section of wood is far safer. When done carefully, the gauge block is also extremely accurate.
Remember that we can not use the miter gauge and rip fence at the same time. This is a very good way to instigate a kickback. The gauge block allows us to use the miter gauge very accurately and make duplicate, identical cuts.
Joinery
 |
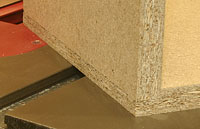 |
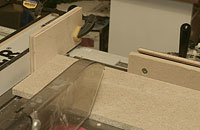
(top) Laying out rabbets and dados, then setting the machine up to cut them precisely is crucial. (bottom) The result of good setup is perfect fitting joints. Click images to enlarge |
Whatever style of joinery used, from butt joints to rabbets to dovetails, the cuts that form them must be made to consistent depths. This is where having prepared, dimensionally correct wood helps a ton. Trying to cut any joint into a cupped board is a losing battle and one that will compromise your ability to produce a truly square box. Trying to press cupped wood flat while cutting the joint is both ineffective and downright dangerous. Pressing that same cup out of the wood during assembly not only makes it very difficult to get square corners but also builds stresses into the project that are likely to distort it later as the wood goes through normal humidity gain and loss cycles.
Some joints like rabbets and dados that run down the long side of a board benefit from the use of featherboards. That small but consistent pressure makes it much easier to get a clean, flat cut. However, adding enough pressure to flatten a bowed piece of wood makes it difficult to move across the cutter cleanly and all but guarantees an uneven cut.
Cutting all of the joints using the same setup is always a good idea as returning to an exact cutter height later is harder than it sounds. Small differences in rabbet or dado depth may seem insignificant, and they may be at that one joint but the cumulative error over the entire project can be problematic.
Assembly
 |
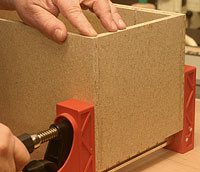 |
(left) Applying an even coat of glue to all mating surfaces strengthens any type of joint. (right) Good quality clamps applied square to the project helps keep it aligned as the glue dries. Click images to enlarge |
|
If the wood and joinery are right, assembling a truly square box is reasonably easy. At any rate, it is far easier than trying to square up a box made from parts with slightly different lengths, less than square ends or varying depth joinery.
Even with perfectly formed parts, proper assembly techniques remain important. Using corner clamping aides not only helps achieve a square corner but also makes the operation easier when an extra set of hands is not available. Applying pipe or bar clamps so they are square to the project eliminates their pressure from pushing the box out of shape.
 |
|
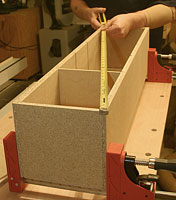
(left) Using high accuracy corner clamps likes this one from Woodpeckers makes it easier for one person to glue up a truly square box. (right) Measuring diagonals and finding them to be identical confirms that the assembly is square. Click images to enlarge |
|
Taking the time to do a dry fit provides an opportunity to check the joints to be sure they all fit properly. Making an adjustment now is far easier than when glue is quickly drying on the remaining joints waiting to be assembled. A dry fit also lets you set up the clamps and work area so everything is where you need it. Avoiding even small delays after the glue is applied is a good thing.
After applying the glue and clamps, measuring the diagonals tells you if the box is actually square or not. To maximize accuracy, it is important to measure diagonals the same way every time. Hook the tape over the far corner the same way and read from the same side of the tape each time. The difference in the numbers seen is what is most important. If we can get the diagonals exactly the same or within 1/32” on a bad day, the rest of the project will be easier to deal with.
Video Tutor |
Click the images above to see videos of the basic procedures. |
If the diagonal measurements are off ¼” or less, reducing the clamping pressure, tapping the assembly square and then snugging the clamps down may be all that is needed. In more severe situations, placing a long clamp across the longer diagonal and using that to squeeze the project slightly past square may be the answer. Over correcting by 1/8” tends to compensate for spring back when the clamps are removed after the glue dries. Admittedly this is an inexact science but the 1/8” rule seems to work pretty well most times.
Almost as important as everything else described above is allowing the glue plenty of time to dry completely before doing anything else to the project. Remember that the glue near the surface of a joint dries well before the interior of the joint where the major strength is developed. When the box is glued up and measures out perfectly square, take a break and admire your good work.
When I plan on installing dowels (Miller Dowel System) or screws to reinforce a joint, I wait until the glue has dried to begin drilling and installing them. The forces of drilling and installing virtually any reinforcing fastener can push a still-wet glue up out of shape.
The skills involved in building a truly square box are used throughout woodworking. Taking the time to learn this basic set of skills will make your projects come out better and increase your range of capabilities substantially. Also, learning the next set of more complicated skills is much easier.
Resources
Have a comment on this story? –Email Me
All written, photographic and drawn materials are property of and copyright by NewWoodworker.com LLC 2000-2019. Materials may not be used in any way without the written permission of the owner.