
This is a Veteran Owned site
![]()
 |
 |
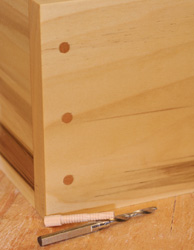
The simple butt or rabbet joints can be made useable with the addition of pegs or dowels. (top) These joints will never be tough because they force gluing end grain to long grain (bottom), second in weakness only to end grain to end grain joints. Click images to enlarge |
Butt & Rabbet Joints
Simple to make but not so easy to make right
Text & photos by Tom Hintz
Posted - 2-20-2010
Butt and rabbet joints are a favorite of beginning woodworkers because they appear very simple to make. In the real world new woodworkers quickly discover that making these "simple" joints correctly is not so simple.
Low Strength
Despite being a full-width joint in most applications, butt and rabbet joints are purely short grain to long grain which dramatically limits their strength regardless of the adhesive used. As we will see later in this article, adding some form of mechanical reinforcement helps but no matter what you do short of installing a large fillet, the butt and rabbet joints remain the weakest form of joinery commonly used in woodworking.
Adding a rabbet to the butt joint provides slightly more glue surface but that additional area is also short grain to long grain so it also suffers the same inherent strength limitation. The ledge created by a rabbet joint does provide mechanical resistance to inward movement of the piece set into it which can be helpful in applications such as installing a cabinet or bookcase top. The rabbet also can add a bit of visual appeal to box-type projects because the exposed end grain darkens quicker than the surrounding long grain wood when stain and finish are applied.
Critical Cuts
Despite their simplistic appearance both butt and rabbet joints must be formed perfectly to achieve all of the strength possible. The ends of the wood being used must be absolutely square to the edges and the wide surfaces for the joint to come out square with all of the glue surfaces in full contact.
The wood must also be consistent in thickness, especially with a rabbet or the assembled joint can be out of alignment. Even if this error is small, it accumulates with each joint in the project. In a box type project the end result of an error can be dramatic when it comes time to assemble the final joint. Using clamping pressure to close the joint is often possible but the natural weakness of these joint types almost guarantees a joint failure in the not-so-distant future.
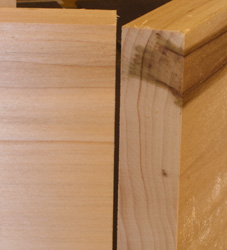
Rabbet Cut
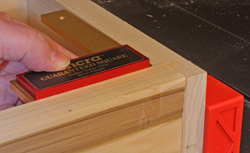
 |
 |
Making clean, square cuts is crucial to making a clean joint, including cutting the rabbet. (top) I like to use Miller Dowels (installed after the joint glue has dried) to dress up these joints and give them a little more strength. (Bottom) Click images to enlarge |
When forming the rabbet the most common depth of cut is between 1/4"-deep to roughly 1/2 of the material thickness. Going deeper than 1/2 of the thickness will weaken the joint because the remaining face is too thin. When designing a project that uses rabbet joints remember to add to the length of the parts that fit in them to account for the depth of the rabbet. The is one reason I like to make the rabbets an easy to work with depth like 1/4" or 1/2". That prevents folks like me who dislike any math more complicated than remembering my pin code from avoid having to come up with odd fractions when sizing the pieces.
The width of the rabbet should be slightly more than the thickness of the wood that will be set into it. By slightly I mean just that. All we are trying to do here is to have the short grain end of the rabbet protrude beyond the wood being fit into it by just enough so that we can sand it flush. I shoot for a protrusion of 1/64th-inch or less. Sanding this narrow lip flush with the side is much easier than trying to sand the entire side down to match a slightly undercut rabbet edge. Over cutting the rabbet a tad also makes ending up with a nice square corner on the project much easier.
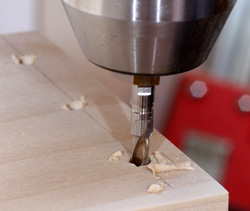
Pinning the Joint
Both butt and rabbet joints can be strengthened with the addition of dowels, a process often called "pinning" the joint. The pins act like wooden screws or nails that add some strength to the joint. Pinning by no means makes the butt or rabbet joint "heavy duty" but it does help.
Pinning a butt or rabbet joint can add a bit of visual appeal. The end grain of the dowels darken more than the surrounding long grain wood when stain and finish are applied adding contrast that makes they stand out visually. You can also use dowels made from a contrasting wood species to make them stand out even more.
I use Miller Dowels for pinning butt and rabbet joints but any dowel material can be used. Use caution when drilling to be sure you are going straight into the opposing wood and do not go too deep. 3/4" to 1" of total depth is fine in most applications. With the stepped drill used to install the Miller Dowel I do go a little deeper to use the full dowel. The smaller diameter of the stepped drill tip helps prevent breakthrough or distortions of the wood when the dowel is installed.
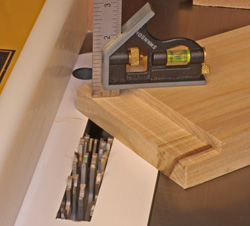
 |
 |
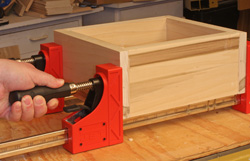
Taking your time when putting the assembly into the clamps (top) and then making final adjustments makes it easier to get a truly square (bottom) assembly. Click images to enlarge |
One tip I would offer on pinning these joints is that it is much easier to glue the joint up, clamp it, check to be sure that it is square and assembled right and then let the glue dry for a couple hours before installing the dowels. Waiting for the glue to dry is just easier. Trying to drill the assembly for the dowels while it is in the clamps and the glue is still wet (and slippery) is just asking for alignment trouble. After the glue is dry installing the dowels is much easier and way safer for your project.
Gluing and Clamping
There is no mystery to gluing up butt or rabbet joints. Apply a thin, even coat of glue to the mating surfaces (including the shoulder of the rabbet if used), assemble the pieces, align and apply a bit of clamping pressure to hold them in place while the glue dries. Sounds like there is nothing to it but keeping these joints perfectly aligned while applying clamp pressure can be frustrating.
Usually I get the pieces assembled very close, apply the clamps with just enough pressure to hold them in place. Then I correct the alignment as needed before snugging the clamps down the clamps a bit. Check the alignment once more (including the squareness of the project) to be sure nothing moved and then leave it alone! When the glue is fully dry you can install the dowels (if they are being used) and then move onto sanding.
The only trick to sanding is to keep the sides flat. I use a metal sanding bar to get the ends of the rabbets flush with the side without making a bevel or ramp on the corner. Once that is flush I move to my random orbital sander (ROS) to sand the project. Keeping the ROS pad flat on the sides and not concentrating any pressure on the corners helps prevent rounding.
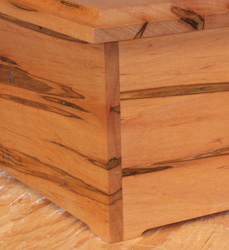 |
This rabbet joint was made several years ago using the techniques explained here and it remains tight and crack-free today. And notice that I didn't even add pins! Click image to enlarge |
Butt and rabbet joints have their place in woodworking as long as you understand their liabilities. Learning to make them correctly to maximize their strength and appearance is not tough but does require paying attention to the details - including stock preparation.
Related Material
Have a comment on this article? - Email Me!
All written, photographic and drawn materials are property of and copyright by NewWoodworker.com LLC 2000-2019. Materials may not be used in any way without the written permission of the owner.