
This is a Veteran Owned site
Building Arched Panel DoorsDon't let them throw you a curveText and Photos by Tom Hintz Forming an arch in the top of a panel-style door adds a look of elegance to the finished product. The same procedures can be used to form arches in the top and bottom of the panels, or split the arch across two doors. With one set of arched door templates, you can create a large number of looks with which to put your personal touch on a project. I hear from many woodworkers who avoid using the arched panel because of how complicated the process appears. Obviously, it is a bit more involved than making straight panels, but not substantially. Using arched panel templates is no different from working with any other pattern. A little practice with the procedure and you will be making arched panels like a pro. Virtually any rail, stile and panel raising bit set can be used to make arched panel doors. If you are unfamiliar with the setup and use of rail and stile bits, or making raised panel doors, see the Resource section at the end of this article for links to informative stories on those procedures. There Is A Difference
It is important to know that there is a difference between the rail and panel patterns, which is why they come in sets. Because the panel fits around the curves in the rail, its lines have to be slightly different to fit properly. Sizing the Rails and StilesThe only design considerations required when using arched panel templates is that the upper rail must be as wide (top to bottom) as the template and long enough so that the curves of the arch end ½" or more from where the rail meets the stiles. If the curves run into where the rails and stiles meet, the joint line can run at an odd angle, sometimes making it very difficult to fit properly. Most often the bottom rail is sized the same as the top rail, but you can please yourself here. Some like to make their bottom rails a bit wider than the top, others a bit narrower. What looks best to you or the customer is most important. Build the Frame and Cut Rail Ends First
|
 |
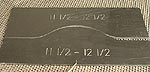
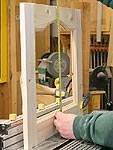
If you are sure of yourself cutting under 1/8" from the template, leaving it on is an option. If there is any doubt, remove it when cutting the waste away. Click image to enlarge |
template edge onto the rail and remove the template.
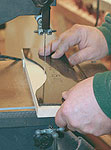
Using a band saw or jigsaw, cut away the waste to within 1/8" of the line. It is important to cut very close to the layout line, without actually cutting into it, to make routing the rail to final shape easier and safer.
Apply good quality double-sided tape to the back of the template and reinstall it on the rail making sure the top edges and the center marks are aligned.
Safety Tip: In many cases approximately half of the router cut will be against the grain, a condition that could require climb cutting to prevent chipping. If you are not familiar with reading grain direction to determine when a climb cut may be necessary, see the Resource section for more info.
Climb cutting is always more dangerous than a normal cut and must be approached with that in mind. I personally think a climb cut should never be made with a hand-held router. With the router in a table, you only need to control the wood, a big enough task. You absolutely must use a good pair of rubber-bottomed push blocks to control the wood and move it safely over the router bit. If you are not sure of yourself making a climb cut, don't do it. Get out the drum sander or rasp and trim the wood to the template by hand.
Climb cutting is moving the router in the same direction as the bit is rotating. When routing this way the bit tends to pull the router along. Reducing the amount of material being removed helps but you must maintain firm control of the router at all times.
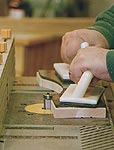 |
Watch for grain problems when routing the shapes. Click image to enlarge |
I have found that reducing the material to be removed using a drum or spindle sander (or a rasp) to 1/16" or slightly less from the template makes climb cuts safer. There must be only enough material left for the flush trim bit to clean the edge up uniformly.
Install a flush trim bit in the router table and adjust the height so the bearing is solidly on the template. Adjust router speed as suggested by the bit manufacturer. Using a good set of rubber-bottomed push blocks makes controlling the piece during this trim cut safer and easier to do accurately.
Paying attention to the grain directions, route the waste material away along the template. Remember that you may be able to move the template to the opposite side of the wood and finish routing from that side to avoid having to make a climb cut.
If the rail extends beyond the ends of the template, route close to the template end and stop. Even the ends of the rail with a small plane or sanding block so they are consistent.
When the routing operation is complete, use a putty knife to work the template free from the rail. The bond created by good double-sided tape can be sufficient to snap the template if you try lifting one edge to remove it!
Make the Stile Cuts
Install the stile bit (cuts the profile on the inside edge of the rail and stile pieces) in the router table and adjust the height according to the manufacturers instructions.
Make the cuts in all of the rails and stiles, using caution when routing the top rail. The shape cut into the top rail means the fence cannot be used. Though some of the cut could be against the grain, you cannot climb cut with this type of bit! Fortunately, these types of bits are usually capable of routing against the grain without causing damage. Reducing the rate of feed slightly can help get a clean cut.
I have found that a good pair of rubber-bottomed push blocks is best for controlling the top rail while making this cut. They also keep your hands away from the cutter should something go wrong.
Make the Center Panel Blank
 |
Measuring for the panel size with the frame assembled avoids problems. Click image to enlarge |
Dry fit the rails and stiles together (use clamps if necessary) to measure for the proper size of the center panel. Measure the depth of the panel groove and then the opening from side-to-side and from the center of the bottom rail to the top of the arch in the top rail. Double the groove depth and add that to the height and width dimensions to arrive at the raw panel size.
To allow for expansion of the center panel, it must be cut undersized slightly, usually between 1/16" to 1/8". Reduce the raw panel dimensions by the amount of free space desired and trim it to size.
Mark the center of the panel at the top edge. Place the panel template on the panel; its top flush with the top of the panel and aligned with the center mark. Use a square to make sure the template is level on the panel before tracing the curved outline. Remove the template and using a band saw or jig saw, remove the waste, cutting to within 1/8" to 1/16" of the line.
Apply good quality double-sided tape on the back of the template and press it into place on the panel aligning the center mark at the top edge and making certain it is level on the panel.
Install the flush trim bit and adjust the height so the bearing is squarely on the template. Route along the template paying attention to grain direction. Making a climb cut may be necessary as with the top rail. You also may be able to apply the template to the reverse side of the panel to finish routing without making a climb cut.
Also, if the panel extends beyond the ends of the template, route close to the end of the template and stop. Use a small plane or rasp to make those edges flush with the routed portion. Use a putty knife to carefully pry the template loose from the center panel.
Raise the Center Panel
 |
 |
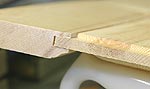 |
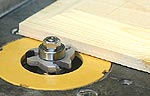
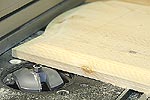
(Top) A back cutter bit makes sizing the edge for the groove easy. (Center) Use the panel raising bit in a router table to shape the edges of the center panel. (Bottom) You can see here how the back cutter bit lets you fit the panel edge to the groove without over-machining the face. Click images to enlarge |
Note: If you are using a back cutter to sink the panel so that it is flush with the frame, make those cuts first, removing the amount of material necessary for the look you want. Then move on to the raising process.
Also, if you are using a panel-raising bit with a built-in back cutter, follow the manufacturers instructions for raising the panel. You cannot make progressively deeper cuts with this style bit.
Install your panel-raising bit and set the height for a very light cut. Route the center panel, cutting the end grain edges first and then the remaining sides. Repeat this process after raising the bit slightly and cutting again. Continue taking light cuts in this manner until the desired profile is achieved.
If the edge of the panel is still too large to fit the groove in the rails and stiles, install a back cutter bit and make light passes on the reverse side of the panel until its edge fits the groove. Though a back cutter bit works best, any flat bottomed bit can be made to work.
Finish the Assembly
Dry fit the rails and stiles with the center panel in place to be sure the joints close with light clamping pressure and that the center panel has the amount of free space desired. When satisfied, take the assembly apart and finish sand the center panel.
Some like to apply stain to the center panel before assembling the door to prevent shrinkage from exposing a small unstained line. If desired, stain the center panel now and allow to dry.
Apply glue to the ends of the rails and the corresponding edges of the stiles and assemble the door, including the center panel. Note that no glue is used on the center panel or in the grooves that contain it so that it floats free.
Place the door in clamps and apply just enough pressure to close the joints. Make sure the door is flat and square in the clamps before setting aside to dry thoroughly.
After the glue has dried, sand all of the joints smooth before routing decorative profiles in the outer edges of the door if used. If mortised hinges and a pull handle are to be installed, do that before applying the finish.
Using the arched panel door design is another option with which you can customize a project, enhancing the look and value without significantly increasing the difficulty. Like all woodworking skills, making arched panels may require a little practice, but the result is well worth the effort.
Resources:
Setting Up Rail & Stile Bits
Building Raised Panel Doors
Reading Grain Direction
Visit the Infinity Tools web site - Click Here
Do you have a comment about this page? - Email Me!
All written, photographic and drawn materials are property of and copyright by NewWoodworker.com LLC 2000-2019. Materials may not be used in any way without the written permission of the owner.