
This is a Veteran Owned site
 |
||||||||||||||||||
Cutting DadosThere is more than one right wayText, photos and video by Tom Hintz Revised - 3-15-2010 Dados have been around almost as long as woodworking. This joint is nothing more than a groove sized to fit another piece of wood closely. If this sounds a lot like a rabbet, it is. The difference is that a dado has two sides where the rabbet has just one. Adding that second side increases the strength but does complicate their creation a bit. UsesDados are frequently used to support fixed shelves in projects such as cabinets or bookcases. Though relatively small, the lower edge of the dado adds considerable vertical strength to a horizontal shelf. We can also locate vertical dividers within a cabinet type project. Dados can also be used as tracks for sliding cabinet doors or dividers. Despite frequently being a long grain to short grain joint, a good fitting dado combined with a quality adhesive is a strong joint for many cabinet type projects. Tools
The most common tools used to form dados are stacked dado sets for the table saw and flat-bottomed router bits for the router table. Hand-held routes are also frequently combined with guides or jigs to cut dados in bulky or oddly shaped workpieces. Wobble type dado blades are occasionally used to make dados on the table saw but the results are too often disappointing. By its nature a wobble dado blade swings through a small but distinct arc that refuses to create a truly flat bottom in the dado. That side-to-side wobbling also tends to leave a chipped or frayed edge far more often than a stacked dado set. If this sounds like I am trying to steer you away from the wobble dados that is because I absolutely am. I really do try to spare NewWoodworker.com viewers frustration when I can. This is one of those times. Many router bit companies offer specially designed flat-bottomed bits that cut dados that actually fit the odd sized plywood of today. If you are using standard wood thicknesses any good flat-bottomed bit of that size should work. However, make test cuts to confirm this! There are also jigs like my Auto-Width Dado Jig that let you match the dado to the wood regardless of its thickness. This shop-made jig is built around a specific router and bit (usually 1/2"-diameter) so you can use a sample of the wood the dado is being cut for to set the jig up. When built and used correctly the resulting dado cannot be anything but click-in-perfect. Click Here to see more on the Auto-Width Dado Jig. A simple clamp-on fence can be used to guide a router to cut dados. This can be especially handy with long narrow pieces like the sides of a bookcase. Running a long narrow piece like that across a table saw or router table is downright dangerous plus they are not likely to produce perfectly straight dados because it is so difficult to keep the piece steady. Dado Safety
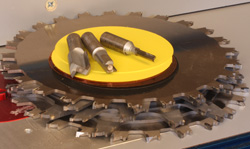
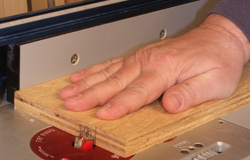
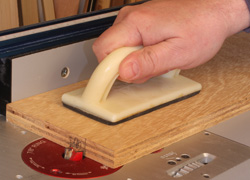
There is a misconception that because a dado cutter does not break through the wood that it is OK to use a bare hand to push the wood across it. If it does not sound dangerous to intentionally place your hand within 1/2" or so of a powered cutter capable of cutting away large amounts of hardwood without effort, your concept of danger is vastly different than mine. I like to use the rubber-soled push blocks like those that are often supplied with jointers when I am cutting dados. The rubber pad provides a much better grip on the wood than does a bare hand plus it puts another layer of protection between that hand and the cutter. When the wood being cut is too small or shaped in a way that makes it impossible to use the push blocks I use a push handle or whatever safety device best fits the situation. The bare hand just is not an option in my shop. Setting Up Stacked Dado SetsWhile most stacked dado sets come with instructions on their use, there are a couple points we want to be sure of. First is to be absolutely sure that none of the teeth on one blade are contacting those on the blades next to it. Should the teeth contact each other during use there is a very good chance that the brittle carbide they are made from will chip or break. Those stresses could also snap an entire tooth from the blade presenting what should be an obvious projectile-related danger to the operator.
Another point is that the teeth on most stacked dados are wider than normal saw blade teeth. This is an intentional overlap that insures creating a clean, flat bottom in the dado. If teeth on two or more components are touching when the stack is tightened down, the blades can be distorted or bent. If nothing else happens, this condition will result in a vibration or poorly cut dado. Placing shims between stacked dado components is how we make fine adjustments to the width of the cut it makes. The shims are very thin and are placed between the components during assembly. If more than one shim is needed it is best that they be distributed throughout the stack to prevent holding two components far enough apart to create a gap that will leave a ridge in the bottom of the dado. Down in the Valley
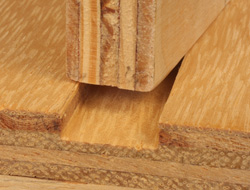
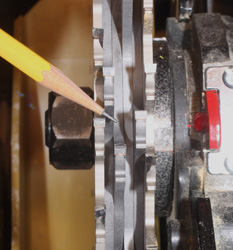
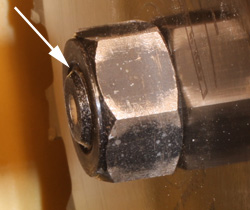
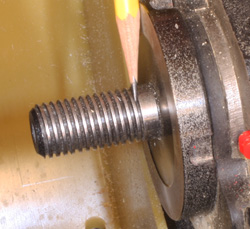
On many table saw there is a "valley" between where the smooth shank of the arbor ends and the threads begin. This "valley" can be wide/deep enough on some saws to allow shims and even the thinner stacked dado components to slip into it. That can be an especially big problem because that stack component actually hangs lower than the rest and then holds that position when the stack nut is tightened. While cutting a dado that out-of-line blade can cause a vibration and it will cut a groove in the otherwise flat floor of the dado. The fix for this is simple. When assembling the dado stack put the thicker components around that "valley" and place the thinner blades directly over the smooth shank on the arbor. Dado DepthThe dado joint gets its strength from the shoulders capturing the piece that is fit into it. Despite the shoulder being relatively narrow the force necessary for the wood to break through the shoulder would be considerable. This is why the dado is a favorite way to install shelves in projects like cabinets or bookcases. The depth of the dado need not be excessive to generate the strength. I never cut a dado with a depth that is more than 1/3rd of the thickness of the wood it is being cut into. For example, in the popular 3/4"-thick stock, my dados will be 1/4"-deep or slightly less. If the dado is cut properly and a thin, consistent coat of glue is applied to the mating surfaces this will be a very secure joint. In over 30 years I have never had one of these joints fail despite my tendency to fill bookshelves well beyond reason. Test Cuts
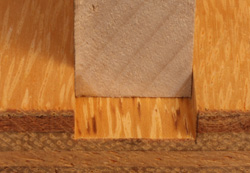
Whether you are using specifically sized router bits or a stacked dado set, confirming the dado width with test cuts is the only way to be sure that the depth and width are correct and to save lots of frustration in the process. A good digital calipers makes determining the amount of change needed to fit the stock much easier and can eliminate a step or two in the setup progression. Another good thing to do is to make a gauge stick, a simple length of wood in which you can cut a sample dado when satisfied with the setup for that specific size wood. Label that cut to identify the wood that fits in it. Also, make notes on what components and shims were in that dado stack. Then in the future when you work with wood that fits that dado on your setup stick your setup time should be a bunch shorter. Dado FitA proper fitting dado is snug around the piece fitting into it with glue applied to all mating surfaces. Too loose and we are asking the glue to do things it is not designed to do, namely bridge a gap and still be strong. If the dado is too tight the piece that it is cut into will want to bow as the part is forced into it. Neither is a good situation for our projects. I like it when my dados and the piece that goes into them click together when dry without forcing them. Then with a few thousandths of glue applied to all of the mating surfaces the joint taps together and I can be sure that glue will get a good bond on all of the available wood fibers. Remember that most dados are short grain to long grain gluing situations so the fit of the dado is very important to the security of the joint.
If your dado comes out too narrow, opening it up can be a tough thing to do without over compensating. In these cases I like to cut a very shallow rabbet on the top edge of the piece fitting into the dado to that it fits correctly. Cutting this rabbet on the top of the piece maintains the strength of its bottom surface, especially when working with plywood. Cutting dados need not be a stress-inducing task. This is a very useable joint with lots of applications in woodworking projects for all of us. And the equipment needed to cut virtually any kind of dado is not overly expensive especially when that cost is spread over the long term (and frequent) use we get from this equipment. Additional Dado-Related ResourcesSetting Up Stacked Dado Blades Have a comment on this article? - Email Me! Back to the Tips & Tricks List
|
||||||||||||||||||
All written, photographic and drawn materials are property of and copyright by NewWoodworker.com LLC 2000-2019. Materials may not be used in any way without the written permission of the owner.