
This is a Veteran Owned site
 |
||||||||||||||||||
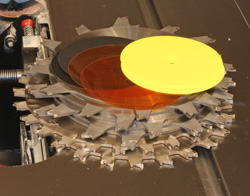
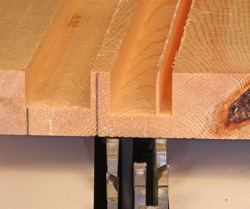
Setting Up Your Stacked Dado SetGet to know your dado stack for better resultsText, photos and video by Tom Hintz Updated - 7-1-2011 Note: This story is being updated and there may be some short (hopefully) periods when photos don't show up as we change them out. Despite the large number of emails I have received on problems getting stacked dado sets to create good fitting joints, no specific brand or style of stacked dado set emerged as a primary culprit. That suggests problems with dado fit are more likely the result of improper technique by the users, variance in wood thickness, misalignments of the saw, or some simple miss understandings of how to use these sets best. Variation in wood thickness is a problem we all have to deal with. Knowing the actual thickness of the wood we want to create a dado for is crucial to finding the proper setup quickly. Those who purchase "3/4-inch-thick" plywood, and cut a ¾-inch-wide dado for it are in for a rude surprise when the plywood fits about as good as a VW in a Buick garage. Whether the wood is the original factory thickness, or has been machined in our shops, matching our dado stacks to the actual thickness is the key. Dado Blades and SafetyEven though dado blades (on a table saw) do most of their work while covered by the wood, eye protection remains very important. Since the blade guards that come with many table saws must be removed for cutting dados, extreme caution must be used. Even though dado blades are not intended to break through the upper surface of the wood, it is a good idea to use some form of push device to add distance between your hands and the blade.
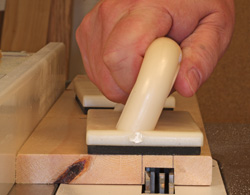
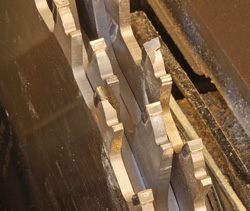
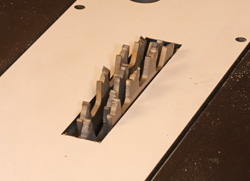
I like using push blocks, normally used with jointers, as the grip of the rubber sole offers firm control of the wood and the handle separates my hands from the blade should something go wrong. If you do a lot of dado work, (or even if you don't) you might want to consider one of the overhead blade guards available. This style guard can remain in place during dado operations. The blade guard on most radial arm saws will work with a stacked dado set but make sure to check your instruction manual to confirm that and for limitations. After installing your dado stack, and before plugging the saw in, make sure there is sufficient clearance within the guard. First Things FirstFor any dado set to cut correctly it must be installed and maintained properly. Before installing the stack, check for sawdust or other contamination on the mating surfaces. Small pieces of debris trapped between blade segments will alter the size of the groove the stack cuts. Make sure the blades are installed so the teeth do not align with those on either side. Contact between saw teeth during operation can severely damage them, and could cause them to chip or break off. Both are very dangerous situations.
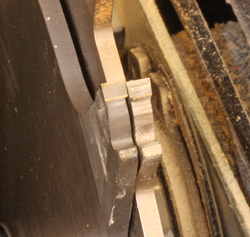
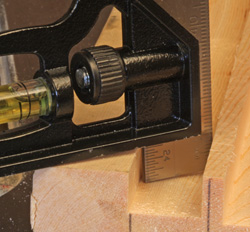
Dado teeth are usually wider than the body to which they are attached, meaning they overlap the teeth next to them. Teeth contacting each other will spread the dado stack at that point, causing it to run out of line, and increasing the width of the groove it produces. Another problem with teeth aligned side-by-side is that sawdust, splinters and debris can become wedged between them during operation, increasing the amount of stack distortion even more. Whether your dado set is new or old, check it, and the arbor, for run out and fit at the arbor. If you are at all concerned with the amount of run out being measured, determine if it originates at the arbor, arbor flange, or the blade itself. If you have access to a good dial indicator, check to be sure the arbor and arbor washer turn without run out. If the arbor shows what may be excessive run out, record the amount and contact the saw manufacturer to determine if your arbors run out is within their specifications. A damaged arbor could be extremely dangerous. If the run out is at the arbor washer, make sure it is seated properly, does not have sawdust or other contamination holding it out of line and that it has not been bent or otherwise damaged. If the arbor is not the problem, mount the outer (full round) dado blades individually and check them for run out. A good rule of thumb is a maximum run out of 0.001-inch per inch of blade diameter when the indicator reading is obtained from just below the gullet between the blade teeth.
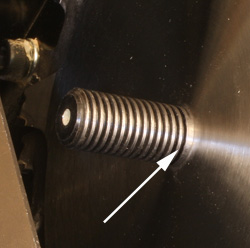
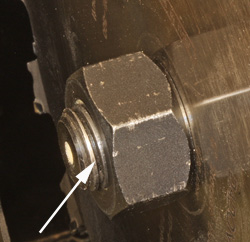
Also, measure the arbor outer diameter and blade hole inner diameter. If there is more than a few thousandths difference one or more of the stacks blades can "hang" lower than the others during assembly, producing an uneven bottom in the dado. Spread the ShimsMost dado manufacturers include shims with which a stacked dado set can be fine-tuned. There are aftermarket sources for shim kits also. However, just because you can buy more shims does not mean using them is the right thing to do. The maximum width a dado set is capable of is limited by the designed-in overlap of the cutting teeth, which produces the flat-bottomed groove. Shim the cutters too far apart and material will be left in the slot. In addition, exceeding the design maximum width is not safe. If more than one shim is necessary, spread them through the stack as much as possible. Installing more than one shim between two cutters could separate them enough to leave a strip of uncut wood standing in the groove. ChippersIt is a good practice when using the thin chipper blade (1/16-inch in most cases) to put that against the outer blade that rests against the arbor washer. Most saws have a shoulder on the arbor that extends out far enough for the thin chipper to rest on it rather than the threads. If mounted over the threads, the body of thin chippers can slip down between the threads on some arbors, allowing it to "hang" out-of-line with the other blades in the stack. Aside from cutting an uneven bottom in the groove, this condition can also make it difficult to tighten the stack evenly.
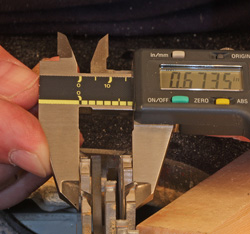
Also, when installing your dado stack at or near maximum width, it may be necessary to leave the outer blade flange washer that normally goes beneath the arbor nut off to insure getting enough of the arbor threads in the arbor nut. Qualifying Your Dado StackUnless your saw is perfectly aligned, there can be a small but important difference between the width of the dado stack and the groove it cuts. To get the best results, and to limit setup time, it is important to know if there is any variance, and if so, how much. In most cases, variations of this kind will remain reasonably consistent through most stack widths, allowing you to factor it in during setup. First, install the two outer dado blades. With most dado sets, this should produce a ¼-inch-wide groove. Make a cut, and then measure the width of the groove. Note any difference, add the rest of the chippers, (no shims) make another cut and compare this new groove to the width the enlarged stack should have cut. The difference between actual stack size and the grooves they cut should be virtually the same. If not, check for an odd-sized or damaged chipper. On my stacked dado set, the grooves are 0.007-inch wider than the stack thickness at both of the above widths. Not a lot, but knowing that makes it much easier to set up the set for a snug dado. Dado Gauge Stick
Terry Geevers, (VA) sent a suggestion that is time consuming initially, but a good idea none-the-less. He made a dado gauge stick by cutting a series of 3/8-inch-deep grooves in a 6-inch-wide piece of ¾-inch plywood using each of his dado stacks possible thickness combinations. He numbered each slot and recorded the makeup of the stack in a notebook that stays with his dado set. Terry fits the wood he is cutting dados for into the best fitting slot in the gauge stick, and then shims the stack if necessary for the best fit. He says it shortens his setup time considerably and helps produce snug fits. Keep RecordsAn alternative to Terry's gauge stick is to keep records of setups as you find them. This is especially true with wood thicknesses commonly used in your shop. Having this information available provides a head start with thicknesses yet to be encountered. I have such a notebook in my dado case and it has saved me lots of time and wasted wood. Dado DepthAnother common question was how to determine dado depth. The common thinking on this is to set dado depth equal to 1/3 of the thickness of the wood in which it is being cut. With a proper fit and good glue coverage, that depth gives you plenty of strength. If the dados are for shelves destined to carry a lot of weight, adding mechanical supports or fasteners might be needed. Most think dados deeper than 1/3 the thickness of the wood in which they are cut is not a good idea.
Another idea is to set dado depth to leave a specific amount of wood. Rather than setting up to cut a certain depth dado, you set dado height to leave a specific amount of material outside the dado. This technique can make determining some dimensions easier. Say you have a 50-inch-wide bookshelf and set your dado to leave ½-inch of material in each side. The shelf width will be 49 inches. I like nice round numbers. Dado joints can add strength and beauty to our projects when they fit properly. That same groove, cut wrong, can ruin an otherwise quality effort. Take the time to learn what your dado stack is doing, and how to adjust it. Your projects will turn out better and your frustration level will be reduced for the effort. Related Material
Do you have a comment about this page? - Email Me! |
||||||||||||||||||
All written, photographic and drawn materials are property of and copyright by NewWoodworker.com LLC 2000-2019. Materials may not be used in any way without the written permission of the owner.