
This is a Veteran Owned site
 |
||||||||||||||||
Making Stopped Dados
One cut from perfectionText, photos and video by Tom Hintz Revised - 3-17-2010 Dados are a favorite joinery method of woodworkers because they are very strong, easy to make with common tools, and can be used in a wide range of applications. When trim molding or a face frame is not used, a stopped dado is often the choice to conceal the groove at the visible edge of the project. A stopped dado is nothing more than a regular dado that ends before reaching the front edge of the piece. A notch is cut in the front edge of the shelf so it fits flush with the front edge of a cabinet, giving the visual impression of a butt joint. Cutting this notch accurately is critical to how the joint looks when assembled. Small errors produce gaps between the shelf and sides that can reduce the appearance of an otherwise well made piece. For our purposes here we assume the dados are sized and located correctly. If you need more information on making dado joints, see the resources at the end of this article. The Groove
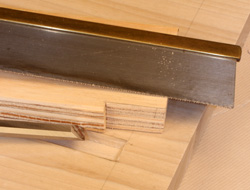
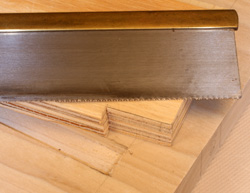
A stopped dado groove is cut with the same tools and procedures used for through dados, except the groove is terminated before reaching the visible edge of the side piece. I like to end stopped dados about 1-inch from the front edge, as this seems to provide enough surface area at the notch for glue to be effective in helping hold the joint closed. There is also enough material remaining to reduce chipping of the shelf while cutting the notch. When a stopped dado is cut on the table saw, the radius of the blade leaves a "ramp" that has to be made flat and square. A sharp chisel and a little patience takes care of this task. If a router is used to cut the dado you can square the rounded end of the dado with a chisel, leave the dado alone and round the edges on the shelf to fit, or simply cut the notch far enough back to fit in the straight portion of the dado. I favor cutting the notch back as there is sufficient glue surface over the rest of the joint to more than compensate for this small, hidden gap left by the radius of the router bit. The NotchForming the notch at the front of the shelf should be a simple task, but this is where the majority of stopped dado fit problems originate. More often than not, these problems come from making the cut in the wrong place even though the layout lines were correct.
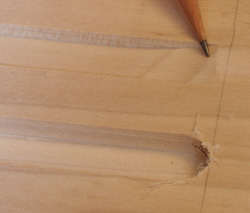
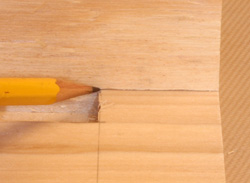
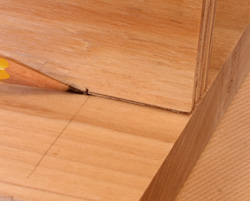
To lay out the notch, hold the shelf against the side next to the dado with its front edge flush with the front edge of the cabinet. Make a vertical mark indicating the rear of the notch, making sure it either clears the rounded portion of the dado or, if the dado has been squared, leaves approximately 1/16" of free area between the rear of the notch and the end of the dado for adjustment and trapped glue during assembly. Next, set the crosspiece in the dado, making sure it is fully seated over the entire length. Using a sharp pencil, trace a line where the shelf meets the side, indicating the depth of the notch. Make sure this line is long enough to lay out the full length of the notch needed. Cutting the NotchThis step is where most fit-related mistakes seem to occur. Many woodworkers have conditioned themselves to make cuts somewhere on the layout line. For most tasks, this consistency is a very good practice. In the case of a stopped dado, when the layout line is made as described earlier, the line actually marks material that is not to be removed. Remember, when you traced the layout line the shelf was fully seated in the dado, meaning it can only be above the material we want to remove.
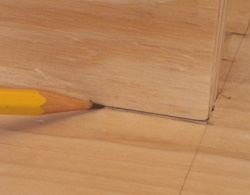
If this cut is made anywhere between the layout line and the end of the shelf, the notch will be over-sized and will hold at least some of the joint apart. Cut into the layout line and there will be a gap at the notch because it is under-sized, allowing the rest of the dado to bottom out before the notch does. The trick is to remove the waste material right up to, but not into the layout line. The notch can be cut on most of the power tools we use but these pieces are often large enough to be awkward to handle. Making an accurate cut can be difficult, but more importantly, the procedure can be dangerous if you are having difficulty controlling the piece as it goes through the cutter. I have found a good dovetail saw is often the most accurate, easiest and safest tool for this job. I extend the layout line across the thickness of the shelf with a combination square to help insure a clean fit. The most important technique is to take your time and pay attention.
I have also cut this notch by nibbling away the material on the table saw. I used my combination blade and a gauge block because I had several notches to do for the project. Overall I think I saved a bunch of time because I didn't have to "sweeten up" any of the notches afterwards to get them to fit properly. If using a dovetail saw is new to you, practice a little on some scrap to get the feel of the saw and how it cuts. Making the cut slightly away from the layout line and then fine-tuning the fit with a sharp chisel or rasp is an acceptable "cheat" to insure a good fit. It takes a little longer to shave away small amounts of wood to "tweak" the fit but the results are worth the effort. With a little experience, fine-tuning is quick and easy, if needed at all. Stopped dados are a great way to add a touch of craftsmanship to even simple projects. Like any technique, there is a learning curve. In this case, the effort required is minimal but the benefits to your projects can be great. Related NewWoodworker.com ResourcesDo you have a comment about this page? - Email Me! |
||||||||||||||||

All written, photographic and drawn materials are property of and copyright by NewWoodworker.com LLC 2000-2019. Materials may not be used in any way without the written permission of the owner.