
This is a Veteran Owned site
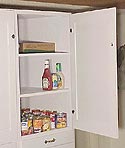
Pantry CupboardBy Tom Hintz Plans are now available for the Pantry Cupboard - Click Here! Despite a full compliment of kitchen cabinets, we needed additional storage space for canned goods, small appliances and other kitchen-related stuff. Additional storage space in the kitchen itself would have been ideal, and is in the master plan. To fill immediate needs, a more-or-less unused space in the garage, next to the kitchen door, was pressed into service. Because this cupboard would be located out of sight in the garage, design consideration focused on functionality. The only visual consideration was that it not appear to be falling over. The space available for the cupboard produced dimensions as follows; The top section was divided by two shelves and the lower by one. A loose design concept was that the top section would be used primarily for storage of canned goods and the lower for small appliances and other larger items. Both sections have "floors" that are also used as shelves. The upper and lower compartments were separated by a pair of 3-inch-tall drawers. I used ¾-inch-thick SBS (sanded both sides) plywood for the carcass and shelves with the finished project consuming just over 3 ½ 4x8 sheets. One 4x8 foot sheet of luaun plywood was used for the back and another for door panels and drawer bottoms. The drawers, face and door frames were made from ¾-inch-thick southern yellow pine.
The basic carcass was built using dados to locate the shelves, top, bottom and drawer frame. The back panel was set into a ¼-inch rabbet. The toe kick panel was fit into the space below the bottom shelf and between the side panels. This served to support and level the bottom shelf and, in combination with the face frame and door thickness, add a 1 ½-inch toe kick setback. Because all of the plywood had a gentle warp (big surprise huh?) I ripped a full-height centerpiece for the face frame, 3 ½-inches-wide. This piece was attached to the bottom shelf first because it was already flat. From there I worked my way up the cupboard adjusting each shelf until a 36-inch level lay flat on its surface before nailing it to the center face frame. The outside vertical face frame pieces are 1 ¼-inch-wide strips pine to allow adequate support for door hinges. The remaining face frame pieces are 3/4x3/4 pine strips. The drawers are built with simple rabbet joints at the front, a dado at the rear and a groove around the bottom for the ply. The doors have full-length grooves for the luaun plywood panels and mortise and tenon (haunch) joints at the corners. Very simple hinges, magnetic latches and pulls were used since I am the only one in the garage most of the time and am not impressed with fancy hardware on a dead simple cabinet. With construction completed, the cupboard was turned over to my finishing department, my wife, Beth. She coated the pantry cupboard, inside and out, with two coats of plain white semi-gloss latex paint over a single coat of latex primer. Again, nothing fancy, but very functional. This pantry cupboard turned out big, heavy and very useful. There is nothing fancy about its construction, but it serves it's purpose, and the cost to build it was minimal.
Do you have a comment about this page? - Email Me! |

All written, photographic and drawn materials are property of and copyright by NewWoodworker.com LLC 2000-2019. Materials may not be used in any way without the written permission of the owner.