
This is a Veteran Owned site

 |
The Ready2Rout Router Table Fence from Rockler makes producing spot on joints, dados and more simple. We all knew that computer technology would get down to woodworking eventually - that is today. Click image to enlarge |
Ready2Rout Router Table Fence
CNC accuracy for YOUR shop!
Text, photos and video by Tom Hintz
Posted – 11-12-2013
You knew it had to happen. The accuracy of computerized control is a natural for the router table fence. With the difference between a too-tight or too-loose joint and a good fitting one being measured in 0.001” increments the old “bump till it’s right” method of fence adjustment fails miserably. Now Rockler offers the Ready2Rout Router Table Fence and dead-on accuracy is suddenly simple and more importantly repeatable. Accuracy is no big help if it is not consistent.
The Ready2Rout Router Table Fence uses an ultra-precise stepper motor driving an equally precise specially threaded shaft to position the fence with an accuracy of 0.001”. The Ready2Rout Router Table Fence has a built-in computerized “brain” that lets you do remarkable things with this newfound accuracy using on-board APPs (applications) and a control screen. You can still “bump” the fence position but now you can do it in specific increments down to 0.001” and be sure of each bump. Because new APPs will be developed in the future the Ready2Rout Router Table Fence has a USB socket that will let you update the computer inside and make your Ready2Rout Router Table Fence even more useful.
Assembly
Because all of the fancy computerized stuff is handled internally assembly of the Ready2Rout Router Table Fence is very simple. You have to attach two hold down wings with provided screws and one nut per side. You also have to install right and left fence wings using bars and large setscrews. The result is a rock-solid unit when attached to your router table.
 |
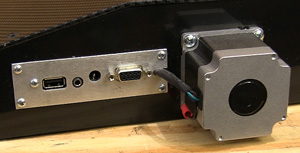 |
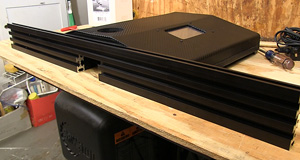
The fence itself (left) is big and has several grooves that make adding your shop made jigs and fixtures easy. The stepper motor (right) is what is controlling the movement of the fence, down to 0.001" of movement! Click images to enlarge |
|
The fence is 32”-long and 3” tall. It has full length grooves that make adding temporary faces or jigs fast and easy. The capacity of the Ready2Rout Router Table Fence is dependent on the size of the table it is mounted to. It has an overall fence travel of 9-1/4” which is going to cover a bunch of project types.
The only other things to do are to connect the power cord/transformer and plug that into the rear panel of the Ready2Rout Router Table Fence. You will also find a socket for the Touch Plate accessory and a USB socket where we can load new apps or upgrades to the internal software. There is also a serial port on the panel that I am told is there for future expansion of this machines capabilities.
Installation and Setup
The Ready2Rout Router Table Fence installs on your router table and in most cases uses the same hardware that secured the fence. After removing your fence place the Ready2Rout Router Table Fence on the table with its mounting slots over the mounting slots in the table stop and install the hardware. I am using a Rockler Router Table and the Ready2Rout Router Table Fence is a direct replacement for the original fence. To start with I aligned the rear of the mounting plates with the back edge of the table to give the Ready2Rout Router Table Fence the greatest amount of travel before snugging down the mounting knobs. I would note later that I never moved the Ready2Rout Router Table Fence from this position during the evaluation.
Aside from connecting the Ready2Rout Router Table Fence to power and a dust collector that really does it for the installation. However there is one optional accessory that will make using this unit much faster and dead-on accurate and that is the Touch Plate.
 |
 |
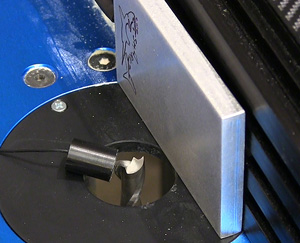
The Touch Plate accessory (left) make calibrating the Ready2Route fast and dead-on accurate. Within each APP (right) you will find areas to enter your dimensions and run the cuts. Click images to enlarge |
|
The Touch Plate is a rectangular metal plate that is ground to a specific thickness. It is connected to a pair of wires, one that plugs into the panel at the rear and another that terminates in a magnet that is placed on the router bit. An APP in the Ready2Rout Router Table Fence uses this Touch Plate to automatically identify zero. When you run the APP with the Touch Plate against the center of the fence it advances slowly until the plate touches the bit. That completes the circuit that stops the fence and calibrates zero within 0.001”.
Control Screen
The Ready2Rout Router Table Fence is controlled through a touch screen with an LCD display that is sealed against dust. In this screen you can do everything from running the APPs, entering dimensions and parameters and adjusting how the Ready2Rout Router Table Fence responds. You can dial in the amount of each computer controlled “nudge” of the fence and how quickly the fence itself moves to the next position between cuts.
The screen provides access to utilities for updating the firmware and installing new APPs as they are developed. All of the tasks you do in this screen seem almost overly simplistic for the kind of automation and accuracy the Ready2Rout Router Table Fence brings to the shop. Throughout the evaluation using the touch screen was easy. The is a short learning curve in getting used to selecting operations on the screen but that is much like using modern cell phones so there are no worries here.
APP’s
The Ready2Rout Router Table Fence comes programed with APPs for cutting box joints, dados, half-blind dovetails and more. Additional APPs will come along and you can add them to the Ready2Rout Router Table Fence through the USB port. I like this idea as it lets you load the APPs you want and update your machine yourself when you want to do it.
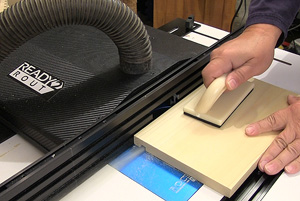
Box Joints
 |
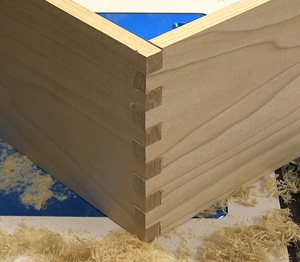 |
We still use the miter gauge to hold and move the wood (left) but the Ready2Route handles putting the fence in the exact position needed for the cuts. This is literally the first box joints (right) that I cut with the Ready2Route. I did not enter any clearance in the software and that is exactly how the joint was cut! I will dial in a bit of clearance in the future on the Ready2Route! Click images to enlarge |
|
Despite many people calling the Box Joint “simple” getting it right can be frustrating on a good day. The Ready2Rout Router Table Fence absolutely makes this an easy joint to make if you simply follow the instructions. The material width must be a multiple of the bit diameter naturally. I am using a 1/2”-diameter bit so cut my wood to 5.5”-wide. The bit height is set to just a shade higher than the thickness as we always do with a box (finger) joint.
Open the box joint app to enter the bit diameter and material width. There also is an adjustment for the clearance between the pins and sockets. You can enter clearances down to 0.001” but I figured that there just has to be some runout in my router and/or bit so left the clearance at zero. I would find out that this was my first mistake with the Ready2Rout Router Table Fence.
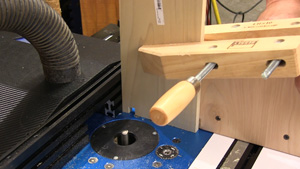
I clamped the material to a fence I added to my INCRA 1000SE, put the Box Joint app at its beginning of the fingers cut and with the wood firmly against the fence made the first cut. All you have to do now is push the “continue” button and the Ready2Rout Router Table Fence moves to the next position. You move the wood against the fence and make the next cut repeating this until the app says it is finished. Do exactly the same for making the sockets only that is done with the wood flat on the table which is easier yet.
With all of the cuts made I tried putting the first Box Joint together and realized my error. The Ready2Rout Router Table Fence really did cut the joint without any clearance. I could get the pieces together with a mallet but not adding any clearance meant that I was trying to fit size-on-size and that presents lots of friction and no place for glue. I would find out later that adding 0.002” or so made it much easier to assemble the joint.
All of the apps work the same way. You set the bit height, tell the Ready2Rout Router Table Fence system the bit size, the wood width and maybe another dimension particular to that joint and press the button to put the Ready2Rout Router Table Fence in position for the first cut. After making the cut push the on-screen button and the Ready2Rout Router Table Fence moves to the position for the next cut. All you have to do is move the wood over so it is against the fence and make the next cut. All of the measuring and positioning of the fence is automatic and spot-on accurate.
 |
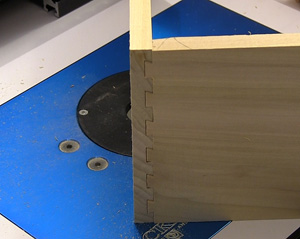 |
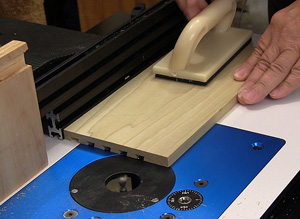
Since most of the wood movement (left) on the Ready2Route is identical to how we have always done it using it is very simple, just way more accurate. This is my first half-blind dovetails (right) on the Ready2Route and it turned out to be a very usable joint! Click images to enlarge |
|
The Dado function has an interesting capability in that it will make multiple passes to cut a specific sized dado with a bit that is smaller in diameter than the width of the dado. You tell the Ready2Rout Router Table Fence what diameter bit you have, the width of the dado needed and how far in from the edge of the wood you want the dado to start. After that the Ready2Rout Router Table Fence does all of the thinking, computes the number and position of the cuts needed to cut the perfect sized dado.
I also tried cutting a dado for a 1-1/2”-wide piece of wood with e ½”-diameter bit. I entered the dimensions and kept pushing the button and making cuts until it said it was down. I had entered 0.002” of clearance and sure enough, the piece of wood fell right into place. A perfect dado cut exactly where I wanted it.
Conclusions
I have to admit that I was a bit skeptical of the practicality of a CNC router fence but now after using the Ready2Rout Router Table Fence in my shop for a couple weeks I see the light. Cutting size-on-size box joints the first time around was impressive. Taking that same setup and dialing in 0.002” clearance and actually getting that in the finished joint is flat remarkable. It isn’t so much the spot on numbers down to 0.001” so much as it is the predictability of the joint fit and reliability of the Ready2Rout Router Table Fence to do that every time.
The other thing that intrigues me about the Ready2Rout Router Table Fence is the future. There are sure to be a bunch of new APP’s coming and that serial port wasn’t put there just in case. I expect we will see lots of additional uses and even capabilities added to the Ready2Rout Router Table Fence without having to trade in the unit itself.
Video Tour |
The Ready2Rout Router Table Fence is selling for $599.99 (11-7-2013) which seems like a very decent price for this level of capability. I can’t see what would wear out on this through normal use so longevity should not be an issue. In addition to the APP’s the ultimate control of the fence will give anyone far reaching capabilities with an accuracy we only dreamed of. No this isn’t rocket science as the accuracy non-believers like to say but being able to cut a dado to fit our real-world wood dimensions and dial in glue clearance accurately is remarkable. It will also make your projects better and in the end that is what we are all looking for.
See the Ready2Rout Router Table Fence page at Rockler – Click Here
Have a comment on this review? –Email Me!
All written, photographic and drawn materials are property of and copyright by NewWoodworker.com LLC 2000-2019. Materials may not be used in any way without the written permission of the owner.