
This is a Veteran Owned site
|
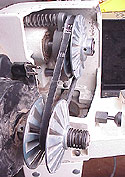 |
Changing the drive belt is easy, if you pay attention and don't get too inquisitive! Click image to enlarge |
I try to make a habit of checking over my equipment occasionally. The idea is to find potential or emerging problems before they become expensive. Though my Jet JWL-1236 Woodworking Lathe has been working perfectly since I assembled it about a year ago, I occasionally remove the pulley mechanism cover to clean that area and take a look. Recently, after receiving three emails from other Jet lathe owners asking how to change their drive belt, I noticed mine also needed replacing. After checking the Jet website (www.jettools.com) and finding no publicly available instructions, I decided this story was needed.
Is The Belt Bad?
The first thing is to determine if the belt really does need replacing. To inspect the belt you have to remove the cover, but only after unplugging the lathe!
If your lathe is a year old, replacing the belt is not a bad idea regardless of how it looks. I had recently
 |
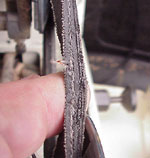 |
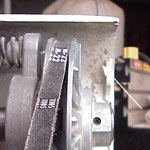
(Top) A build up of "lint" indicates wear of the belts fabric layers. (Bottom) Any signs of fraying, cracking or separating mean you need a new belt. Click image to enlarge |
noticed an odd noise when shifting the lathe from high to lower speeds, almost as if the machine was going through some kind of harmonic. That noise appears to have come from a "wave" that developed in the belt at speed that dissipated as the rpm dropped. Installing a new belt eliminated the wave, and the noise.
If your belt shows any signs of stretch, cracking, ply separation or fraying, it definitely needs to be replaced. You may also notice debris that looks similar to lint on the inside of the cover in line with the pulleys. This actually is a kind of lint, generated by the sides of the belt and the fabric plies within it wearing against the pulleys. Though finding lint does not automatically indicate imminent failure, more than a little lint is sufficient reason to put belt replacement on your short term planning list.
Remove the Old Belt
The first step is to make sure the speed selector handle is in the "Slow" position. If it is not, start the lathe, move it to the Slow position and then shut the lathe off.
Before going any further, UNPLUG the lathe from the electrical supply! Fingers will fit between a belt and pulley, and once trapped will make the trip around the pulley. The results of that instantaneous trip around the pulley can range from very painful to devastating. What is certain is that it is always a decidedly unpleasant experience.
 |
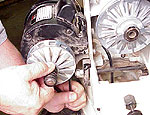
Roll the old belt off the side of the pulley as shown, then rotate the pulley to "walk" the belt off. Be careful not to get your fingers between the belt and pulley! Click image to enlarge |
Remove the belt cover and inspect the area for accumulations of debris, signs of excessive wear and broken parts. Chances are if something is broken, you would have some other indication but looking is free can could save a bunch of money if you catch something early in the failure process.
One of the first things you will notice about the machinery is that both the spindle and motor pulleys are spring loaded. The springs are part of the variable-width pulley system that lets you change spindle speeds without having to move the belt from pulley to pulley. Those springs are a warning that we do not want to take any of this apparatus apart. Bad things come quickly to those who mess around with spring-loaded mechanisms.
Fortunately, we do not have to take anything apart to change the belt. With the speed selector in the Slow position, we can roll the belt out of the groove on the spindle pulley (upper one), without tools. Hold it to the side of the groove and rotate the pulley clockwise, keeping your fingers out from under the belt on both pulleys while doing this. The lower pulley is in the spread position and will close as the belt is removed from it. Just let it close up gently as you rotate it to free the belt. Don't try to hold the pulley open with your fingers or anything else.
Now is a good time to take a good look at everything to be sure nothing is going wrong that needs to be addressed. While accessible, clean the area thoroughly using a soft-bristled brush to loosen debris before vacuuming it out. I don't like using compressed air around bearings because it is easy to accidentally blow debris into a bearing and that could shorten its life. A vacuum is effective and much safer for you and the machinery.
Install the New Belt
 |
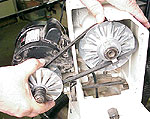 |
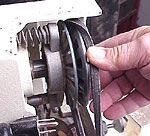
(Top) Pulling on the spring to reduce it's tension a bit helps get the new belt seated in the pulley. (Bottom) Hook the new belt into the pulley and then rotate both pulleys to "walk" the new belt into place. Click image to enlarge |
The first order of business is to get a new belt. Your options appear to be ordering one from Jet or locating one closer to home. I found that my local NAPA auto parts store had a good replacement, made by the Gates Rubber Company. The NAPA number is 3L240 and it cost about $5. I actually tried another national chain auto parts store a bit closer to home but after being asked three times what kind of car it was from (and telling him it was from a lathe each time) and then having the ace counter person inform me that automotive belts ARE NOT used on machinery, I headed for NAPA, and a much better buying experience.
The only trick to installing the new belt is getting it into the motor pulley that closed when the old belt was removed. The spring pressure is strong enough to make opening the pulley by hand somewhere between very difficult to impossible. DO NOT try to pry the pulley open with anything as you will damage the surfaces where the belt rides and could break the pulley. There is a better way.
Wrap the belt around the pulley and pull upwards. At the same time, pull on the spring holding the pulley closed with your other hand. With only moderate effort, the belt should slide down into the pulley.
Holding a little pressure on the belt will keep it seated in the motor pulley, while you press the belt onto the leading edge of the spindle pulley above it. Hold the belt in the spindle pulley and turn the motor pulley (clockwise) by hand to roll the new belt into position. It may get a little tight just before passing over center, but it will roll into the upper pulley groove with relative ease.
When the belt slips into the grooves on both pulleys, turn them by hand a few times just to be sure the belt has worked its way fully into both.
Put the cover back on, plug the machine in and start it up, running on low speed for several seconds. If everything sounds and appears to be operating normally, run the speed up a step or two, and then return to the slow setting.
Your lathe is ready for another year or so worth of use, and you know how to change the belt the next time that service is needed.
See more on the Jet JWL-1236 lathe - Click Here
Do you have a comment about this page? - Email Me!
All written, photographic and drawn materials are property of and copyright by NewWoodworker.com LLC 2000-2019. Materials may not be used in any way without the written permission of the owner.