 |
Turning bowls is easy, but is best learned starting with the basics.
Click image to enlarge |
Bowl Basics
Turning a simple bowl
Text & Photos by Tom Hintz
Now Available! The Basic Bowl DVD from NewWoodworker.com LLC! This 54-minute DVD covers the entire process of turning a basic bowl and was specially designed to answer the most frequent bowl-related questions we receive. For more info on The Basic Bowl DVD - Click Here
Note: This story looks at basic bowl turning using a chuck (Talon from Oneway) and its wood screw. While there are other tools and techniques for turning bowls, I consider a good chuck to be the safest and most efficient, especially for beginners. In addition, a chuck has many other uses on the lathe that make it a good investment.
The process of turning a block of wood into a bowl is both fascinating and gratifying. The procedures described here apply to virtually any style bowl but this story focuses on the basic, tapered side shape. After developing your skills on this style bowl, moving on to more complicated shapes or designs will be much easier, and safer.
Types of Wood
Fresh-cut (green) wood is a favorite for practice because it cuts very easily. The downside is that as material is removed, the bowl begins drying quickly which makes it susceptible to cracking if left partially done for any length of time. If you have to stop turning a green blank before it is finished, wrapping it in a closed plastic garbage bag will help retain the moisture in the wood, reducing the chances of splitting.
Even sealing the blank in a bag may not prevent its distorting. A partially cut blank can develop an oval shape very quickly. When possible, plan enough time to turn and finish the bowl in one session.
Dried woods are much more stable but can be more difficult to turn. I turned both wet and dried woods while learning and while frustrating at times, I feel the mix helped me learn the basics a little faster.
Prepare the Blank
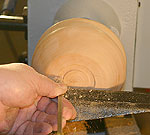
 |
Removing the excess wood makes the initial phases of turning easier and safer.
Click image to enlarge |
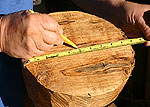
There are two basic types of blanks: a cut square and rough-shaped pieces of a log. In either case, we need to find the center of both the top and bottom of the blank.
If the blank has bark on it, now is a good time to remove that and any loose pieces or knots that could come off during turning. This can also reveal which side will work best for the bottom or top of the bowl.
Cut squares are seldom truly square but laying a straightedge across the corners and scratching an "X" where they cross is a quick way to find the center of the mass. Mark both sides and punch the centers of the X with an awl.
With erratically shaped blanks I use a centering tape (Centerpoint) to measure across the blank in several places, drawing a line a couple inches long at the center. This usually results in several lines that may
 |
Using a centering tape makes finding the center of mass easier on oddly shaped blanks.
Click image to enlarge |
not cross each other at the same point but will "frame" the actual center of the mass. Use an awl to punch a starter hole in the center of the "frame." As with squares, mark the other side using the same procedure.
The centering tape method is especially useful when the blank has a protrusion on one or more sides that will obviously have to be trimmed or turned away. Take the center-finding measurements across sides that are closer to a round shape, working around the protrusions. This finds the center of the useable mass to get the largest bowl possible from that piece of wood.
Decide which side will be the bottom of the bowl and which will be hollowed out. Drill an appropriately sized starter hole for the chucks wood screw in the side to be hollowed out.
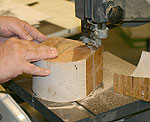
Rough Rounding
Using a compass, draw the largest complete circle possible on both faces of the blank. Trimming away as much of the material outside the circle as possible before mounting the blank on the lathe improves balance, plus makes the initial rounding easier and safer. If the blank is tapered, trim to the largest side.
When available, the band saw is the best tool for removing waste but a good hand saw can be used. While some use a circle cutting jig on the bandsaw, I freehand the cuts, staying just outside the circle line.
Before going to the lathe, check the blank once more for loose pieces, knots or other defects that trimming may have revealed.
Mounting the Blank
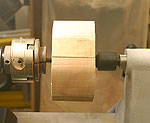 |
Using the tailstock to help guide and push the blank onto the wood screw makes this operation much easier and more accurate.
Click image to enlarge |
Install the wood screw in the chuck according to the manufacturers instructions and then turn the lathe on to be sure it is centered. When certain there is no wobble to the screw, lock the spindle.
Hold the pilot hole drilled earlier in the blank against the screw and then bring the tailstock to the other side. Insert the live centers point in the dimple made with the awl earlier and lock the tailstock base. Turn the tailstock crank to apply a little pressure against the blank.
Turn the blank clockwise to begin threading it onto the wood screw, turning the tailstock handle at the same time to maintain moderate pressure on the blank. I have found this to be the easiest way to thread the blank onto the wood screw very straight. It also allows you to use both hands when the blank begins to tighten on the screw.
Note: On smaller diameter hardwood blanks I have occasionally had to use a strap wrench to gain enough leverage to finish turning the blank onto the wood screw fully. With most chucks, the blank will butt against the jaws when fully seated on the screw.
Release the spindle lock.
Set Up the Lathe
Position the tool rest about 1/8" from the highest point on the blank on the horizontal centerline and parallel to the wood. Turn the wood through a couple revolutions by hand to make sure it clears before locking the tool rest and its mount (banjo) in place.
Bring the tailstock up to the work piece if it has been moved and insert the tip of the live center into the hole in the center of the wood. Lock the tail stock base and crank a little pressure onto the live center before locking that down. Light pressure against the workpiece is all that is needed to steady the wood during the initial turning steps. The wood screw handles securing the wood.
Rounding the Blank
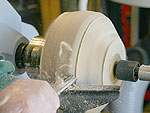
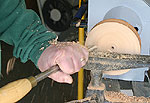
 |
Using a scraper for the initial rounding is easier and less likely to produce a catch. Once the blank begins to round out, I change to a bowl gouge.
Click image to enlarge |
The initial rounding should be done at low speed, using a conventional bowl gouge, fingernail grinds or even scrapers. If the blank is badly out of round, I like using a heavy scraper to turn away the major high spots as it is easier to handle and less likely to catch. When most of the blank is round, I'll switch to a bowl gouge.
Adjust the height of the tool rest according to the type of chisel being used. For scrapers the tool rest should be a little below the centerline of the wood, for gouges slightly above. Make sure the tool rest is parallel to the wood, lock it in place and spin the wood by hand to be sure it clears.
Turn the lathe on the slowest speed and begin taking light cuts across the wood to remove high spots. As the wood is cut away, the tool rest will have to be moved closer to the wood to minimize the amount of the chisel hanging over it. I try to keep the space between the tool rest and wood to ¾" or less.
During the rounding process, you may be able to begin shaping the bowl at the same time, especially when working with rough-cut blanks. In these cases, as the tool rest is repositioned, you can angle it slightly to begin forming the basic bowl shape as the piece is rounded.
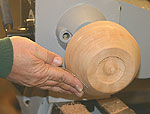
Shaping the Bottom
 |
Cutting a recess or spigot will be needed to use a chuck to hold the blank when turned around for hollowing.
Click image to enlarge |
After rounding the sides of the blank, prepare the bottom for whatever method will be used to secure it to the chuck.
First, turn the bottom surface flat. Then, the final shape of the bottom can be cut. Though I most often use a recess into which the jaws of the chuck fit, cut and glued-on tenons are options. The manufacturer should provide dimensions and special shaping information in the instructions that came with your chuck. Always follow the chuck manufacturers recommendations as their jaw designs may require a specific taper, depth or diameter to maximize gripping power.
Glued-On Tenons
When using glued-on tenons, make sure the mating surfaces are flat and free of finishes. Many turning blanks are coated with some form of wax to control drying. Also, many turning finishes also have wax in them that will compromise a glued joint. It is important to remove contaminated wood before gluing a tenon on.
With the tenon and bowl blank prepared, apply glue and place the tenon on the bowl, being certain it is centered. When satisfied, use the tailstock live center to apply a moderate amount of clamping pressure to hold the tenon place until the glue dries. Remember there is a considerable amount of surface being glued. To be sure this bond is cured, most turners allow the glue to dry overnight. There will be a considerable amount of weight spinning on the tenon so do not take chances.
Hollowing the Bowl
 |
Taking light cuts during hollowing is safer and lets the beginner maintain control over the developing shape.
Click image to enlarge |
Start by flattening the face to be hollowed. A flat surface is much easier to work with, especially near the edges where a catch can be very damaging to the blank.
While taking deep cuts to hasten the hollowing process can be tempting, multiple lighter cuts are safer and less likely to produce catches or strain that could pull the blank out of line in its mount.
As material is removed, concentrate on keeping the sides straight and the bottom flat. This takes some practice but is worth the effort as it makes keeping track of the overall depth and wall thickness much easier. Check both of these dimensions often. If a recess was cut in the bottom of the blank for the chuck, be sure to consider that when measuring the depth of the interior. It is easy to get carried away and break through the bottom.
When the interior dimensions get within a ¼" of the finished size, start taking lighter cuts. This allows sneaking up on the final size and smoothes the surface. Until your tool-handling and sharpening skills improve, the surface may still require considerable sanding. Have faith, that gets better.
True the Lip
The last step in the cutting process is finalizing the lip. Taking very light cuts, true the lip and create whatever shape is desired. Working at the edge of a bowl can be a little dangerous as catches are always a possibility. I like using a sharp scraper to true the lip and then finish the edge with sandpaper.
Finishing
 |
|
When sanding (Top) or applying finish (Bottom) hold the paper or cloth so it can slip easily from your grasp if a catch should occur. Never wrap anything around your fingers!
Click images to enlarge |
Virtually any type of finish can be used but woodturners are particularly fond of "friction" finishes, materials that are applied and then buffed or "burned" in right on the lathe. Most often these finishes contain some form of wax that reacts to the heat generated by holding a cloth on the spinning wood.
Sanding and finishing on the lathe often means turning the piece at rather high speeds to generate the necessary heat to "cure" the finish. Turners do this every day but it can be a dangerous process if not done with caution.
Never wrap sandpaper or a cloth around your fingers. In case of a catch, you want the paper or cloth to slip out of your grasp rather than twist your fingers or hand around, potentially pulling you closer or into the spinning workpiece.
Take your time when finishing, think about what you are doing and follow the directions on the finish container. Most importantly, remember that there is nothing wrong with applying finish off the lathe. Sometimes a sprayed on finish can look very good.
Options
There are many tools, accessories and techniques for turning bowls, some of which are best used after gaining experience with the basics described in this story. After developing your skills and confidence using the lathe, chuck and tools, you can more easily progress onto other more complicated designs and tools.
Watch for reviews of more specialized tools and more How-To's that will be added to the Woodturning section of NewWoodworker.com in the future.
Need woodturning gear? See the Lathe section of our Tool Reviews and the Lathe pages of the Tool Room!
|

