 |
Turning pens is inexpensive but big on fun.
Click image to enlarge |
Turning Pens
Cheap thrills at the lathe
Text & Photos by Tom Hintz
Note: I also have a full-length DVD on Turning Pens - Click Here for info on that DVD.
Pen turning is growing in popularity because it is fun, easy and can be done on virtually any size lathe. Another attraction is producing unique gifts for friends or even merchandise for sale.
In this story, we will turn a basic pen and look at the necessary (and not so necessary) tools. This is only the beginning though. Master the basics and the only limiting factor is your imagination. Everything from the materials used to the shape of the pens is open for exploration.
Equipment
 |
Getting started in pen turning is not expensive but can be very rewarding.
Click image to enlarge |
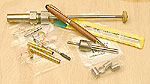
Turning pens, mechanical pencils, letter openers, magnifying glasses, perfume spitzers and more requires a surprisingly small investment to get started. Aside from the lathe, the only must-haves are a pen mandrel, barrel-trimmer and a metric drill for the style pen being turned. If you choose to get in further, a drilling vise and pen press pretty much maxes out the equipment list.
Free (Almost) Wood
 |
My home-made jaws work fine for drilling the blanks.
Click image to enlarge |
One of the things I like about pen turning is that scraps from other projects can often be cut into pen blanks. The only real stipulation is that the grain should run down the length of the pen, not across it. The wood tends to fracture when the grain cuts across the pen. I have had some success with the grain running diagonally across the pen but there were nearly as many failures.
When buying wood for pens, deals can often be found in cut off or scrap bins. In addition, many exotic woods are available in reasonably priced sticks cut specifically for making pens.
Preparing the Blank
Start by cutting the wood blanks to about ¼" longer than the tubes from the pen kit. Mark the center on one end of each blank and using the drill specified for the pen kit, drill a hole through the length of the blank.
 |
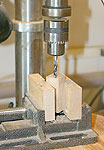
Getting the blanks to this stage often takes longer than turning the pen!
Click image to enlarge |
Special vises are available for this operation that help hold the blank square on a drill press. I made a pair of hard maple jaws for a cheap drill vise. With the jaws closed, I drilled a ¼"-diameter hole centered on where the jaws met. This produced a groove in each jaw face that is theoretically perfectly square to the drill. I put the blanks in the jaws with opposite corners in the grooves.
Rough up the outside of the brass tubes with very coarse paper to give the glue something to hold on to inside of the wood blanks. I use pieces of old coarse sanding belts. Make sure that the scratch marks run around the tubes, not down the length.
Though some use epoxy, many prefer slow-setting CA (cyanoacrylate) glue for securing the tubes within the wood blanks. Put glue inside the blank and on the tube before quickly pressing the
 |
The barrel trimmer squares the end of the wood and shaves it down to the tube.
Click image to enlarge |
tube into the blank. Ideally, the ends of the tube should be slightly inside either end of the blank so it can be trimmed square.
Allow plenty of time for glue to cure before continuing.
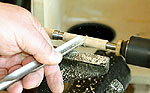
Use a barrel trimmer (the mandrel sized to match the inside diameter of the tube) to square the wood at either end of the blank and trim it flush to the ends of the brass tubing. Be careful not to shorten the brass tubes as they are cut to a specific length to match the pen parts. I trim the ends until the cutter just shines the ends of the brass tube.
Note: Some barrel trimmers are designed specifically for hand use. I have had good luck turning my barrel trimmer in a drill press set at its slowest speed. I hold the blank in a clamp to help resist the torque effect and to keep my hands far away from the moving drill press parts.
On the Mandrel
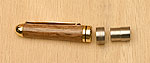 |
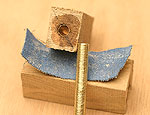
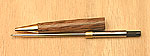
Some pen kits use the ring at center to size the tenon for the decorative ring shown installed on the upper barrel.
Click image to enlarge |
For many fledgling pen turners, the most difficult thing is getting the bushings and barrel blanks on the mandrel in the proper locations. Make sure you get instructions specific to the pen kit when you buy them. Most woodworking stores have the instructions on hand. You can also download the instructions from Internet sites that sell the pen kits.
Before putting the blanks on the lathe, make sure you understand how the bushings are to be arranged. Most bushing sets have three or four pieces that must be in specific positions. These bushings are your guide to the final diameter of the wooden barrels. There may also be a loose ring, usually on the center bushing used to size the end of the upper barrel for a decorative ring.
The blanks themselves are often different lengths and must be oriented correctly on the mandrel. Again, the instructions should specify these locations.
With the bushings and blanks installed and their positions checked against the instructions, tighten the jam nut on the mandrel. Bring the tailstock up to the end of the mandrel, lock it down and then turn the point of the live center into the dimple in the end of the mandrel. The live center should exert only enough pressure against the mandrel to maintain contact. Too much pressure could bow the mandrel causing a major out-of-balance condition that will instigate all sorts of bad things during turning.
Turning
 |
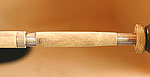 |
(Top) Round the blanks and begin reducing their diameter.
(Bottom) Turn down close to the bushing size.
Click images to enlarge |
Because the pen blanks are small in diameter, the lathe can run reasonably fast. I start the lathe on a slow speed to check balance but do all of the turning with the lathe at one of the middle speed settings.
The turning tools used is a matter of personal preference. I like using a ½"-wide spindle gouge as it feels good to me and I can do everything from rounding the blanks to final shaping. Use whatever tool feels best to you.
If your bushing set has a loose ring on the center bushing, there is an extra and slightly touchy step in the turning. A tenon equal in width to the loose ring, sized so the ring just slips onto it must be turned in the top barrel blank. I use a sharp ¼"-wide parting tool for this most of the time. Take your time and try slipping the ring onto the tenon often. The small diameters we are working with can let you get carried away and cut the tenon undersize very quickly if you are not paying attention.
The most important thing to remember when turning is that the blanks cannot be smaller in diameter than the bushings. Leaving the wood slightly larger than the bushings and sanding them down to final size is an acceptable "cheat." It also prevents contact between the metal bushings and what I hope is the finely honed edge of your tuning tool.
 |
Sanding the barrels the rest of the way down to the bushing diameter is safer for the tools and more accurate.
Click image to enlarge |
Though it may be tempting to turn a fancy shape into your first pens, stick with basic shapes until you get the feel of the process. After gaining a little experience, it will be easier to turn the imagination loose.
Sanding
If you have been practicing rubbing the bevel with your turning tool to leave a super-smooth surface, you can reduce the amount of sanding needed. You will not eliminate it though. One of the keys to getting a nice finish on pens is sanding down to very fine grits, often 600-grit and finer. Because the turned pen barrels are so small, they can be turned and sanded rather quickly.
If the pen has a tenon for a ring, avoid rounding this edge over during sanding. I keep the ring on the tenon when sanding that part of the barrel.
Finishing
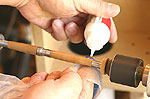 |
I use two or three coats of thin CA glue as a base for my wax finish. The plastic bag over my finger is very important!
Click image to enlarge |
Most finishes are applied to the wood on the lathe, often using the range of speeds to apply and then polish the surface. One of the oddities of pen turning is the range of materials and techniques used. Everything from simple "burned in" wax to CA glues and complicated home-brewed concoctions are being applied. I would suggest keeping the finish on your first few pens simple.
The finish I use most is a combination of thin CA glue and wax. The CA gives me a reasonably hard surface and fills the grain while the wax shines the surface quickly.
With the lathe on the slowest speed, a plastic sandwich bag covering your finger, apply drops of CA to the top of the wood and smooth it in a thin coat along the surface. I find it easiest to put my finger on the underside and drip the CA from the top. Start at one
 |
With the lathe on high speed I "burn in" the Hut wax to complete finishing.
Click image to enlarge |
end and smooth the CA in one pass the other end of that barrel. Move your finger to a new spot on the bag, repeat the process on the other blank and then shut the lathe off.
You can't go back touch up the first pass because the CA is already setting up. The CA will also begin drying immediately on the bag which is why I move my finger to a new place on the bag before moving to the next spot or application.
Let the CA dry completely (several minutes) before lightly sanding the surface smooth and repeating the process. How many coats to apply is strictly up to you. If the wood is porous, applying several coats of CA will help fill the grain. Some like to apply many coats of CA to develop a shine on its own though I find this a very difficult process. You may not.
Most often, after two or three coats of CA I will lightly sand the wood (600-grit or finer) to be sure it is smooth and then apply light coats of Hut wax, (sticks) buffing each coat in. Usually two or three coats produce the soft sheen I am looking for. Again, how many coats is up to you and what look is desired.
Whatever finish is used, allow it to dry completely. Before assembly, I use the barrel trimmer (by hand) to clean up the ends of the tubes to remove any built up finish that could affect how the parts seat.
Assembly
 |
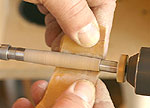
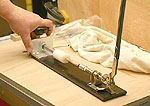
Pre assembling the cartridge and mechanism will provide a good idea of how deep the mechanism has to be pressed. Sneak up on that depth!
Click image to enlarge |
The instructions for your pen kit will specify the assembly sequence and any special considerations for this part of the process. The other important aspect of assembly is how the parts are pressed into place.
I began pen turning using the woodworking vise on my bench to press the parts into the barrels. That worked OK but I did have problems that resulted in killing a few nearly completed pens. That caused me to spend the $30 for a legitimate pen press, making the assembly process easier, more accurate and far safer for the pens themselves.
The biggest trick to assembling most pens is seating the internal mechanism correctly so the cartridge tip extends far enough for writing but also fully retracts.
 |
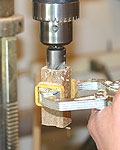
A pen press makes assembly much easier, more accurate and safer for the pens.
Click image to enlarge |
Testing the fit as the unit is pressed into the barrel remains the easiest way for me to get this right. Remember that getting the mechanism back out once it is pressed in place is very difficult, often requiring a special tool.
Screw the pen cartridge into the mechanism and make sure it is in the extended mode. Hold that assembly next to the blank, the tip extending ¼" or so (whatever looks right) past the metal end. Mark the mechanism to show how much will protrude from the barrel at the other end. Remove the cartridge and begin pressing the mechanism into the barrel, stopping short of the mark. Install the cartridge to check your progress. Usually the mechanism will have to be pressed further into the barrel but go in small steps to sneak up on the proper depth.
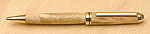 |
Completing the pen is very rewarding.
Click image to enlarge |
If the upper barrel has a decorative band where it meets the lower portion of the pen, glue that in position and allow to dry completely before assembling the pen. I normally use thick Ca for attaching this ring but epoxy and polyurethane glues are also popular.
When all of the glue has dried, install the cartridge and top barrel to complete the pen. Check the operation and buff it up.
Your first pen is complete! However, if you are like most novice pen turners, there are many more to come.
|
