 |
Turning a peppermill is as much sequence as it is technique.
Click image to enlarge |
Turning A Peppermill
Sequence is as important as technique
Text & Photos by Tom Hintz
Note: What follows is my way of turning peppermills. If the instructions that came with your peppermill mechanism differ, follow them, particularly in regards to dimensions. Click Here to see my full-length DVD on turning peppermills.
Turning peppermills is one of the more common lathe projects, but one that can be a little intimidating. The truth is, turning peppermills is relatively easy once you understand the basics - and sequence - of the process.
Equipment
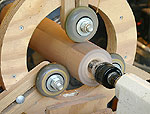
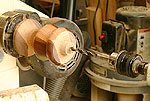
Turning peppermills does not require a lot of fancy equipment but there are a few pieces you will need. A good chuck is essential and is equally valuable when making many other turning projects. A steady rest is also important for drilling the body.
 |
 |
(Top) A low-speed steady rest can be made in the shop.
(Bottom) I turned this taped plug in minutes from scrap.
Click images to enlarge |
The hole can be bored without a steady rest but will often wander wildly.
Finally, we need a tapered plug that goes on the live center of the tailstock and fits into the hole in the base of the peppermill body. I turned a plug from oak, 1 ¾"-long, 2 3/8"-diameter at the large end and ¾"-diameter at the small end.
A drilling chuck for the tailstock will also be needed. These are relatively cheap and can have other uses at the lathe depending on the type of projects you like to turn.
Prepare the Blank
When turning a peppermill, there will be some waste on the chuck end of the blank. Material must be dedicated to securing the blank in the chuck, plus additional material is left to allow turning the head down to near-finished diameter, usually slightly smaller than the bottom of the mechanism knob. Material will also be lost when the body and head portions are separated. When a tenon is turned as part of the head, additional material for that is required.
I have found it best to calculate all these factors, add the material I feel necessary and then add a couple inches to that just to be safe. That little additional material can get you out of serious trouble later in the process.
Secure the blank in the lathe between centers and rough it to a basic cylinder. Small flat areas will be turned out a little later in the process. Turn a tenon sized to fit your chuck on one end and cut the other end flat as close to the tailstock live center as possible. The material under the tailstock live center will be removed by drilling.
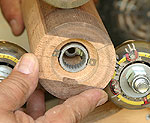
 |
 |
(Top) Drill in as far with the 1" Forstner bit as you can to set up using the longer bits.
(Bottom) Remember to blow the dust out frequently to avoid overheating the bit and wood.
Click images to enlarge |
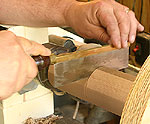
Remove the blank, install the chuck and then mount the blank loosely in the chuck, place a steady rest over the blank and then temporarily support the free end with the tailstock. Remember to keep the tool rest mount between the tailstock and the blank as it will be needed later. Snug the tailstock slightly to center the blank and then tighten the chuck jaws to secure the blank.
Set up the steady rest close to the tailstock end of the blank and secure its base. Adjust the wheels to support the blank and secure them in that position. Remove the tailstock before turning the lathe on at the slow speed to be sure the blank turns true.
Drilling the Blank
Note: Drilling is done at the lathes lowest speed, usually 300 to 500 RPM, to prevent burning the wood and/or the bit. Remember to withdraw the bit often to clear dust and debris that can insulate the cutting edge and cause it to overheat.
Note: If the body itself is over 10"-long, consider boring the 1"-diameter hole in halfway from either end to move any deviation to the center of the body.
To drill from both ends, drill the 1"-diameter hole halfway into the body. Turn a tenon slightly smaller than the maximum diameter your chuck jaws will accept at the tailstock end. This tenon can be turned away later by adding a small cove or other feature at the bottom of the mill.
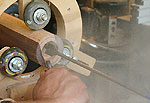
 |
|
(Top) With the cutting edge aligned with the layout mark, put tape around the shank at the bottom edge of the body.
(Bottom) Drill until the tape aligns with the bottom edge of the body.
Click images to enlarge |
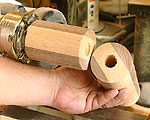
Cut the body from the blank, turn it end-for-end, remount it in the chuck using the tenon. Locate and center punch the center of the cut end, slip the steady rest over the wood and then use the point on the tail stock to hold the blank straight while installing the steady rest.
You can now follow the remaining drilling procedures used to drill shorter bodies. Place a drilling chuck in the tailstock and install a 1 5/8" Forstner bit. Bore a 1 5/8"-diameter hole, ½"-deep in the end of the blank. This creates a recess that sets the mechanism in from the bottom edge of the body and makes room for the retaining bracket.
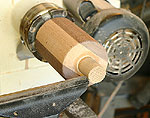
Change to a 1"-diameter Forstner bit and drill the body as deep as the bit will reach. If you have extended-length Forstner bits and are making a short peppermill, the bit may drill to the full depth wanted.
Mark where the body and head are to meet, the width of the tenon if one is to be used at the bottom of the head and the top end of the head. If the peppermill is being turned to fit a certain mechanism length, remember to factor in the ½"-deep recess at the bottom and the width of the tenon.
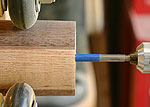
Lay a long 1"-diameter drill on the side of the blank, its cutting edges at the mark showing the end of the body. If the body is to be drilled from both ends, hold the bit's cutting edges slightly beyond the mid point of the body. Wrap a piece of tape around the shank of the bit at the bottom edge of the blank to act as a marker.
 |
Remember to fit the grinder hosing and bracket before cutting the body off!
Click image to enlarge |
Bore the hole until the tape lines up with the bottom edge of the blank. Remember to withdraw the drill often to clear sawdust. Compressed air is most effective at getting the dust out of the hole, especially as the hole gets more than four or five inches deep.
Before moving on to the next step, the 1"-diameter hole must be opened up at the base of the body to accept the peppermill mechanism. Assemble the mechanism's cutting ring and its bracket to use as a gauge. Move the tool rest into place and using a small scraper or a parting tool, expand the 1"-hole slightly, stop the lathe and check the fit of the mill parts. Repeat the process until the mechanism fits into the hole slightly loose. There should be approximately 1/16" clearance at any point around the mechanism.
Cutting the Body Free
 |
 |
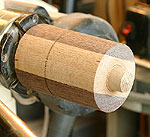
(Top) Cut the body off at the mark indicating the hole depth.
(Bottom) If you were accurate with the layout and drilling, one cut should break through at the end of the center hole.
Click images to enlarge |
You have two options for cutting the body from the blank: use a parting tool or a thin saw such as a dovetail saw.
I like to use the dovetail saw to cut the body from the head because very little material is lost this way, allowing the grain pattern to match closely where the body and head meet. If you were accurate with the layout line and drilled to that depth, one cut on that line will separate the body at or near the bottom of the hole. This technique requires adding a separate tenon to the head rather than turning one.
I drill a 1"-diameter hole approximately ½"-deep in the base of the head and then using a parting tool, adjust the hole to fit a piece of 1 1/8"-diameter dowel 1 ¼"-long. Apply glue and press the dowel in place using the tailstock to apply pressure. After the glue dries completely, shorten the dowel so ¼" to 3/8" projects outside of the head. Turn the dowel down so that it fits snugly into the 1"-diameter hole in the body. After the turning is complete on the outside of the peppermill, the tenon is sanded slightly to loosen the fit in the body for free operation.
If a tenon is to be turned on the head, usually ¼" to 3/8"-long, use a parting tool to reduce that section to a little more than 1". Use a dovetail saw to carefully finish cutting the body away.
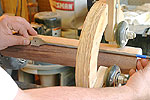
 |
 |
(Top) I like to add an oak tenon rather than turn one from the base material so the grain doesn't vary from the head to the body.
(Bottom) After the glue has dried true the tenon, shorten it and fit it to the body hole.
Click images to enlarge |
Clean up the end of the center hole and slowly turn the tenon (or dowel) so it fits in the center hole snugly. This fit will be loosened up in the final steps but should be very snug to hold the body firmly when turning the outside shape.
I have found that cutting a slight undercut on the head where it meets the body helps produce a tight-fitting seam between the head and body. The taper is slight, just a degree or two, cut from the outside edge of the head to the tenon. A little goes a long way here so don't get carried away!
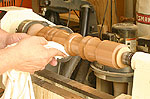
Turn the Outside Shape
Remove the steady rest, push the body onto the tenon and secure the bottom end with the tailstock using the tapered plug described in "Equipment" above. Tighten the tailstock to hold the assembly securely.
If the center hole wandered, the head and body pieces will be out-of-line with each other to some degree. I use the roughing gouge to equalize the head and body and make sure the remainder of the blank is almost perfectly round. Small out-of-round sections can be corrected while turning the outside shape so leave all the material possible on the blank.
Measure from the bottom edge at the tailstock and make a mark at the top of the head, denoting the final length of the peppermill. Remember to factor in the recess in the bottom when turning the mill to fit a specific-length mechanism. Use the parting tool to begin reducing the scrap material above the head but leave at least a 1"-diameter core at this point for maximum support. This area will be reduced in the final stages of turning.
Starting at the bottom of the peppermill and working towards the head when cutting the final shape is a good idea to reduce the stress on what will be a very small diameter section connecting the head to the scrap wood in the chuck.
Though you can allow your creativity to go wild when turning peppermills, how the seam between the body and head will be treated can influence the features surrounding that area. There are basically two choices: celebrate the seam by actually cutting a small bevel on both of the meeting edges to be sure it is seen, or disguise it. I most often disguise the seam by cutting a feature at the seam that normally produces a line of some sort.
 |
|
(Top) When the outside shape is complete and sanded, reduce the wood at the top of the head so that shape can be finalized.
(Bottom) Applying the finish is all that is left before cutting the mill free.
Click images to enlarge |
I turn the entire shape of the peppermill up to where it curves down to form the top of the head. Doing all major sanding at this point while the connecting piece is still large is safest. Final sanding and finishing can be left for when the shape of the head is completed.
When the major turning is complete, reduce the wood connecting the head and scrap to the final dimension wanted. I generally make this connector ¼" in diameter. Make sure to remove as much scrap material as is safe between the top of the head and the chuck to make adequate room to get turning tools in, bevel rubbing, all the way down to the final size of the connector. This is where making the original blank a few inches longer than needed pays off. Shortchange yourself on the length of the blank and turning the top portion of the head cleanly can be difficult to impossible.
Final Sanding and Finishing
With the turning and most of the sanding completed, the spinning mass has been greatly reduced and the piece should be very well balanced. At this point the RPM of the lathe can be safely increased for finish sanding and finishing. That doesn't mean cranking the speed up to maximum is smart or safe. Watch the piece and use your best judgment to determine the maximum speed, erring on the side of safety.
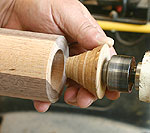
After the finish has been applied and dried as necessary, carefully remove the body from the head. Using medium to fine grit sandpaper, reduce the tenon slightly so that it fits the center hole in the body just loose enough to allow the head to turn easily. A very small amount of wax on the tenon helps smooth this action.
 |
Drilling the hole for the driveshaft is the last step and may break the head free in the process.
Click image to enlarge |
Some like to drill a slight recess in the bottom of the tenon to accept the mechanism's drive plate. If that is planned, do it at this point.
Drill the hole (usually ¼"-diameter) through the head for the mechanism driveshaft. If the scrap wood holding the head is small enough, the head may break free when the drill reaches it. If not, use a dovetail saw to carefully cut the head free at the final length. Sand the edges of the hole to clean that area up and apply finish as needed.
Clean the Center Hole
It is important to remove all of the debris from the inside of the peppermill before use. I made a long sanding shaft, mounted in the chuck that is used to sand away any fuzz left in the hole by drilling. After that some careful tapping, vacuuming, a bottle brush and blasts of compressed air make sure all remaining dust and debris is removed.
Some leave the center hole untreated, others like to coat the internal surfaces. If a coating is to be applied, be sure it is food-safe when dried. Simple shellac is a favorite material for this task as it is easy to apply, fast drying and non-toxic.
Your peppermill is complete and ready for installation of the mechanism. If you are unfamiliar with that process, or if the driveshaft is too long, see Fitting A Peppermill Mechanism. |