nwwlogo

- FlyingRC.net
NewMetalworker.com  -  NWW on YouTube  - Donate


This is a Veteran Owned site
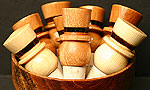
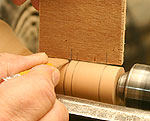
 
This is a fast, easy-to-turn project that makes a great gift!
Click image to enlarge

Turning a Snowman Bottle Stopper

A fast, easy-to-turn gift idea

Text, Photos and Video by Tom Hintz

   The Snowman bottle stopper is a fast, fun to turn gift that will be appreciated for years to come. Because of the small blank required they can often be turned from pieces of scrap that might otherwise go unused.
   I use a shop-made jig for mounting pre-drilled (dowel hole) bottle stopper blanks in my lathe but virtually any mounting method that works for bottle stoppers will do. See the link at the end of this story for a downloadable PDF (Adobe Portable Document Format) file with dimensioned drawings of the jig and the Snowman bottle stopper.
   In addition to the jig, I use the tailstock live center to add stability to the piece until near the end of the process when the scrap is cut off and the final cut made to clean up the top of the hat. This is not always necessary but does allow me to be relatively aggressive during the early stages of turning.

Prepare the Blank

   Cut blanks 2 ½"-long by 1 ¼" to 1 ½"-diameter and prepare as necessary for how you will mount it in the lathe. My jig requires a 3/8"-diameter by 1"-deep hole, centered on one end of the blank. Later, the cork and dowel is inserted in this hole.

The turning techniques used to produce the Snowman Bottle Stopper are basic. Making these is also great practice.
Click images to enlarge

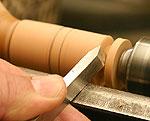
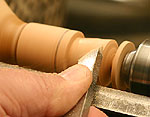
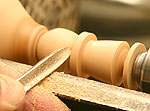
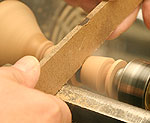
   Mount the blank in the lathe and turn it round. If round blanks (dowel-type stock) are used, I still round them slightly to be sure they are true on the lathe.

Layout

   Making a "story gauge" with the transition points is helpful, especially when several stoppers are to be made. Mark the transitions on a piece of flat scrap large enough to hold against the stopper blank and transfer them to the stock with a sharp pencil. With my jig, the head portion is located at the left end of the blank with the scrap at the live center end to allow forming the top of the hat later.
   After making a bunch of these stoppers, I forego the story stick in favor of making V-cuts, located by eye to locate the transitions. With a little practice, this has become surprisingly accurate and very fast.

Turning

   Start by making a deep V-groove at the top of the hat, removing most of the material from the scrap area. Turn this groove down leaving a stem between 3/16" and ¼" in diameter. This provides plenty of support when turning the rest of the stopper but can be cut off easily later.
   Make another V-groove about 3/16"-deep at the top of the brim. Work the hat to a taper shape until the narrow end meets the V-groove. I like to leave the top of the brim with a small upward angle so may take a final cleanup cut after tapering the body of the hat.
   Cut another V-groove at the underside of the brim, also approximately 3/16"-deep to both define the brim and make room for rounding the upper portion of the head. The bottom of the brim seems to look best when it is 90-degrees to the length of the finished stopper. I wait until after rounding the head and then make a cleanup cut on the bottom of the brim to true that surface up.
   Round the top and bottom edges of the head, working the juncture with the brim as needed for a clean transition.
   When rounding the bottom of the head remember the diameter of the cork being used. The bottom edge of the head should flow into or be slightly larger than the cork.

Burning the Hatband

   When shaping is complete everywhere but the top of the hat, do any finish sanding necessary. Turn the lathe up to the highest speed you are comfortable with and hold a ¼"-thick piece of hardboard, on edge, against the hat slightly above the brim. Press just hard enough to produce friction and hold until the band is burned into the hat clearly. Try this on some scrap a few times to get the feel for how long to "burn" it.

Shape the Top

Click on the image to view a video showing virtually the entire turning sequence.
(1:14 min. - approx. 4.5M - Windows media)

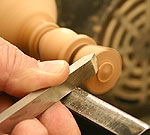
   Cut the waste from the top of the hat and make a final cut across the end grain to finish that surface. Sand as needed.
   The actual shape at the top of the hat can be whatever you like. I think a very shallow conical shape looks best but you might want it more rounded or flat. Indulge yourself!

Finishing

   Whatever finish you normally use on bottle stoppers is fine. The burn-on Hut waxes and other friction finishes all work well.
   I like to remove the stopper from the jig, put it on a piece of scrap dowel and apply several coats (spray) of clear, high-gloss lacquer.
   When the finish has dried, install the dowel and cork to finish the Snowman bottle stopper.

Options

   Virtually any type of wood can be used to make the Snowman bottle stopper but I prefer hardwoods because of their strength and appearance.
   Decorating the face of the Snowman with painted-on charcoal eyes, nose and mouth is possible but consider how that will stand up to fingers gripping those surfaces when the stopper is being removed from the bottle. I leave my Snowman stoppers plain.
   The hatband can be painted rather than burned on with the only real consequence being the addition of another step and drying time.
   To make a more universal holiday gift the head portion can be left off and the hat extended slightly to make a top hat stopper.

Scaled Drawing

   Click Here to download a dimensioned drawing (PDF format) of the bottle stopper mounting jig I use and the Snowman Bottle Stopper.

Do you have a comment about this page? - Email Me!

Back to the Turning Directory


All written, photographic and drawn materials are property of and copyright by NewWoodworker.com LLC 2000-2019. Materials may not be used in any way without the written permission of the owner.
Privacy Statement