
This is a Veteran Owned site
Jointer BasicsUnderstanding this ancient but efficient machineText & Photos by Tom Hintz Posted - 8-16-2006 When set up and used properly, the jointer has the important capability of straightening wood, something that makes virtually all aspects of building projects easier. However, jointers have limitations and we must understand them to make the best use of this machine. What A Jointer Can and Cannot DoA jointer can machine a face or edge of a board perfectly flat and straight. It can also make adjoining surfaces square to each other. What it can’t do is make any surfaces parallel to each other. That is the job of the thickness planer or in the case of edges, the table saw. The jointer “sees” one surface of the wood at a time. The knives are set parallel to the outfeed table and the machined portion of the wood, sliding on that table is the only registration a jointer has. When squaring an edge, the fence comes into play but the outfeed table surface remains the only point of registration that keeps the edge straight. The jointer has no way of keying of another surface to make a cut parallel to that surface. Consequently, while the jointer can make adjacent surfaces smooth, straight and square to each other, it has no way to make those cuts parallel to each other. When working with edges, we often joint one edge straight and then go to the table saw to cut the opposing edge parallel to it. With the wide faces, after jointing one face flat, the planer is used to cut the opposing wide face flat and parallel to the jointed one. It this combination of machines that allows us to produce perfectly straight wood with square, parallel edges. Jointer Setup & CareFor the jointer to straighten boards, it must be set up properly. The fence has to be straight and properly aligned to the table at its various settings, the infeed and outfeed tables parallel to each other – known as coplaner - and the knives set at the proper height and parallel (front to back) with the outfeed table. The instruction manual that came with your jointer should provide specifications and procedures for checking and setting these alignments on your machine. The good news is that most jointers are very similar in construction. The procedures shown in this story will often be very close if not identical to those used on your machine. Checking the Fence and Tables
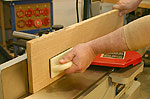
Start by checking the fence to be sure it is straight. A good straight edge at least 24”-long, can be used to detect distortions along the machined face of the fence. Hold the straight edge against the fence and move it from end to end horizontally and diagonally. Watch for a gap at the middle of the straight edge as that will indicate a warp or twist in the face of the fence. Take your time, as these defects are usually very small. If a gap is detected, a set of automotive feeler gauges can be used to quantify the size of the problem. Find the thickest leaf of the gauge set that will slip between the straight edge and fence to measure a gap. If the fence is warped or twisted, the only solution is having it machined flat. Most automotive machine shops can handle this job. Fortunately, a distorted fence is a relatively rare occurrence. If the machine is new, contact the manufacturer for warrantee considerations. Once the fence is known to be straight, it can be used as a base surface for the first check of the tables.
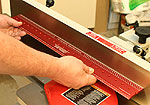
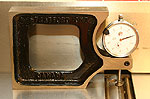
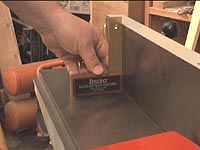
Place a precision square on the outfeed table and adjust the fence so it is exactly 90-degrees to that spot on the table. This is also a good time to be sure the 90-degree stop on the fence is adjusted properly. Holding the long leg of the square against the fence, slowly slide it down the length of the table, watching both legs to be sure they remain flush with the fence and table surfaces. Move the square to the infeed table and repeat the test, again watching both legs of the square to be sure they remain flush with both the fence and table surfaces. If a gap develops between the square and table at any point along the tables we have to determine if the table is warped or just out of alignment. If a problem is detected on a table, use the straight edge to try and isolate it. If the straight edge does not show a gap on the surface, the table may be tilted on its mount. Your instruction manual may provide suggestions for correcting this or you may have to contact the manufacturer for suggestions.
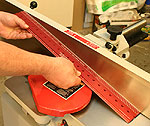
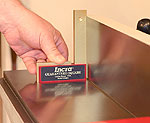
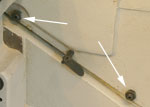
Most jointers have adjustment screws called “Gib Screws” located along the seam where the tables meet the base on which they slide. In most cases, these adjust the play between the table and the runners on which it slides. Unless specified by the manufacturer, Gib screws do not change the angle of the table surface. Coplaner TablesWe also have to be sure the infeed and outfeed tables are on the same plane with each other, a condition called coplaner. Even though they operate on different levels, the infeed table lower than the outfeed, they must be level to each other. The short legs of the squares should meet above the knives with no gap between them. If a gap is found, note where on the squares it is. If the bottom of the squares touch but there is a gap at the upper ends, one or both tables are tilted down at their outboard ends. If the top of the squares is closed but a gap exists at the bottom, one or both tables are tilted down towards the middle at the cutter head.
While you have the squares on the tables, repeat this check with them at various points on the tables from the rear to the front edge of the tables. A gap appearing at one edge of the tables most likely indicates a twist in one of them. In either case, discovering a gap is extremely rare. Most cast iron jointers, particularly the better ones have the base and tables assembled and aligned at the factory before a final surfacing pass is made. This insures they are perfectly aligned, or coplaner. Barring a serious accident in the shop or shipping, the tables will remain coplanar. It is also unlikely that these machines will have a mechanism for adjusting the tables individually. A few jointers, particularly those with aluminum tables have provisions for correcting an alignment of the tables. If your machine has this capability, it should be described in the instruction manual. Here again, unless specifically stated otherwise by the manufacturer, the Gib screws cannot be used to correct a coplaner error. If a problem with this table alignment is discovered and the instructions do not provide a solution, contact the manufacturer. Note: To see how to check a framing square for accuracy and repair it if it’s not Click Here Checking the Knives
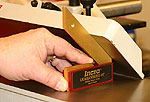
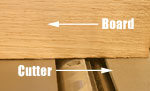
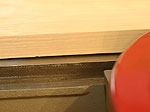
The alignment of the knives is critical and one of the more frequent trouble spots, particularly after the original knives are replaced or reinstalled after sharpening. Most jointer instruction manuals specify settings, often with the knives even with (height) and parallel to the outfeed table. This is a critical setting that impacts how well the jointer cuts as well as the life of the knives. When set perfectly, the knives work equally, last longer and cut cleaner. I use the Oneway Multi-Gauge, a heavy, machined steel frame with a dial indicator mounted in it that makes setting knives a highly precise but surprisingly easy task. Being able to clearly see variations of less than 0.001” enables me to get the knives perfectly aligned with very little effort.
I have found it easiest to start with the knives set a little low and then, with the Multi-Gauge, carefully bring them up so they are level with the table across it’s full width. I set one knife at a time and make sure that the cutting edge is at its highest point in the rotation of the cutter head. The accuracy of the Multi-Gauge means that if this procedure is repeated on each knife, they all will be perfectly aligned to the table and each other. Wax the Tables!The last step in jointer preparation is waxing the table and fence surfaces. As the wood is flattened by the knives, the amount of contact area increases quickly. That multiplies the amount of friction that resists your efforts to slide the wood across the knives. Waxing the tables and fence surface with a good, non-silicone paste wax allows the wood to slide easily with far less downward pressure, something that is very important as we discuss in the next segment of this story. Being able to push the wood across the knives smoothly makes it far easier to get consistent and smooth cuts.
After you get the jointer set up perfectly, don’t forget these procedures. Any machine that gets used needs to be checked occasionally to be sure the settings have not changed. A jointer stays aligned very well if not abused but if you are like me, as soon as you assume it’s OK, it will act up during the next job using expensive wood. Going through the alignment checks regularly (I check mine monthly) takes just a few minutes but can save lots of frustration and even money. Using a JointerStraightening wood on a properly adjusted jointer is easy once you understand the process. It is also important to realize that you are stronger than the wood and can “force” the jointer to make bad cuts. The key is letting the jointer do the work and moving the wood across it so that the least amount of wood is removed to correct the defect. Size MattersThough it may seem expedient to joint a long board before breaking it down into project-sized pieces, the opposite is usually true. Many consider the maximum length that can be processed on a jointer to be roughly twice the length (overall) of the tables. Most manufacturers warn of jointing short pieces with minimum lengths often in the 12 to 18” range. While very long boards can be successfully jointed with proper support outside the tables, it is almost certain that more wood will have to be removed to eliminate a defect, particularly an arch between the ends. Breaking a long board down to near project sized pieces not only makes them easier to handle, it can reduce defects such as arching or bowing between the ends by as much a 50%. Far less material must be removed from the shorter pieces to eliminate a defect, leaving a thicker board when jointing is complete. I always cut long boards down, creating pieces 1” to 2”-longer than needed for the project. Then, after they are jointed, planed and squared, final trim cuts can be made to bring them to their final length, now with absolutely square ends. The same principle applies to width. It makes no sense to joint the wide face of boards that are considerably wider than needed for the project. If the board is considerably wider than needed, I’ll joint the straightest edge, take it to the table saw and rip it down to the size needed, plus ¼”. Then, I can joint a wide face, go to the planer to make the other wide face flat, parallel and reduce the stock to the wanted thickness if necessary. With the wide faces parallel, I go back to the jointer to make sure both edges are square to the newly machined faces. If the board is within ¼” to ½” of the needed width and does not have serious edge defects I can joint and plane the wide faces first. However, to avoid accidentally coming up narrower than needed, inspecting the edges carefully is important. Experience is the best teacher here. Speed n’ Feed
Part of letting the jointer work properly is feeding the stock across the knives slow enough to allow the cutters to slice the wood away. Even with a ¾”-thick board on edge, an excessive feed rate can overpower the knives. A telltale sign of a too-fast feed rate is a rippled appearance of the edge after cutting. Slowing the feed rate slightly will allow the knives to clear the surface evenly and leave a flat, smooth edge. Complicating this somewhat is that as the wood gets harder, the feed rate has to be reduced. Just how much to slow the feed rate down is an educated guess that gets easier with experience. Grain OrientationTo minimize chipping, jointer knives should be cutting down or with the grain. There are temporary exceptions to this rule, as described below. To prevent chipping, tearout and get the best surface possible from the jointer, its knives have to cut down or with the grain on the final finishing passes. One some pieces, particularly when jointing the wide face, reading grain can be very difficult. Occasionally, taking very light cuts (1/32” max) in both directions and inspecting the surface between will reveal which produces the smoothest cut. The Strongman Syndrome
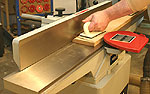
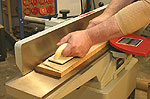
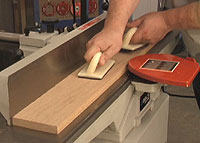
Applying too much downward pressure to the wood can easily flatten a bow or twist as it passes over the knives. With the wood pressed flat, or close to it, the jointer dutifully cuts it flat in that position but when released, it springs back up and the defect reappears. One of the harder things to learn when operating a jointer is developing a feel for how much pressure is necessary to maintain control of a piece of wood as it moves across the knives. Any more pressure than that begins to flatten the wood on the jointer, reducing the defect that the jointer sees. Waxing the tables and keeping the knives sharp reduces the effort necessary to control the wood and makes this an easier lesson to learn. You still have to develop the feel for what it takes to control the wood but it is easier when the wood and jointer are not fighting back in the form of excess friction. The best teacher in this case is practice: and messing up a few pieces of scrap wood. Hand/Pressure PlacementBecause some portion of the board on the outfeed table is already flat, that is where our hands should focus what pressure is being applied. We are forced to have our hands over the infeed table to get the piece started and to guide the piece until a large enough section at the leading edge is machined flat. However, as soon as there is enough wood flat on the outfeed table, your hands and the pressure they apply should focus there to keep the machined edge of the wood flat on the outfeed surface which forces the rest of the board to follow on the line.
Dealing With DefectsIf the wood has a serious defect such as an arch or bow we may have to apply enough pressure before and after the cutter head to keep the board as level to the table as possible during the initial cuts. Then, as soon as the jointer begins making a flat surface on the leading edge, pressure can be concentrated over that spot on the outfeed table. That way the knives can extend that machined-flat portion and minimize the amount of wood that is removed during however many cuts needed to eliminate the rest of the defect.
Another technique that can help true a mildly distorted board is swapping ends between the first few cuts. While we want the finish cuts to be made with the knives working “down” the grain, reversing the piece during the initial cuts will help average wood loss at either end, help bring the board down flat to the tables evenly and actually minimize the amount of wood removed. If the defect is big, especially on an edge, it may be better to reduce its severity with a preliminary cut with a hand-operated saw or even a hand plane. For more on this technique, see our companion story, “Preparing Wood for the Jointer.” This additional step can save time, wood and help reduce tapering of the board. ConclusionThe jointer is like any other woodworking machine in that understanding its limitations and gaining experience are what make you proficient using it. Once you learn to use a jointer correctly and start producing truly straight and square material for your projects, you may wonder how you ever built anything straight without it.
ResourcesPreparing Wood for the Jointer Checking and Repairing a Framing Square Have a comment on this story? - Email Me! Back to the Tips & Tricks Directory | ||||||||||||||||||||||||||||||||
All written, photographic and drawn materials are property of and copyright by NewWoodworker.com LLC 2000-2019. Materials may not be used in any way without the written permission of the owner.