This is a Veteran Owned site
![]()
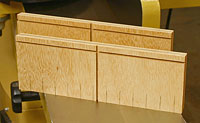 |
These simple, shop-made tools will help find twists in boards and machine surfaces. Click image to enlarge |
Make and Use Winding Sticks
A simple, shop-made twist detection tool
Text, photos and video by Tom Hintz
Posted - 6-30-2007
Winding sticks are simple pieces of wood that when carefully prepared and used can help reveal twists in boards and machine surfaces. They can also help identify where these defects are to minimize repair efforts.
Accuracy & Application
Winding sticks are great for finding medium to major twists in long surfaces. Boards and jointer tables come to mind but virtually anything that is relatively narrow and long can be checked with winding sticks. However, winding sticks are useless for finding bows over the length of a board or surface.
The accuracy of winding sticks depends on how they are made, used and how good your eyes are. Trying to detect small twists along a surface can be difficult with winding sticks. If your eyes aren't what they used to be, the margin for error increases proportionately. You can compensate somewhat for eye power by moving closer to or farther from the winding sticks to enhance focus. However, the farther you get from them, the harder it is to see what they are telling you with accuracy.
Material
I like to use 3/4"-thick (23/32's in the real world) plywood because of its stability and resistance to humidity-induced distortions. Using hardwood is an option and I have seen several impressive winding stick sets made from exotic wood scraps. When using solid wood it is important to apply a good finish to all sides to limit moisture absorption.
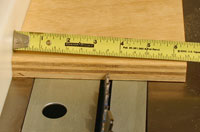 |
Laying the blank against the fence and blade will help align the bevel cut closely the first time around. Click image to enlarge |
The sizes used in this story work well in most shops but you may want to make yours larger or smaller. Or, you can make more than one set if you have specific needs. Most important is cutting the winding sticks accurately so the readings they produce are as precise as possible.
Cut the Pieces
The finished winding sticks will be 10"-long and 3 1/2"-tall but it is far safer to make the rip cuts using the table saw fence in a larger piece of wood and then cut the individual pieces from that using the miter gauge. The piece of wood used in this story was 22"-long and 9"-wide because it was large enough and was lying around in my scrap bin.
First, I set the blank on the table saw surface to identify the straightest edge. That edge was put against the fence and a rim cut taken to true the other long edge. This freshly cut edge will be the bottom of the winding sticks. Making this first cut creates a clean, flat edge that is 90-degrees to the wide faces of the winding sticks so they stand correctly when used. The bevel cut made next produces parallel edges.
 |
The grooves on the face of the winding sticks makes aligning them very easy and accurate. Click image to enlarge |
Adjust the blade to a 10-degree angle and set the fence to produce a 3 1/2"-wide cut. A trick I learned to set the fence for accurate bevel cuts is to lay the wood against the fence and butted against the blade. Raise the blade to be sure it will cut through the wood and then lay the tape measure across the wood so the width of the cut can be set to where the blade exits the top surface of the wood. This still involves a little "eyeballing" of the setting but you can get very close the first time.
The angle cut will be at the top of our winding sticks, the slope facing away when used. This helps prevent having to look across the thickness of the wood which can "fuzz up" the image your eyes see.
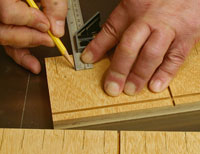 |
Adding a row of evenly spaced hash marks along the bottom edge helps align the winding sticks on the surface. Click image to enlarge |
When satisfied with the cut width trim the blank to the final 3 1/2" width. If you miss by a little on this cut, don't worry about it. The actual height is less important than having parallel edges on both winding sticks. Having both sticks the same height just seems to work a little easier.
Note that one face of the piece is wider than the other because of the bevel cut. The widest will be the front, the one that will face you when using the winding sticks.
Set up your miter gauge and make sure it is 90-degrees to the miter slot and return the blade to 0-degrees. Make a light trim cut on one end of the blank to be it is square to the long edges. Turn the blank around and trim its length to 20 1/8".
Lower the blade so that 1/8" is above the table. Measure in 5-inches from both ends and draw cut lines on the edges so you can see them with the blank flat on the table. Carefully cut a groove at each of these lines using the miter gauge.
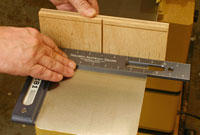 |
When placing the winding sticks, using a square is quick and insures they will be parallel to eliminate perspective from skewing the accuracy. Click image to enlarge |
Adjust the rip fence so it is 3 1/8" from the blade, still at the 1/8"-height. Cut a groove along the top of both pieces, the square edge against the fence, front face down on the table.
The grooves are to make aligning the winding sticks visually easier to improve accuracy. The horizontal line near the top simply creates a visible shadow line that may be an easier target when the background closely matches that of the winding sticks.
Measure in 10" from either end and draw a cut line. You should have a roughly 1/8"-wide "bracket" in the center. Raise the blade to make a through cut and using the miter gauge, carefully align those "bracket" marks with the blade and cut the two winding sticks apart. You should now have two winding sticks that are identical in height, with parallel edges and nearly identical in length.
 |
Matching the centerlines keeps you and your eyes aligned with the winding sticks. Click image to enlarge |
As a final touch I put hash marks along the bottom edge of the front face, 3/4" apart. (Incidentally, this is the width of the blade on my small combination square.) When placing the winding sticks on a relatively narrow surface we can use the hash marks to be sure they are oriented directly in line with each other.
Using the Winding Sticks
For winding sticks to be effective, they must be parallel to each other. When placing them on a board or machine, using a square to be sure they are 90-degrees to a common edge will prevent introducing perspective which would negate their accuracy. Carefully setting them by eye will get them close but I like using the square because it is both fast and exact. If the idea is accuracy, there is no sense cheating that now.
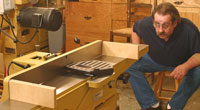 |
Everyone's eyes are a little different so you may have to hunt a little to find the right distance from which to view the winding sticks clearly. Click image to enlarge |
Start by placing a winding stick at either end of the surface being checked. Both front faces should be aimed in the same direction, towards you. For most, the optimum distance for viewing the winding sticks puts you roughly the same distance from the first winding stick as the second one is from it. You, the first and second winding stick should all be equal distances apart. Bring you eyes down so that the top of the first winding stick is even with the bottom of the horizontal groove on the farthest winding stick. Adjust your position so that the vertical grooves on both winding sticks align.
As noted earlier, you may have to move closer to or farther away to get the clearest picture. This changes with everyone so don't be afraid to experiment a little.
What You Are Seeing
If the horizontal groove on the far winding stick runs parallel to the top edge of the stick closest to you, the surface is flat. If the groove on the rear stick runs at an angle to the one closest to you, the surface has a twist.
Video Tutor |
To check the rest of the surface, move the farthest winding stick a little closer to you, making sure it is parallel to the closest one each time it is repositioned. By taking several readings, moving only the farthest winding stick, you can determine where a twist begins, or where it is worst. That can help decide if a portion of that board can be used for a shorter part or if a machine surface such as jointer beds need repair. Using the winding sticks the same way after a repair or straightening of a board will let you confirm that the fix was effective or if more is required.
Winding sticks can be a good quick-check tool, especially when medium to major twists are suspected. Making and using them correctly is crucial to the accuracy of the results they provide.
Related Stories
Have a comment on this story? - Email Me!
Return to the Tips & Tricks List
All written, photographic and drawn materials are property of and copyright by NewWoodworker.com LLC 2000-2019. Materials may not be used in any way without the written permission of the owner.
