
< |
WorkbenchCheap, Sturdy and Lots of StorageText and photos by Tom Hintz
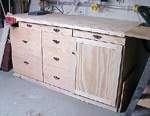
The rebuilding of my shop was based around moving the RAS from the left side of the shop to the right end of this new bench. For me, having the RAS to the right of the bench makes more sense, and allows me to use the workbench itself as an extension table for the RAS. The major consideration though was building the new bench so the top would match the height of the RAS table for a more comfortable working height. The RAS table had long been my favorite place to work because its height was the most comfortable of anything in my shop. The new bench turned out to be 32-inches front-to-back, 74-inches long and 40-inches tall. I had envisioned something a bit longer but here again, making the best use of the available space dictated the final dimensions.
Panel ConstructionWatching Norm Abram (The New Yankee Workshop) build shop cabinets using a frameless panel construction inspired me to try it. The panels were sized so when the replaceable work surface was screwed in place the overall height matched my 40-inch-tall RAS table. The panels define the vertical borders of three bays. Two of the bays contain drawers and the third a large door-covered space in which I could store machinery. The panels are tied together at the top with a 2X4 frame and 4-inch-wide strips of the 3/4-inch-thick ply that run the full length of the bench, set flush into cutouts in the panels. One runs along the bottom of the front and two others along the top and bottom at the rear. The upper strip in the rear also serves as the brace through which the bench is secured to the wall with lag screws. To help the panels sit evenly on a floor one-inch-high cutouts were made along the bottom edges of all four panels, stopping four inches from the front and rear edges.
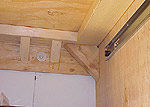
Top FrameThe upper frame is made from 2X4's laid on their sides and joined with half-lap joints. This frame is set into notches in the panels so its upper surface is flush with the top edge of the plywood panels. I arranged the crossbars of this frame so that when assembled, the bulkheads define the bays. Because the 2X4's are laid down, this frame provides a huge amount of surface area to support the 3/4-inch-thick plywood top. The only place I added diagonal bracing was on the left end of the bench where my drill press would stand. A 2-inch-wide by 1 ½-inch-thick pine strip was screwed around the left and front sides of the top frame, extending the top out from the bench carcass. This ledge provides a place for clamps and spaces the top out to act like a toe-kick. During construction, I began wondering if this panel construction technique was such a good idea, as it appeared to be a bit wobbly. Once I lagged it to the wall (three lags into studs) and added the top surface the bench became rock solid with no wobble at all. I have since stood on top of it to hang lights and the bench remained absolutely solid.
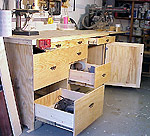
DrawersWhen it came time to design my drawers there was no fooling around. My workbench drawers are used often and loaded with more heavy stuff than I expect. This is no time for grace and elegance. I need strength, durability and function. All drawer bodies for this bench are made from ¾-inch-thick pine with half-blind dovetails on the front corners of each. The bottom panels are ¼-inch-thick plywood set into dados. I like this construction because it is strong and relatively light. It also allows for easy access to whatever I am looking for. I usually dovetail all four corners of my drawers but decided to try installing the back panel into dados cut in the side pieces. I suspect it will be my last also because I think it takes longer than dovetailing. Once the dovetail jig (I use a Leigh) is set up, cutting dovetails in the remaining two corners of each drawer adds very little time to the process, and eliminates another setup on the table saw to cut the dados for the rear panel. All future drawers in my shop will be dovetailed on all four corners. Plywood panels were cut for applied drawer fronts. I used a 1/8-inch-thick strip of wood to space the drawer fronts from each other. Each front was held in position, and then nailed in place. After all of the fronts were tacked in place, they were removed and the front panels permanently secured with screws.
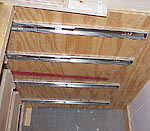
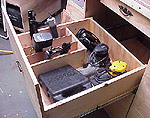
Eight drawers were built into the bench to maximize the storage space. All are mounted directly to the plywood panels, which define the drawer bays, on full extension, ball bearing slides with a 100-pound load rating. These slides certainly cost more initially, (about $16 per pair) but eliminate the need for drawer frames which saves a small amount of money and even more time. Most importantly, using quality drawer slides insures trouble-free operation for many years. There are three, 3 ½-inch-tall drawers across the top, all 24-inches deep. The width of the drawers is really dependent on the slides used, but usually 1-inch smaller than the opening. The left bay has two large drawers that are 24-inches deep and have an overall height of 15 ½-inches. The middle bay contains three drawers 24-inches deep and 8-inches tall. I added an organizing insert to one drawer already and more are sure to come as the needs are identified. The first set of dividers organizes my cordless drill and nail guns. I have ideas for other inserts but have yet to explore them fully.
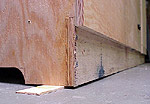
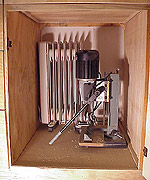
Storage BayOn the right side of the bench, a full bay was reserved to house my mortising machine and other larger equipment. The bay is approximately 30-inches tall, 25-inches wide and 30-inches deep. I made a simple tongue and groove flat panel door, hung on the same cheap hinges used throughout the shop. To keep the machines off the floor I ripped 2-inch-tall strips and, then glued and screwed them to the side panels. A ¾-inch-thick particle board floor was cut to fit and rests on the strips. InstallationThe only problem encountered during installation of this bench was discovering that the shop floor had a 3/16-inch rise at the wall that goes back to level an inch or so from the vertical wall surface. I had to trim an equal amount from the rear "feet" and the full-length strip to get the bench to sit level. (Note: This is covered in the plan instructions.) Once the bench was lagged to the wall, I pushed shims under the front legs (with glue to secure them) where necessary to ensure firm contact with the floor. As is so often the case, the floor in my shop is not perfectly level in any direction so the shims were necessary to keep the top level and the feet in firm contact with the floor. A woodworker's vise was let into the left corner of the workbench so that the inner jaw is flush with the edge of the bench. After screwing the top surface in place, I gave the entire top a light sanding and rounded the exposed edges slightly. There will be no finish applied on the bench as I always manage to scrape that off anyway. I do not have a water problem in the shop so that kind of protection is not necessary.
Into ServiceSince this bench was completed it has lived up to nearly all of my expectations. The height is perfect for me and allows extended periods of working without producing the aching back experienced with my old 36-inch-tall bench. The drawers have made organizing the tools I use most often a snap. Another benefit is with the storage so nearby, I am more prone to putting things away which keeps the work area more organized, and probably safer. The only feature my new bench lacks is size, but it does make good use of the available floor space in my shop. We all have to make compromises when designing our shops, and what we build for them. Someday, when I get a larger shop, I'll build another bench like this, as big as I want it. Until then, this version is working very well. |
|||||||||||||||
Do you have a comment about this page? - Email Me! |
All NewWoodworker.com Custom Plan Sets, written, photographic and drawn materials property of and copyright by NewWoodworker.com LLC 2001-2012. Materials may not be used in any way without written permission of the owners.
Privacy Statement