
This is a Veteran Owned site

 |
Setting up and aligning your table saw is important and easy if you follow simple procedures and used good measuring tools . |
Table Saw Basics – Part One
Setup & Alignment
Text & photos by Tom Hintz
Posted – 8-28-2006
NEW! Check out our full-length Table Saw Basics DVD! Click Here!
Note: In order to show the measuring devices and procedures involved in setting up the table saw, the factory-supplied blade guard and splitter assembly has been removed. While many of these checks and adjustments are easier to perform with the blade guard off, it must be re-installed when the setup is complete.
For any table saw to perform at its best, it must be properly aligned when set up and then checked regularly thereafter. Even the sharpest, most well-designed blade cannot cut cleanly unless the blade, fence and miter gauge (also called a miter guide) are precisely aligned. An error in any of the saw systems will hamper performance and compromise operator safety.
In this section we will go through the alignment process on a contractor-style table saw. The basics are the same on all table saws but how individual adjustments or alignments are made might vary depending on saw style and manufacturer. The instruction manual that came with your saw should explain how to make these adjustments. If the instructions differ from those presented here, follow the manufacturer instructions carefully.
Setup Tools
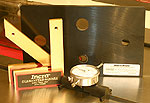 |
I use setup tools from MasterGage.com and INCRA that make these tasks much easier and far more accurate. Click image to enlarge |
I cannot stress the importance of using accurate tools when setting up and aligning your machines. There are folks who use sticks and screws and are comfortable with the results. I prefer to see the settings on the face of a good dial indicator. Several years ago I experienced a major kickback (see that story here) that was caused by a technique error on my part made worse by a small misalignment of the fence. That bruise and the realization of how much worse it could have been inspired me to reduce the amount of error in my table saw alignments through better technique and using high precision measuring tools.
In the text and photos below I use my MasterGage SuperBar and MasterPlate for adjusting the blade and fence. These tools are not overly cheap (nor overly expensive) but will last forever and make tiny adjustments easy to quantify – and check. That makes these setup tools worth every penny to my potentially endangered appendages and me.
Miter Slots Are the Key
 |
The one thing you can't change on a table saw is the orientation of the miter slots. That's why we adjust everything else to them. Click image to enlarge |
With the exception of a benchtop saw or two that do not have them, miter slots are the one constant on table saws that cannot be changed. Therefore, we base nearly all of the alignments directly off the miter slots and most often the left one because it is used most.
When using a miter gauge, sled or many shop-made and commercial jigs, the miter slots control the path of the wood as it is moved across the blade. If the blade, fence and miter gauge are precisely aligned to the miter slots, they can work accurately and safely.
While we cannot change the position of the miter slots within the cast iron table, it can be necessary to tweak their width slightly when accessories with adjustable (close-fitting) guide bars are used. Because these guide bars fit so precisely tiny irregularities in width of the miter slot can result in “tight spots” as the bar slides along the slot. In all but extremely rare instances, the fix is simple.
Mark the portion/s of the slot where the guide bar tightens up, usually at its forward end. Wrap a piece of 150-grit sandpaper around a ¾”-wide piece of wood, insert that into the slot and sand the edges along the tight areas. Usually these irregularities in the miter slot are very short and the amount of material that must be removed is generally in the 0.003” to 0.005”-range. Go slow, wipe the slot down to remove sanding debris and check your progress with the guide bar frequently.
Start at the Blade
 |
Start by checking the arbor and flange washer. Deviations there can influence all other alignment measurements. Click image to enlarge |
Start by removing the blade and cleaning the arbor, washers and the blade itself. Even tiny bits of dust or debris (including buildup where the washers make contact) can result in a measurable error when extended out to the edge of the blade.
This is also a good time to check the arbor itself for runout if a suitable dial indicator is available. Check the arbor itself and the face of the inboard washer if it is attached to the shaft. Place the rod of the dial indicator near the outer edge of the inner flange washer and zero the scale. Slowly turn the arbor by pulling on the drive belt, stopping frequently to allow the indicator rod to “relax”. Note the highest deviation from zero as the arbor turns through a full revolution.
With the exception of a major impact, it is very unusual to find a bent arbor. If you can measure more than 0.002” of total runout, contact the manufacturer for their thoughts. There is no legitimate way to repair a bent arbor so if it exceeds the manufacturer specifications, it must be replaced.
Bevel Stops
|
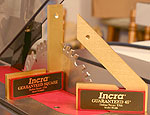
Using high-accuracy squares like the INCRA Guaranteed Squares is the only way to know for sure that the blade is returning to true vertical or 45-degrees. Click image to enlarge |
The bevel scale on table saws is good only for rough setting of the blade. To make accurate bevel cuts it is best to set the blade angle using a good square or bevel finder set to the desired angle. When setting a bevel cut up for a project, always make sample cuts and measure them to be sure the angle is correct before cutting the project pieces.
I do take the time to set the 0 (straight up and down) and 45-degree stops. Use good quality squares for this and be sure that the arm of the square rests only on the body of the blade, not a tooth.
Parallelism
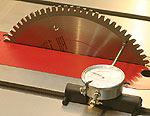
Assemble the blade, washers and nut onto the arbor, tighten the nut and raise the blade all the way up. Make a dot just below one of the gullets between the teeth and turn the blade so that dot is at the front of the table throat. Fit the dial indicator in the miter slot and place its rod on the dot. Turn the dial face so “0” is under the needle and lock it there.
 |
 |
Checking the blade at a single point, moved front to rear during the test eliminates runout of the blade itself and gives a very clear indication of how parallel the blade is to the miter slot. Click images to enlarge |
|
Lift the rod from the surface of the blade and carefully slide the dial indicator to the rear of the blade, turning the blade so the dot is also at the rear. Position the dial indicator rod on that same dot (don’t change the face setting on the dial indicator) and check the reading.
Note: Taking the readings on that dot at the front and back eliminates runout of the blade/arbor that could skew the readings by several thousandths. Most blades have a little runout that has no impact on cutting performance but can give you fits when trying to adjust the blade to the miter slot.
The difference between the two positions shows how close to parallel the blade is with the miter slot. While perfect is the goal, most will settle for a total error in the 0 to 0.003” range. Larger errors must be fixed for the saw to work as best it can.
 |
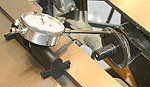
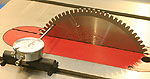
The MasterPlate, also from MasterGage.com is used in place of the blade and because it is machined perfectly flat, provides super-accurate readings over a slightly wider range front to back. Click image to enlarge |
Incidentally, when I measured my saw for the photos in this story, the blade showed to be within 0.0015” of perfect. Needless to say, I left it alone! Arbor runout at the washer was less than 0.001”.
The instruction manual that came with your saw should describe how to make blade parallelism adjustments. Many cabinet saws are designed so the table itself can be adjusted to the blade. Contractor style saws generally require loosening four bolts on the underside of the table and shifting the entire blade mechanism to make a correction. Benchtop saws can have either type of adjustment or may even have an external system for adjusting the blade. Whichever mechanism your saw has, take your time and get the blade as close to perfectly parallel as possible. Most saws hold this adjustment for a very long time so it is worth the effort to get it right the first time around.
Runout
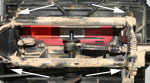 |
This is the undercarriage of my Delta contractor saw. The arrows point to the four bolts that have to be loosened to adjust blade parallelism. This is not a fun task but thankfully, is not required frequently. Click image to enlarge |
To check the blade for runout, place the dial indicator rod on the blade just below the lowest point of the gullets. Zero the face on the needle and lock it.
Turn the blade slowly by pulling on the belt. The blade itself deflects far too easily to turn it with a stick of wood or your fingers. Watch the dial indicator as the blade turns and note the largest reading. Most blade manufacturers consider 0.001” of runout per inch of blade diameter to be within spec. It is my experience that better blades usually have 0.005” or less of total runout while cheaper ones often run closer to 0.010” limit, sometimes more.
If more than 0.005” of runout is discovered you can double-check this by loosening the blade and turning it 180-degrees on the arbor, tightening it and doing the test again. If the arbor is contributing to the runout, this should cancel out at least some of the runout noted.
A blade with serious runout has to go back to the manufacturer for straightening. If the blade is nearing the end of its useful life, it is frequently cheaper to replace it after the costs of repair and shipping are considered. Check with the manufacturer, get the prices and make your own decision.
Fence Alignment
A miss-aligned rip fence, particularly one that angles towards the blade at the rear can cause burning, splintered edges and even kickbacks. Pressing the wood against the side of the blade as it is pushed through is the culprit that also accelerates wear on the teeth that can shorten their life substantially.
 |
 |
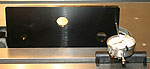
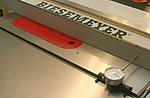
I like my fence to be tailed out at the rear (away from the blade) between 0.001" and 0.003". An extremely accurate dial indicator like the SuperBar, slide from the front (left) to the rear (right) of the fence is the only way to see this tiny adjustment accurately. Click images to enlarge |
While some manufacturers call for their fences to be parallel to the miter slot, experienced woodworkers frequently angle the fence away from the blade at the rear slightly, usually in the 0.001” to 0.003” range. That tiny bit of intentional miss-alignment keeps the wood free as it passes the blade and prevents it from “dragging” against the wood during the last part of the cut.
Some instruction manuals say to simply align the edge of the fence with the edge of a miter slot. While that procedure will get you close, it is not close enough. I have aligned several fences with the miter slot and then checked them with a dial indicator. Finding a fence adjusted this way with less than 0.010” of error (towards or away from the blade) was a rarity. When I am the one pushing wood through the saw, that is not acceptable.
Install the dial indicator in the (left) miter slot near the front of the table, lower the blade completely and bring the fence over to the indicator’s rod. Gently bump the fence against the rod until the needle moves through approximately ½ of a revolution around the scale and then lock the fence. This bit of preload on the dial indicator insures that it remains in contact with the fence throughout the test. Turn the indicator dial so “0” is under the needle and lock the face.
Carefully slide the dial indicator down the fence until it reaches the rear of the table. Note the difference, if any on the scale. Remember that we want the fence somewhere between parallel to the miter slot to angled away from the blade at the rear by up to 0.003”.
If corrections are needed, check the instruction manual for the procedure used with your fence. However the actual adjustment is made, the changes needed will be very small. I usually leave the dial indicator at the rear of the fence and use that reading to quantify the adjustment. Once satisfied with the correction, tighten the fence adjustment down.
Move the dial indicator back to the front side of the fence, set the “0” to the needle and slide it to the backside of the table again to check the adjustment. Be patient as it is not uncommon to make several adjustments to get it right, especially with a new saw. Once you become familiar with how the fence responds to changes, this process gets easier – and faster.
Measuring my Biesemeyer fence showed it to be tailed out at the rear 0.0025”. My target is 0.001” to 0.003” so we will call this perfect. A testament to the quality of the Biesemeyer fence is that while I check its alignment once a month, I have not had to adjust it for over a year despite using it almost daily.
Miter Gauge
 |
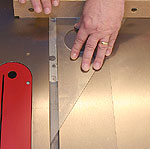 |
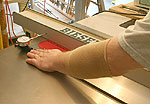
Using a framing square (left) to align the miter gauge fence to the blade is only accurate if the blade is perfectly parallel to the miter slot. If not, you just transfer that error to the miter gauge and still make crooked cuts. (right) A simple (and cheap) artist's square/triangle is accurate and makes aligning the miter gauge fence with the slot an easy task. Click image to enlarge |
|
The procedure for aligning a miter gauge fence is a frequent point of contention. Some, including a few instruction manuals prescribe placing the short leg of a framing square against the side of the blade and adjusting the miter gauge fence to match the long leg. While this method is easy, (the reason some manufacturers recommend it) it is not precise unless the blade is perfectly parallel to the miter slot. If the blade is at all out of alignment, this method simply transfers that amount of error to the miter gauge. This puts the fence of the miter gauge out of square to the miter slot, which controls the path of the wood and guarantees that it cannot make a square cut.
If the miter gauge is aligned square to the miter slot, the cut will be square even if the blade it out of alignment. The blade will cut a slightly wider path through the wood, but the cut will be square to the edge against the miter gauge fence.
I use a 14”-tall artist’s square (it’s actually a long triangle with a square on one side) to set the fence on my INCRA 1000SE miter gauge. These squares are cheap and very accurate.
Place the short leg of the artist’s square against the miter gauge fence and align the long edge to the side of the miter slot. Adjust the miter gauge so the entire long edge of the artist square is aligned to the edge of the miter slot. Fast, simple and because of the length being checked - very accurate.
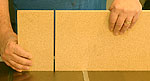 |
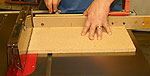
While making a cut in a wide piece of wood and matching the ends up is a commonly recommended way to set a miter gauge fence, it is very inaccurate if both long edges of the wood are not perfectly straight and exactly parallel to each other. Click image to enlarge |
Another popular way to check the alignment of the miter gauge fence is to make a crosscut in a 8 to 10”-wide piece of wood. Place a long edge against the miter gauge fence and cut off a piece 10” to 12” long. Flip the cutoff piece upside down (put the top edge on the table) and match up the freshly cut ends. The theory is that if the miter gauge is square to the slot, the ends will match perfectly with the cutoff piece upside down. Any gap that is present when they are held together indicates an error in the miter gauge fence alignment.
The problem with this method is that both long edges of the piece of wood being cut have to be perfectly straight and exactly parallel to each other or it will show a false error when the cutoff piece is flipped over.
I’ll stick to my artist’s triangle/square. I have confirmed the setup of my miter gauge with the cross cut method after aligning it with the artist’s square and have never found a gap between the pieces.
Set Up the Splitter
 |
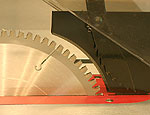 |
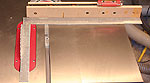
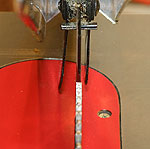
Taking the time to make sure the splitter is centered ont he blade (left) and clears it at the highest setting (right) allows this important safety feature to work as intended. Click images to enlarge |
|
To be effective, the splitter must be aligned with the blade so the cut (kerf) slides over it without catching. On most saws, there are two mounting points, one off the back of the saw and the second near the back of the blade in the throat opening. The instruction manual should describe the process of aligning the splitter.
Using a narrow kerf blade for this alignment helps because if the splitter is centered on that blade, installing a normal, 1/8”-width blade will require realignment of the splitter. Some advocate aligning the splitter to the fence side of the blade but centering it on the blades width is how most manufacturers specify and it works effectively in that position.
In addition to being centered on the blade, some splitters have a height adjustment that allows setting the gap between a fully raised blade and the curved part of the splitter. Even if your splitter has no height adjustment, check this clearance just to be safe.
The Last Step
When all of the alignments are complete, there remains one step that will make the saw easier – and safer – to use. Waxing the table.
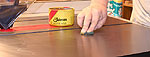 |
Keeping the table waxed not only preserves the surface, it keeps it slick so the wood slides easily so you do not have to fight it as it goes through the blade. Click image to enlarge |
Keeping the table waxed with a good non-silicone product makes the wood slide easily and consistently as it is pushed through the blade. Keeping the table slick lets you concentrate on controlling the wood and feed rate. Eliminating excess drag and “sticky” spots is what makes operating the saw safer. The wax also helps protect the cast iron surface from rust, staining and many forms of abrasion.
There are many purpose-designed materials for maintaining cast iron surfaces but my favorite remains Johnson’s Paste Wax, originally intended for hardwood floors. The downside to this wax is it can be difficult to find. I find it most often in the floor care section of grocery stores and home centers. The good news is that it lasts a very long time. I bought three cans about six years ago and as of writing this story have used a bit over half of the first can. This is definitely not a budget-breaker.
Checking Alignments
Video Tutor |
Getting all of a table saw’s alignments correct is a necessary part of setting up a new machine. However, they have to be checked occasionally to be sure nothing has changed. How frequently to check the alignments is up to you and generally based on how frequently the machine is used. For most woodworkers, checking the saw alignments once a month is sufficient. If you find alignment errors at monthly intervals, it might be necessary to make weekly checks.
I routinely check may saw alignments before starting a major job or when using expensive woods. Checking alignments goes quickly but can have a large impact on your projects and safety. Catching an alignment error before the saw tells you about it with ruined wood or a kickback is a very good – and painless plan.
Go to Part 2 of Table Saw Basics – Use
Other Resources
Installing a Zero Clearance Insert
Zero Clearance Inserts and Factory Splitters
See the Table Saw section in our Tips & Tricks pages - Click Here
Have a comment on this story? –Email Me!
All written, photographic and drawn materials are property of and copyright by NewWoodworker.com LLC 2000-2019. Materials may not be used in any way without the written permission of the owner.