
This is a Veteran Owned site
Rebuilding the NewWoodworker.com ShopText and photos by Tom Hintz Like most new woodworkers, I had no concept of how involved I would get in this hobby when I began. When I brought my first machine, a radial arm saw, (RAS) into the shop formerly known as the garage, I set it up near the overhead door because I did not know of a reason not to. There was no thought about where additional equipment would be installed and how those changes would affect working in the shop. When equipment was added, it was placed in the next available spot. As you might suspect, this on-the-fly shop design soon led to problems. Simple tasks were taking longer than necessary because often one piece of equipment had to be moved to use another. Too many tasks were being performed with reduced accuracy because the setup of the equipment was in one way or another a compromise of how it should be. Most worrisome was the very real possibility that operating my shop in this configuration probably was not as safe as it could be. Any kind of clutter, be it inappropriately stacked scraps or compromised equipment placement, can present a danger to anyone occupying the shop area. Fortunately, I did not have an accident, or even a close call, but the realization my shop needed revising became clear. Planning vs. RealityI wanted to build a new bench and move the RAS to the right of it, with a common fence that would include my mortising machine and
power miter box. While this remains an intriguing layout, I had made the classic male mistake; my mind perceived the available space as much larger than it actually was. Forced to choose between useable bench space and the common fence, I opted for working space. Gaining storage space to help organize the increased amount of equipment, tools and related accessories was another primary need. To this end more wall-hung cabinet space, in-bench drawer area and at least one stand-alone cabinet were needed. After making several sketches of possible layouts, I decided on one that used the available space most efficiently. There would be no common fence or permanently installed mortising machine, but I was confident I would have a better, safer shop. First and HardestThe first order of business was to clean out the shop, old cabinets, shelves and scrap piles. The last was the toughest. I gave the old bench to my benchless neighbor, the shelves were torn down, cut up and put out for the trash man, but that pile of scraps was hard to part with. I knew that most of the scraps were useless and had to go. The size of the piles (I had two) alone begged for reduction. I eventually sorted through the piles and filled three large boxes that exited my life with the trash man. It was a tough day, but it had to happen.
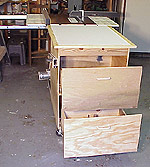
CabinetryNote: Full stories on each of the cabinets built for this shop update will be posted on this site and added to a link list at the bottom of this page as they become available. The primary thrust of my shop rebuild was moving the RAS and constructing new cabinets that are better suited to my situation. Cart/Table Saw ExtensionThe first cabinet built was a new roll-around shop cart that doubled as an extension table for my table saw. I had considered building a simple extension for the TS but realized that if built in a cart form I could also realize additional storage space and a re-locatable work surface.
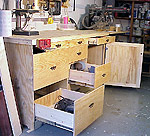
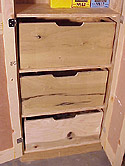
My new 35 1/8-inch-tall (matches my TS height) cart gives me a 27-inch-wide by 31 ¼-inch-long extension surface, plus two large drawers (mounted on full extension, ball bearing slides) and a good sized cubby below the recess where the TS motor goes when butted against that machine. I am able to keep virtually all of the push devices, blades, blade wrenches and other TS-related related equipment in this cart. WorkbenchNext came a new workbench. I used plywood to form upright panels, connected with four-inch-wide plywood strips at the front and back of the base and at the top rear, and a 2X4 top frame (positioned on their sides) that supports the final work surface. The bench measures 74-inches-long, 32-inches deep and 40-inches tall, matching the table of the RAS it butts against. Included in the work surface is a two-inch-deep ledge around the front and left sides that allows clamping work pieces to the bench top. The right side of the bench butts against the RAS to serve as an extension when cutting long boards on that machine. The new bench has two large, three mid-sized and three shallow drawers. All are 24-inches-deep and mounted on 100-pound rated, ball bearing, full extension slides. All of the drawers were built from ¾-inch-thick pine with ¼-inch-thick plywood bottoms to withstand the excessive weight they are likely to contain. A full-height storage space with a door is located at the right end of the bench in which my mortising machine and other equipment live when not in use. A woodworking vise was installed at the left-front corner to make use of the heavy-duty drawers as supports when long pieces were being worked on. I decided to make the bench 40 inches tall as I often found myself working on the RAS table because it's height was most comfortable for me.
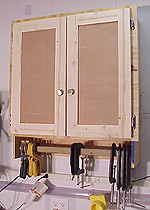
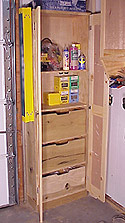
Wall CabinetAbove the bench hangs a new wall cabinet that is 30-inches tall, 28-inches wide and eight ¼-inches deep. It also has two doors and will be used for storing things I often need around the workbench. I added a 1 ½-inch-square bar across the bottom on which c-clamps and other hand-operated clamps are hung. Since I do a lot of assembly on the bench, it seemed natural to have these clamps close at hand. Tall CabinetI also built a tall, narrow, two-door cabinet that stands in the corner. This cabinet is75 ½-inches tall, 24-inches wide and 11 ½ inches deep. The three lower shelves were fit with plywood boxes in which I could put the household electrical, plumbing and hardware supplies. The rest of the shelves will be used for various woodworking things for which I need a place. Overall I did not gain as much floor space as I would have liked to, but the shop is definitely far more organized and there is far less stuff sitting around without a place to go. I still have to hang some pegboard, and probably will move some things around in the new drawers to better fit my work patterns. The shop is more user friendly - and safer - due in large part to less clutter, better organization and more room between the various pieces of equipment. Now I have to work on the wife I hopes of taking over the other half of the garage. Related stories:New Workbench
Do you have a comment about this page? - Email Me! |
All written, photographic and drawn materials are property of and copyright by NewWoodworker.com LLC 2000-2019. Materials may not be used in any way without the written permission of the owner.