
This is a Veteran Owned site
![]()
 |
Cutting accurate bevels and miters is a matter of precise setup, precise corrections and good technique. Click image to enlarge |
Cutting Accurate Miters & Bevels
Preparation, setup and technique
Text, photos and video by Tom Hintz
Posted - 7-25-2007
Miter and bevel cuts can be some of the more frustrating tasks we face when building many popular projects. Because miter and bevel cuts are frequently used to form a joint, there is virtually no margin for error if the goal is a gap free assembly. As is so often the case, the process begins with preparation of the wood itself.
Accurate Wood
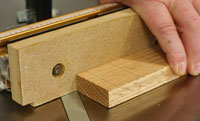
Regardless of the machine or technique used to cut a miter or bevel, if the wood itself is not straight, square with parallel edges and consistent thickness, there is little hope of cutting a truly accurate miter that will fit perfectly. Virtually all of our cutting machines, including table and miter saws, base the cut on one surface of the wood being held against a fence. If the wood is not straight, the joint cut simply cannot be correct.
 |
If the wood being cut is not straight, square and consistent in thickness, cutting accurate bevels or miters is going to be very tough. Click image to enlarge |
Even if the amount of error in an individual cut is very small, it compounds with every subsequent cut made. Cutting the parts for a simple four-sided box multiplies that error eight times. If you assemble the box one corner at a time, three of the joints may fit well. However, the forth joint will not - and the amount of error at that joint can be surprising. In addition to multiplying the original cutting error, the length of the parts can exaggerate its impact on the project even more.
Even when the joint itself is cut correctly, the length of the parts remains a major concern. If the opposing sides of a box are not identical in length, there is no way for an otherwise perfectly cut joint to close properly. This is why many woodworkers take the time to set up a stop (gauge) block. The accuracy of these simple devices is far better than trying to hit a cut line regardless of how good your eyes are! See Resources below for more on Using Stop Blocks.
Tools
 |
 |
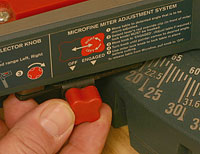
Two of my favorite tools for cutting miters are the Bosch 4410L sliding compound miter saw with its ultra fine-tuning feature (left) and the INCRA 1000SE miter gauge that also has a high-precision fine-tuning feature. (right) Click images to enlarge |
|
Two of my favorite tools for cutting miters are the Bosch 4410L sliding compound miter saw and the INCRA 1000SE miter guide, used on my POWERMATIC PM2000 table saw. While both are high-quality, high-accuracy tools overall, each has fine-tuning capabilities that allow me to dial in tiny corrections to the angles being cut easily.
I have used shop-built jigs for cutting miters and they do work well. The problem is that a jig is usually built for one type of miter. Plus, if the jig is not built dead-on perfect, everything it cuts will be off to some degree.
 |
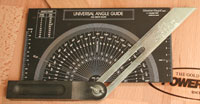 |
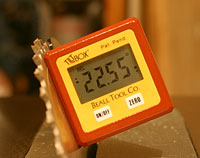
The Beall Tilt Box (left) makes setting precise bevel angles as simple as reading the display. The Universal Angle Guide (right) can be a big help when setting non-standard angles on miter saws and other tools. Click images to enlarge |
|
I also use the Beall Tilt Box (see Resources below for more on this tool) for setting blade (bevel) angles because its accuracy and digital readout make setting precise blade angles simple. It also shows the amount of the correction I am making precisely to help prevent overcorrecting.
Another good tool for setting angle is the Universal Angle Guide by MasterGage.com. This finely machined plate has super precise laser-engraved markings that allow setting a common angle finder to 1/2-degree accuracy. This comes in handy when setting a miter guide or miter saw to an angle not included in preset detents. It also makes adjusting a tool with a less-than-accurate scale much easier.
The key with the machines used to setup and make cuts is to take your time and get it as close as possible. Test cuts and adjustments are likely to remain necessary but with quality tools and careful adjustment, the number of tests and corrections are both reduced substantially.
Cutting Technique
 |
Adding a strip of 120 to 150-griot sandpaper to a miter gauge fence can make a huge difference in the battle to eliminate slippage of the wood during the cut. Click image to enlarge |
Safety: Cutting accurate miters on a power tool does not mean forgoing safe practices. Be sure that while concentrating on cutting the perfect miter, you also pay attention to where your fingers are and what you are doing!
It is important to realize that making cuts, even with a sharp blade, applies force against the wood. When making a simple 90-degree cut, that force pushes the wood against the fence, which makes it relatively easy to hold the piece motionless during the cut. However, when cutting an angle that force tries to move the wood along the fence. If it moves just a little, the miter being cut cannot be accurate.
To combat this movement, woodworkers frequently apply sandpaper to the face of their miter guide or an auxiliary face attached to it. Adding 120 or 150-grit paper to the fence adds "bite" or traction that makes holding the wood absolutely still during an angle cut much easier.
Adding a sandpaper-covered auxiliary fence to powered miter saw is more difficult. Some woodworkers use adhesive-backed stair tread tape, applied to the fence of the compound miter saw with much the same effect.
Cut and Re-Cut
Video Tutor |
One of the better tricks I have learned for cutting accurate miters is to cut them twice - sort of. The idea here is to make an initial cut to reduce the amount of cutting force experienced during the final cut. The down side is this technique only works when cutting to a line and not with stop or gauge blocks.
Using an angle finder, draw a line on the wood where the cut is to be made. Using that line, align the saw to make a cut 1/16" to the waste side. Then, slide the wood over to cut the wood to the final dimension. If the previous cut was made close enough, there is less than a kerf-width of material left. When making the final cut, there is little wood being removed and none on the other side of the blade. This drastically reduces the amount of force applied to the wood during the cut and makes it far easier to hold the wood motionless, eliminating the "creep" factor that can so easily create an error that may not be noticed until the pieces are assembled.
This double cut procedure does take a little longer but in the overall scheme of things actually saves time. There will be far fewer re-cuts or making a new piece when a bad cut makes it too short. And, once you get used to making miter cuts this way, your time-per-cut goes down naturally.
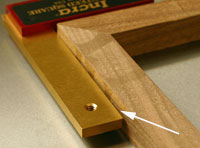 |
Making a correction for this gap will mean a very small reduction in the angle being cut. This is where digital measuring instruments are a huge help. I dialed in less than 1/2-degree to get rid of this gap. Click image to enlarge |
I know this double-cut procedure sounds too simple but it does work. Follow the rest of the tips presented here on preparing the wood and setting up the machines and your miter cuts will be better the first time around and require fewer adjustments to get them perfect.
Making Corrections
The ultra high resolution of the tools I use when setting up and cutting miters end bevels allows me to make the tiny adjustments sometimes needed to correct a cut. That fine resolution also makes subsequent adjustments far more accurate because I can see the amount of the adjustment accurately, how that impacted the joint and base further adjustments on that known amount with confidence.
Deciding which way to go when making corrections is easy, if you stop and think about it. Say we cut a pair of 45-degree miters but when assembled, the joint is less than 90-degrees. Reducing the original cut by a few tenths of a degree (44.7-degrees for example) may be all you need to get a perfect 90-degree corner when assembled. If the assembled joint is over 90-degrees, increasing the original angle cut slightly will help bring it down to a perfectly square corner. Deciding how big of a correction to make is a learned skill but having good measuring tools helps a bunch.
Lacking the high-resolution tools means you have to "bump" the tool setting, make another test cut and keep repeating the process until the cut comes out right. Perfect joints certainly can be obtained this way but it that process is likely to require patience.
 |
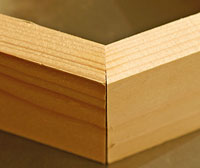 |
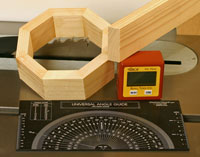
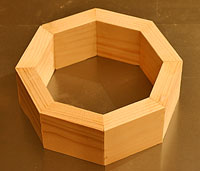
This 8-sided box (left) was cut on the table saw, setup with the Beall Tilt Box. The total gap (right) is a little thinner than a piece of paper (magnified here) and would be gone altogether with a normal film of yellow glue at all of the joints. The pieces for this photo are held together with CA glue. Click images to enlarge |
|
The moral of this story is that when cutting miters or bevels, perfection does not come easy. Using high-resolution tools makes the process much easier and once you get used to reading them, can reduce the number of test cuts substantially. Most important though is the quality of the joints you can produce. Nothing makes a woodworker feel better than a project that came out straight, square and gap free.
Resources
INCRA 1000SE Miter Guide Review
Bosch 4010L Sliding Compound Miter Saw Review
Do you have a comment on this story? - Email Me!
Back to the Tips & Tricks List
All written, photographic and drawn materials are property of and copyright by NewWoodworker.com LLC 2000-2019. Materials may not be used in any way without the written permission of the owner.