
This is a Veteran Owned site

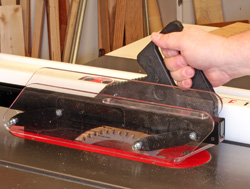 |
If you want to avoid kickbacks, use the blade he guard and a good push handle as you know you should anyway! Click image to enlarge |
Blade Height and Kickback
Cranking it up is not the answer
Text, photos and video by Tom Hintz
Updated – 11-8-2011
Kickback on the table saw can be caused by a number of factors, blade height being just one. Miss-alignment of the blade and/or fence to the miter slot, a dull blade, loss of control of the wood, removal of the splitter and/or riving knife assembly, cutting small pieces and poor operator technique are common factors that may contribute to kickback. Frequently, more than one of these factors is involved but each can initiate a kickback on its own.
I have looked at table saw alignment in other stories on NewWoodworker.com and suggest you read those, listed in the Resources section below. For our purposes here, we will assume your saw is properly set up and aligned as part of your regular maintenance.
Blade Height
There are some that are convinced that raising the blade high above the top surface of the wood helps prevent kickback. The idea is that because the teeth are coming down onto the wood at the front of the blade more vertically, they apply downward force on the wood as they cut, pushing the wood down onto the table. If we could make the back of the blade disappear this might be true. However, with the blade high the teeth at the back of that blade are emerging from the table nearly straight up. Because the blade is so high, the front and back edge are much further apart which increases the leverage. If the wood turns into the back of the blade just a little bit, it wants to rise and when that happen a kickback is likely milliseconds away.
 |
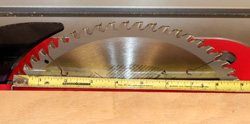 |
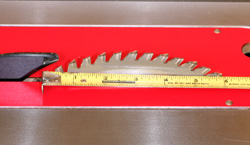
I know there are some who think that running the blade very high will prevent kickbacks, or lessen the chance. Wrong! With the blade low as prescribed by the blades manufacturer the up and down forces (left) are closer together and not nearly as pronounced as with the blade high. Raise the same blade much higher (right) and those up and down points of leverage are not only enhanced by the wider distance, they are also much closer to straight up in the back and straight down in the front. Click images to enlarge |
|
Think of this as Newton’s third law, once removed. If the blade and fence are perfectly aligned, the wood has no inherent stress trying to close the kerf (even a little), the operator pushes the wood in a perfectly straight line and the splitter and anti-kickback pawls are in place, the rear edge of the blade may not be as big of a factor. In the real world though, given the number of variables, you are pushing your luck on the best of days. If the wood turns just a little, or the kerf begins to close up from stress within it, you could be on your way to a true demonstration of how fast and powerfully things can go wrong on a table saw. I have been in front of a piece that turned into the back of the blade slightly, I saw that but before it truly registered I had already heard the Bang! and felt the pain of the wood hitting my side. If I would have had the blade higher that piece may well have hit me higher, raising the potential for major injury even more.
All this and we haven’t talked about the liabilities of so much blade exposure and how close that puts your fingers even with a push stick or handle. Here again, if you work in a perfect world, fear not, all will be fine. If you consider yourself mortal it is time to rethink your table saw habits.
Real World Defense
The best defense against kickback is to keep your table saw properly aligned, including blade and fence parallelism and the miter gauge square to the miter slot. Employing proper technique, including the use of a good push handle (with an extended forward edge) is also important. Keeping the blade guard, splitter and anti-kickback assembly or riving knife properly installed and aligned should be a no-brainer. However, the frequency with which we hear of kickbacks shows that way too many of us are not using our brains enough.
 |
 |
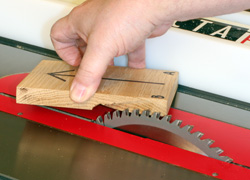
Kickbacks tend to start at the rear of the blade where it comes up out of the table. Raising the blade just makes that worse. The piece in my hand (left) is my only major kickback and it started at the back of the blade, without the guard or a riving knife when the piece turned into the blade slightly. If I would have had a riving knife and used a good push handle (right) I probably would not of had that kickback. Click images to enlarge |
|
Cutting small pieces on the table saw has always been a good way to have problems. When faced with having to cut a piece under 12”-long, I look to the band saw or try to rip the piece from a longer piece of stock and then cross cut it to the final size.
The most common blade height setting suggested by the blade manufacturers I have talked with is having the bottom of the gullets at the top edge of the wood. Some suggest having the bottom of the gullets just below the surface of the wood, some just above it. The idea is that exposing the gullets increases dust ejection and introduces air into the cut that helps mitigate temperature build-up.
Another important factor is keeping the blade clean. Built-up pitch and other wood-related contaminates increases the friction between the blade and wood. Like the moment arm, friction magnifies the forces (up and down) the blade applies to the wood.
Conclusions
Nothing can totally eliminate the possibility of experiencing a kickback. However, keeping your saw properly aligned, using good technique and safety equipment (See Saw-Aid in the Resources section below) drastically reduces the chance of a kickback starting. The splitter and anti-kickback assembly or riving knife can substantially reduce the severity of a kickback should one try to start.
Video Tutor |
I believe that raising the blade high above the wood both increases some of the common factors that support a kickback and expose the operator unnecessarily to more of the spinning blade. Consequently, I always set my blade height so that the bottoms of the gullets, at their highest point, are even with the top of the wood being cut.
In a little over 40 years of woodworking I have had exactly one serious kickback, caused by my poor technique combined with disregarding a few of the above cautions. Since then, I have developed a much better maintenance program that includes cleaning my blades frequently along with checking the alignment of my blade, fence and miter gauge. I also use push handles or push blocks. My blade guard and splitter assembly or my riving knife is also in place. Simple, common-sense solutions that make my table saw use far safer.
Resources
Table Saw Basics – Part 1, Setup & Alignment
Do you have a comment on this story? –Email Me!
Back to the Tips & Tricks List
All written, photographic and drawn materials are property of and copyright by NewWoodworker.com LLC 2000-2019. Materials may not be used in any way without the written permission of the owner.